title: “Slimebook - Intro” description: “Intro to Slimebook, an educational free online resource about NEAR Protocol ecosystem”
Intro
Hey, my name is Slime, and this book is my attempt of creating a comprehensive and somewhat up-to-date NEAR ecosystem guide. Please let me know in Telegram or Slime Community Discord server if something is outdated or unclear.
This book is divided by “levels” and in future will be divided by “paths”, so you don’t necessarily need to read everything, just read what looks interesting for you, and feel free to stop reading at the level when it gets too complicated.
If you find this book useful, you can support it by donating or contributing to it.
Let’s get started! 🚀
Getting started
Of course, the first thing you need to do is to create a NEAR account using a wallet.
There is no official NEAR Wallet1, but there are a lot of wallets created by other teams. The most popular ones are:
- Meteor Wallet - web + chrome extension
- HERE Wallet - mobile
- Bitte Wallet - web
- MyNearWallet - web
- NEAR Mobile Wallet - mobile
- Sender Wallet - mobile + chrome extension
- Nightly Wallet - browser extension + mobile
- HOT Wallet - telegram web-app
There is a full list of all wallets and their features, but I don’t recommend using lesser-known wallets, especially if you’re new to the ecosystem, it’ll just waste your time and (most likely) not bring any benefits.
While I aim to keep this book objective, I know you probably don’t want to read all these pages and compare it yourself, so here’s what I recommend:
- If you’re on a computer, use Meteor Wallet.
- If you’re on a phone, use HERE Wallet.
- If you want something very secure, use Ledger hardware wallet with Meteor or MyNearWallet.
Connecting to dapps
Once you have a wallet, you can connect it to a dapp (decentralized app) and start using it. You can find the most popular dapps in this book and https://www.discoverbos.org/projects, though some of them might be dead or outdated.
When you click “Connect a wallet” on the dapp’s website. it will ask you to choose a wallet and then your wallet will ask you to confirm the connection. When you connect your wallet to a dapp, you give it a permission to read your account name, balance, and sometimes, to send transactions on your behalf. Don’t worry, it can’t transfer tokens and NFTs without your confirmation, even if you connected it to a scam dapp.
Usually, these connections also request a 0.25 NEAR allowance for transaction fees, but it doesn’t use your 0.25 NEAR right away, your NEAR stays in your account, but the dapp can use some portion of it to pay for the transactions that it sends. 0.25 NEAR is the standard amount that dapps request, even if they don’t need to do any transactions. Your 0.25 NEAR is not frozen, you don’t even need to have 0.25 NEAR to connect, it’s just an allowance to use up to that much. But every connection creates a key on blockchain, which costs about 0.00004 NEAR, and you need some NEAR for storage of this key, so you can’t connect to dapps if you don’t have any NEAR at all. Logging out deletes the key, which also costs about 0.00004 NEAR.
Safety of your wallet
Most wallets will give you a seed phrase (pass phrase) when you create an account. It’s a list of (usually) 12 words that you should keep safe and never share with anyone. Even the developers of the wallet. This phrase can give access to your account to anyone who knows it, but it can also be used to restore your account if you lose access to your wallet, so it’s important to keep it safe and secret. For the best practices, see Where to save your seed phrase.
There was an official NEAR Wallet, but it was deprecated in favor of the community wallets, and discontinued in January 2024. MyNearWallet is the closest to the official wallet (a fork), but now it’s developed by a community team. But in my opinion, it’s the worst user experience I’ve ever seen in a crypto wallet, so I don’t recommend using it.
Meteor Wallet
Meteor Wallet is (in my opinion) the simplest and most user-friendly NEAR wallet. It’s a web wallet that can also be used as a Chrome extension.
To create a wallet, open the Meteor Wallet website and enter your username:
Yes, as simple as that.
Next steps
Now you can move some NEAR in your wallet (Receiving NEAR) or continue exploring other Meteor Wallet’s features.
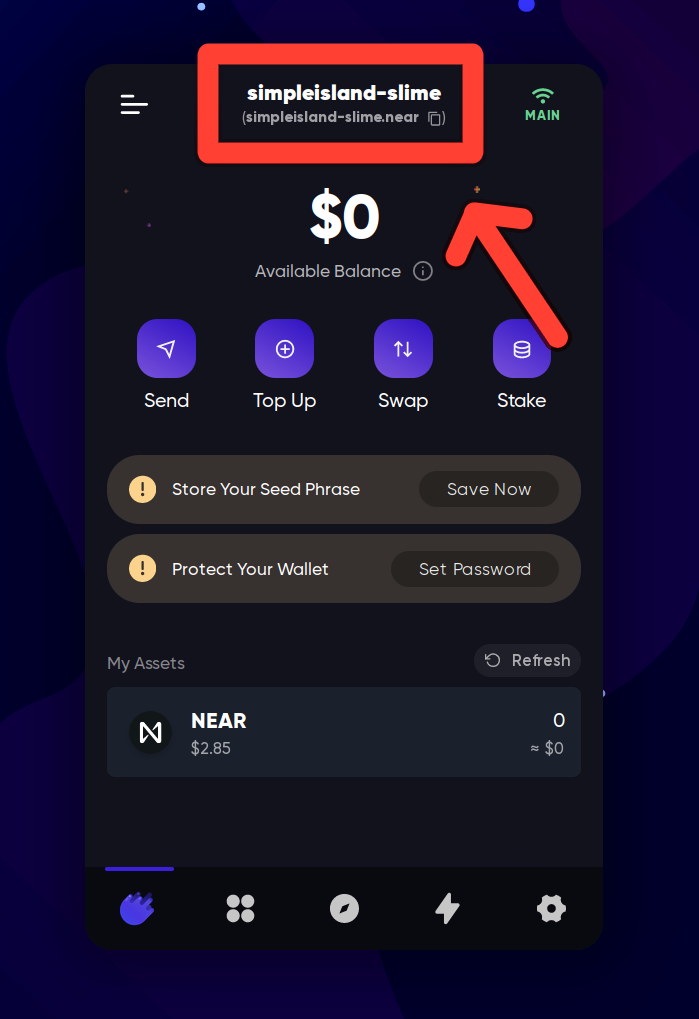
In the example above, our address is simpleisland-slime.near.
Sending NEAR
To send NEAR to someone, you need to know the recipient’s account ID (username). When you have it, you can send NEAR to them:
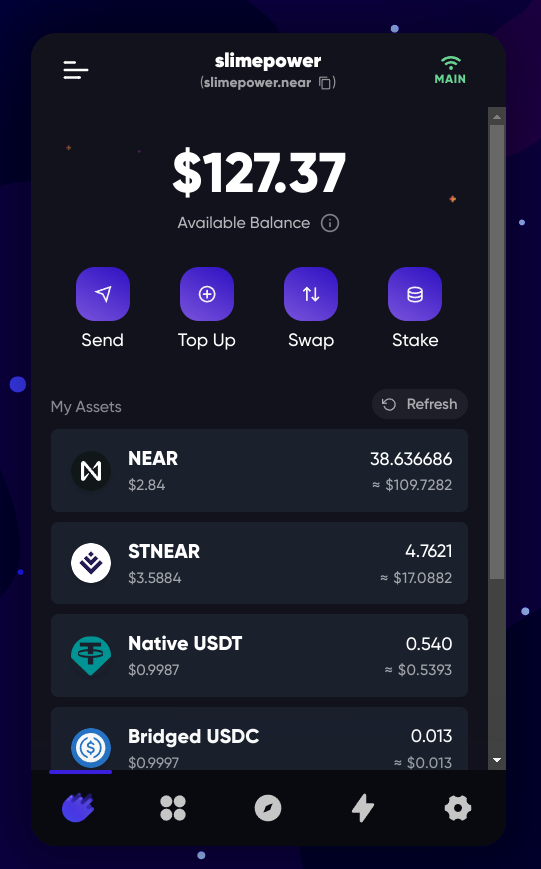
You can send other tokens when you click at them, the same menu will open for the selected token:
NFTs
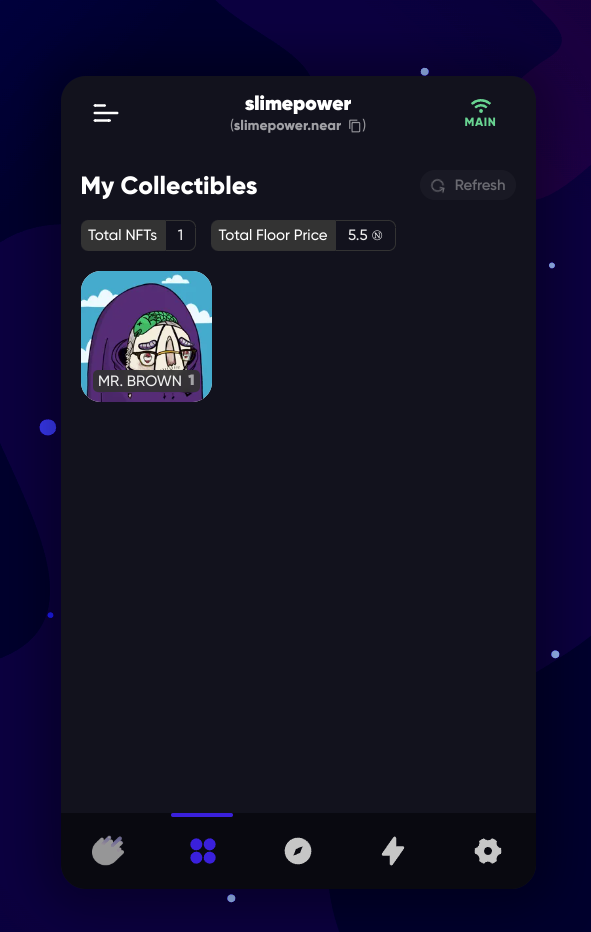
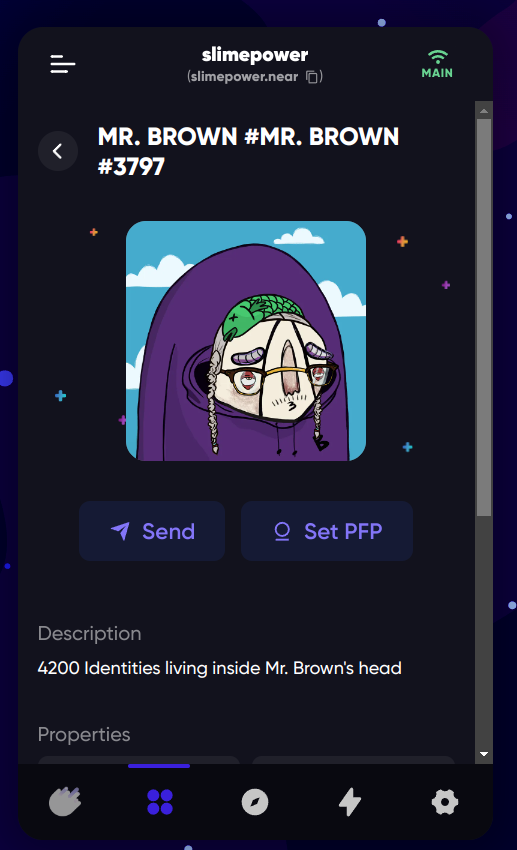
Meteor Wallet has a built-in NFT viewer, where you can see your NFTs in the wallet, view their traits, floor prices, transfer NFTs, and more.
Transaction history
Under the “lightning bolt” sign, you can see your transaction history:
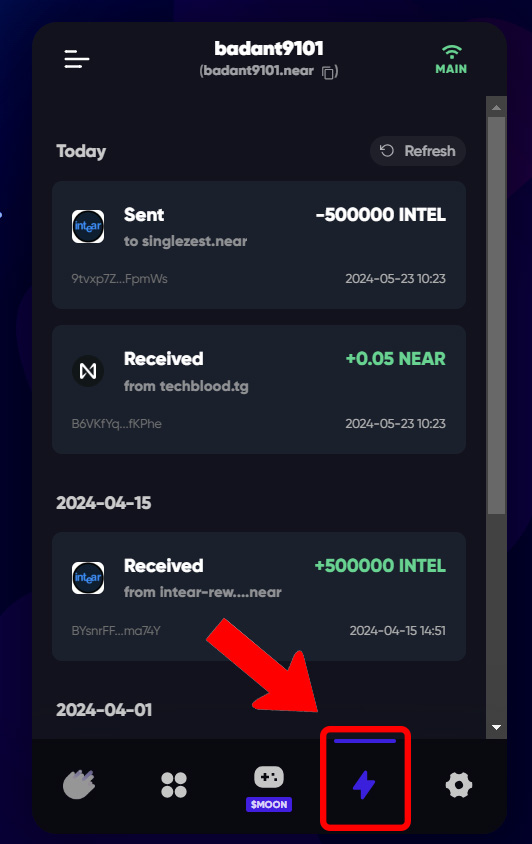
Settings
Settings in Meteor Wallet are located here:
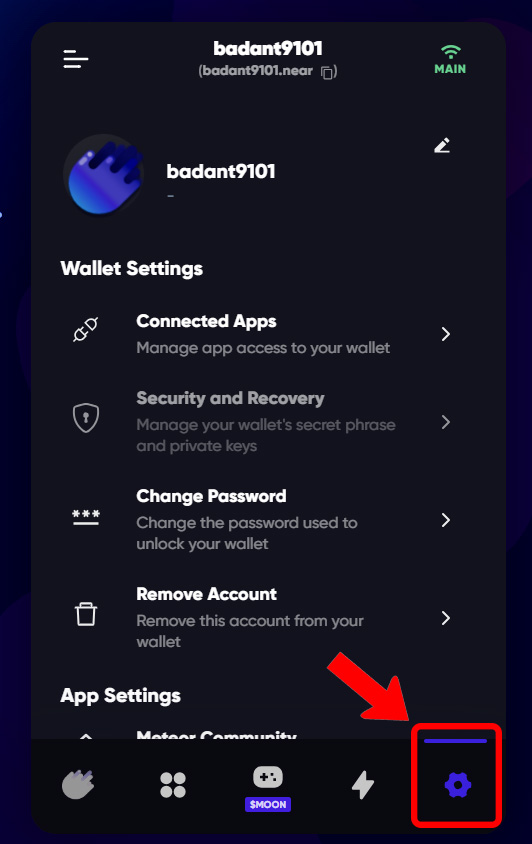
-
Connected Apps: Here you can see all the apps that you have connected your wallet to (or technically, created a Function Call key). You can also revoke access to these apps by clicking “Deauthorize”.
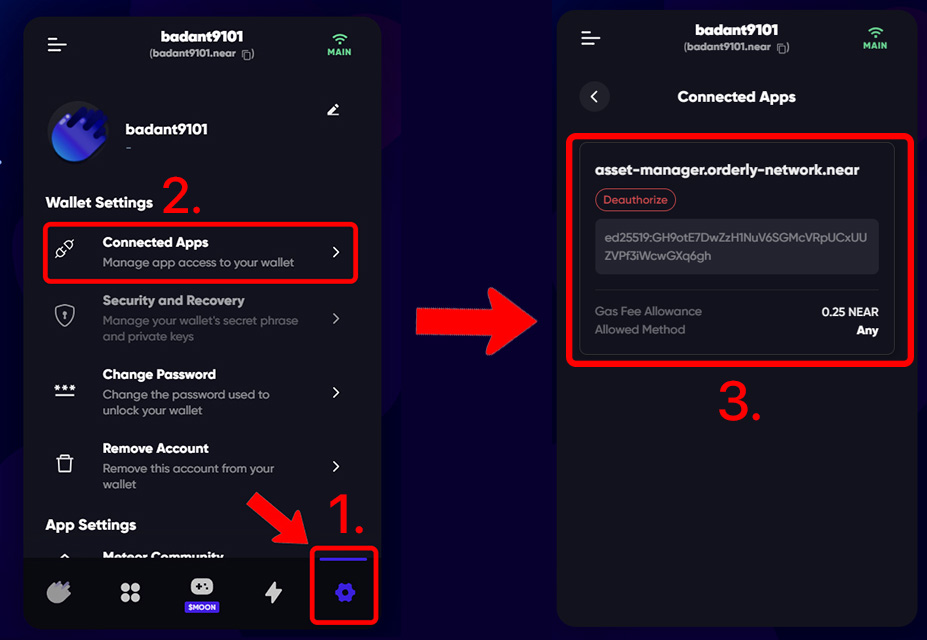
-
Security and Recovery: This part of the wallet contains your account’s seed phrase. You can view or export your seeds & private key from this page. It also gives you an option to manage Full Access Keys and Function Call Access Keys of your account.
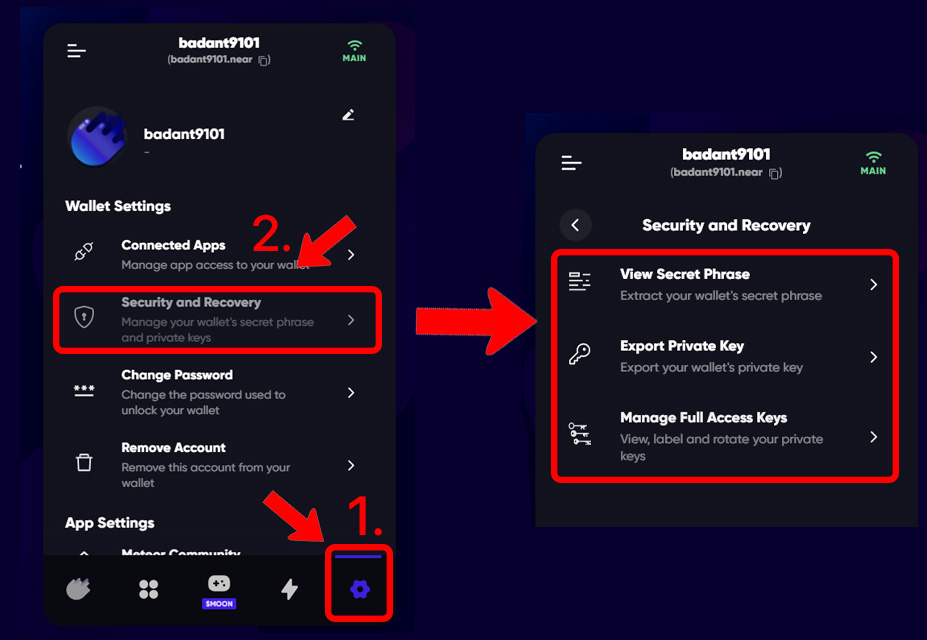
-
You can also provide feedback, share your issue with technical support, set a password, remove the account from meteor wallet, and other things from this page.
HERE Wallet
HERE Wallet is a mobile NEAR wallet that has an app for both Android and iOS, and a limited version of it can also be accessed from web, though it’s definitely not priority for the team, so I wouldn’t recommend using it.
Tip: Once you register, you receive 10 gas-free transactions
Let’s start by creating a wallet and exploring HERE wallet. You can download it HERE:
1. Create new Account:
Don’t forget to save your seed phrase!
2. Explore Overview Tab:
View Recent Transaction + Wallet Balance.
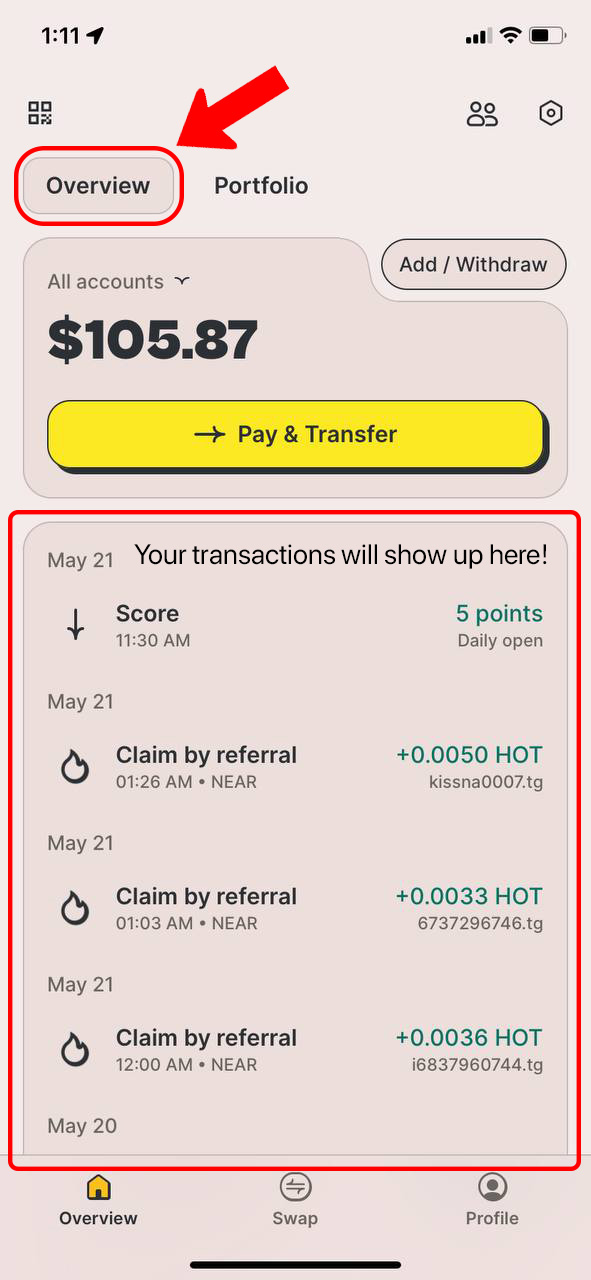
3. View Portfolio:
You can see your tokens in the ‘Portfolio’ tab:
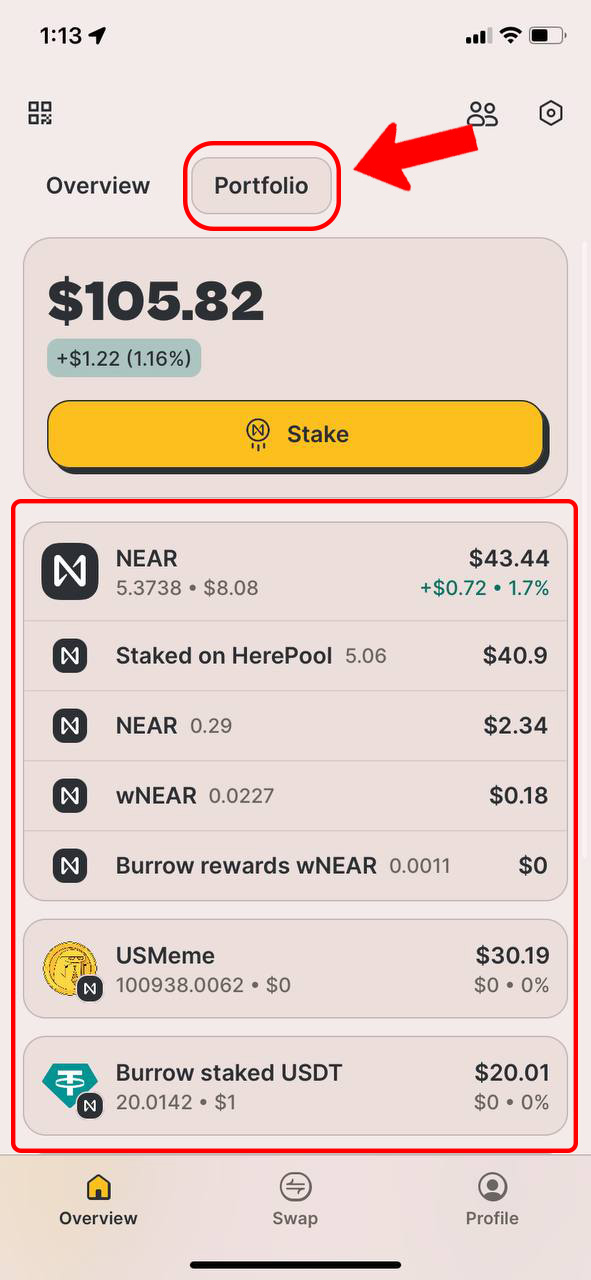
4. Do Transactions:
Buy or withdraw cryptocurrency with Fiat money like USD, INR, AED, directly in HERE Wallet or send your tokens to other accounts:
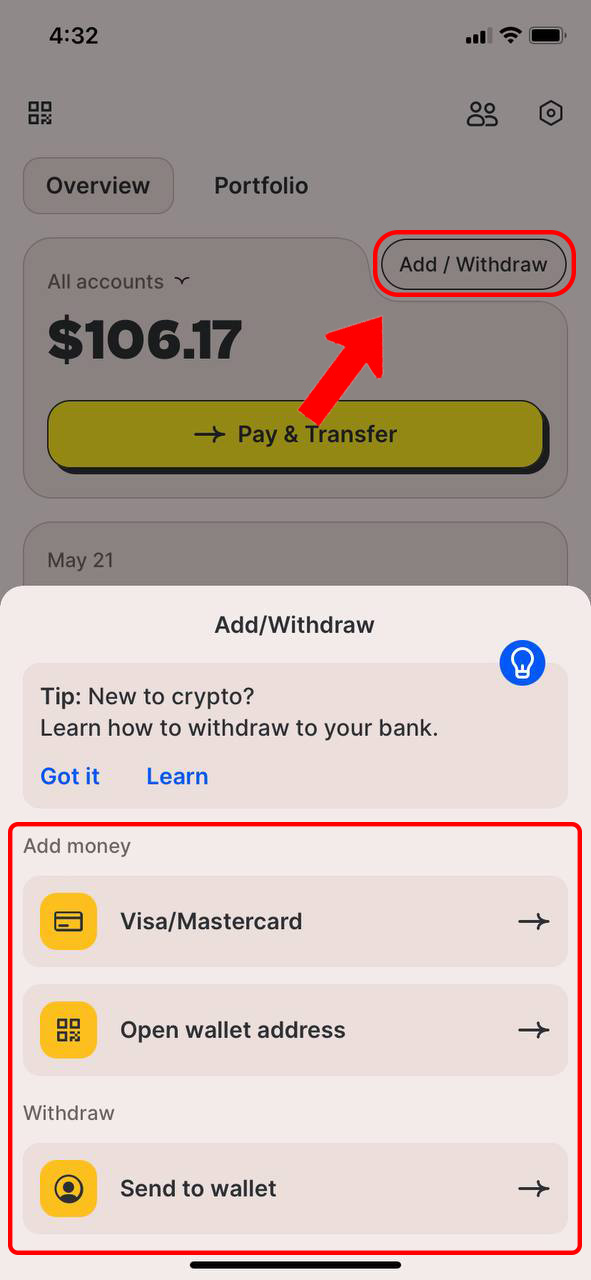
5. Explore Settings:
You can secure your HERE app with FaceID, TouchID or passcode, change RPC, manage your Access Keys, and more.
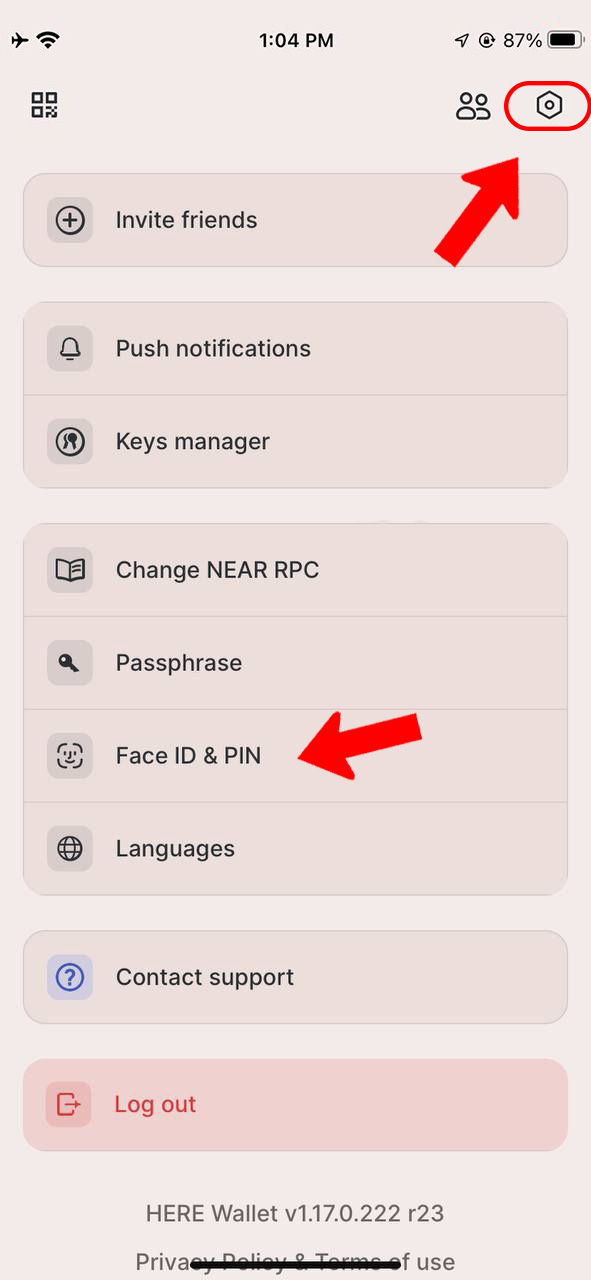
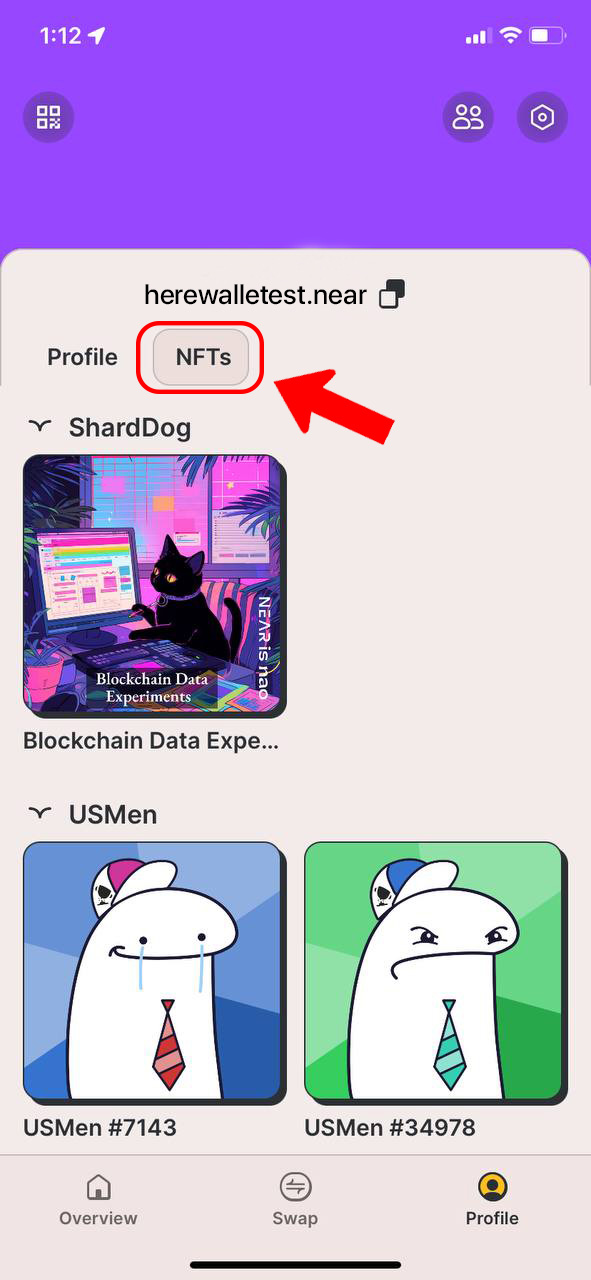
6. NFT Section:
Send or receive NFTs:
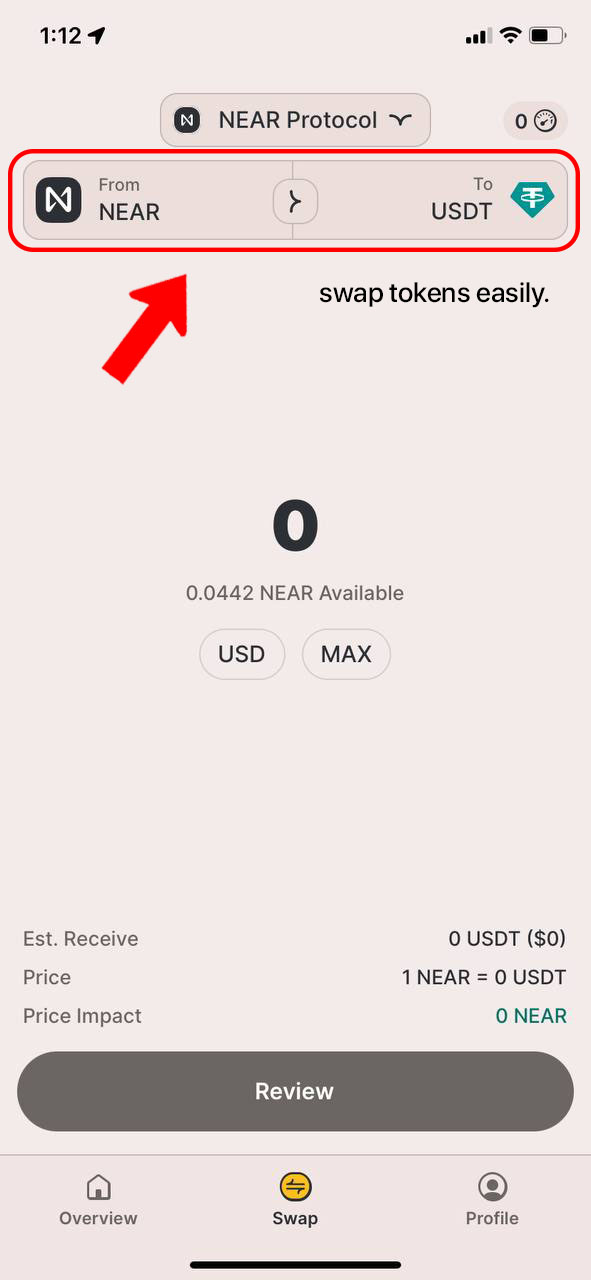
7. Swap:
You can exchange tokens in the wallet:
Score
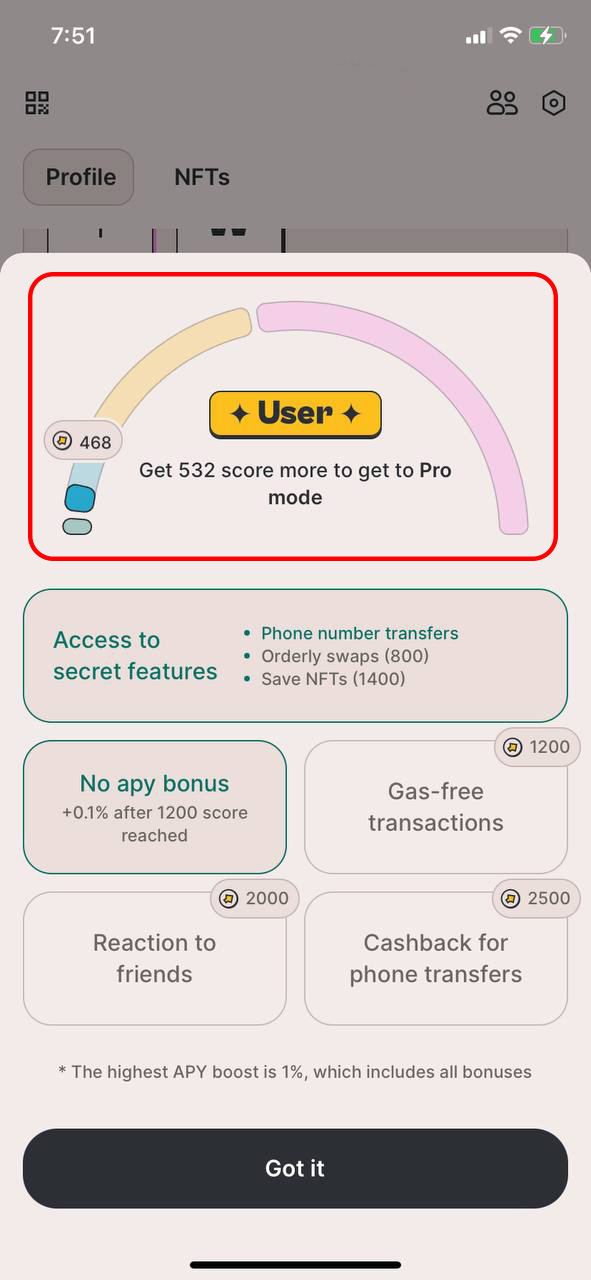
Score is a system that measures your activity in the app. It is attached to the account and cannot be sent to friends or bought for money. It can be accumulated for the use of certain features, contests, inviting friends, and can only increase.
Levels
0–100: (Not a) BOT 500–1500: USER 400, 800, 1200: Unlock a secret feature (Special Reward) 2500: God mode. Gas free transactions / cashback for swaps.
How to earn Score
You can earn score by opening the app every day, making swaps, staking, inviting friends, connecting Binance, and engaging in other activities. You can find the most recent list of activities that earn you score in the app.
Benefits of Higher Scores:
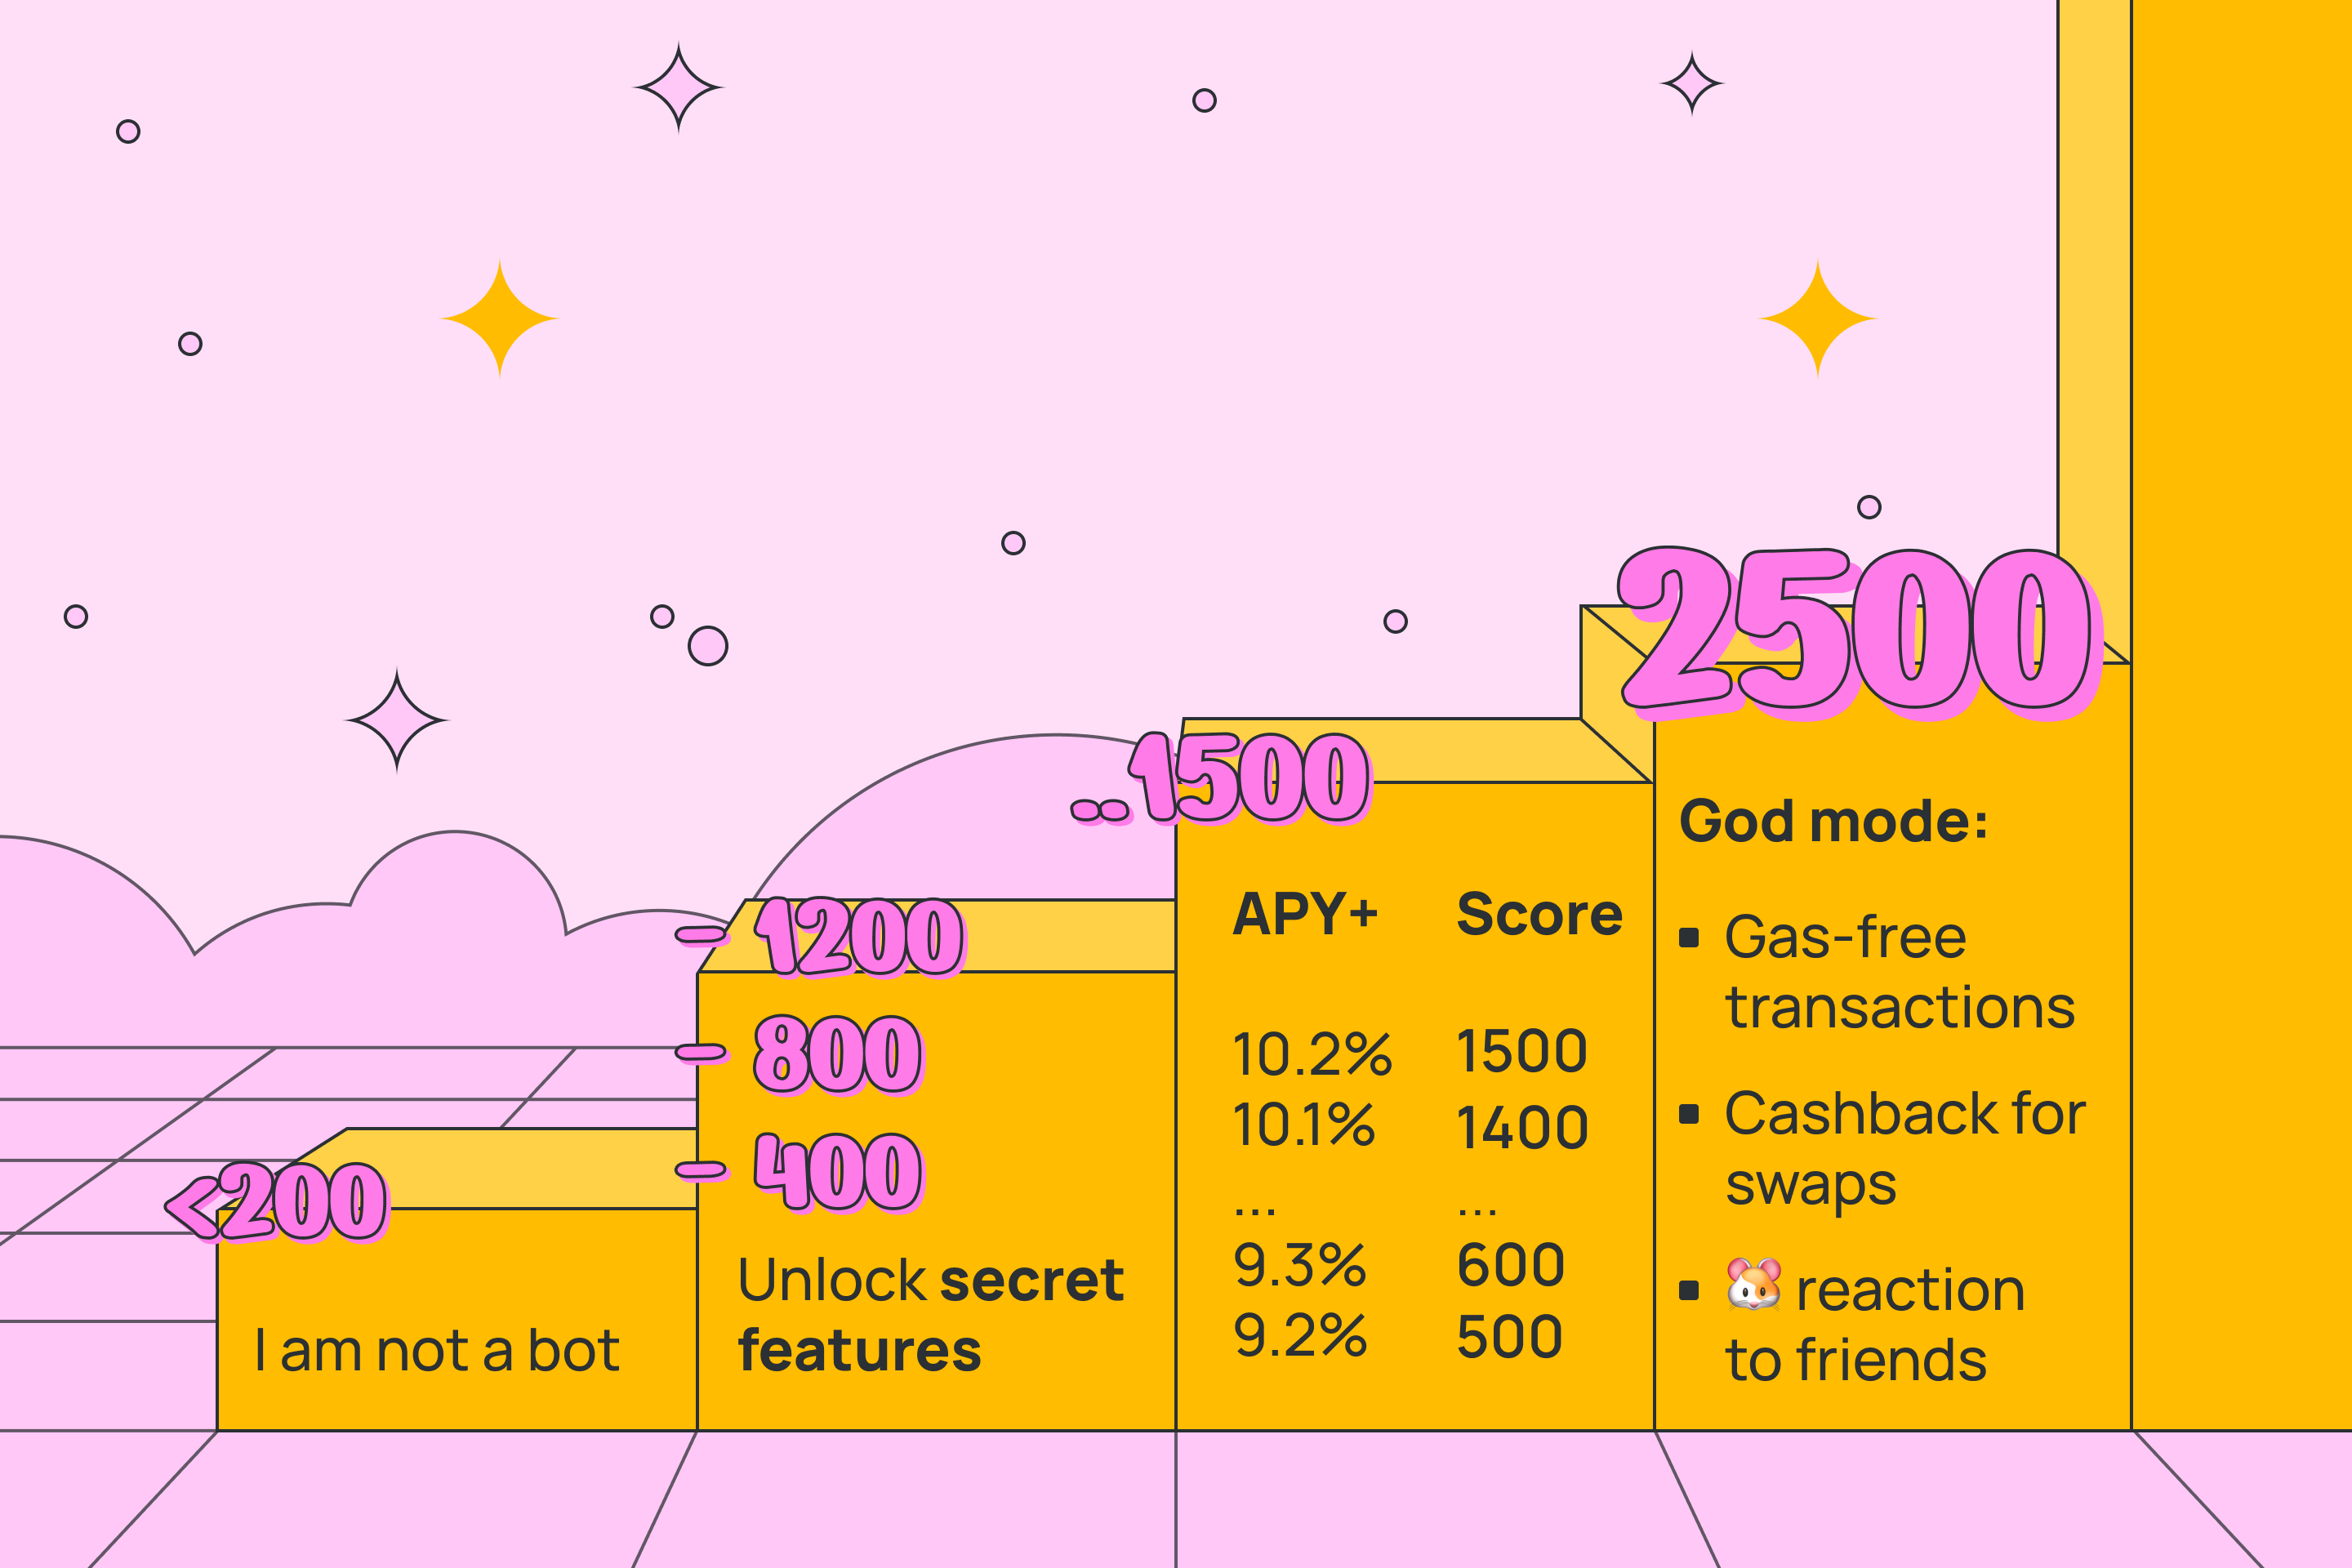
Note that this was taken from the HERE Wallet official site, which at the time of writing is almost dead, most images and pages are broken, and 9.2% staking APY is crazy high (higher than native staking with 0% fee), so I’d take this with a grain of salt.
Bitte Wallet
NOTE: Bitte Wallet was called Mintbase Wallet a few months ago, and has rebranded since. The existing images and videos have not been updated, because the interface is the same, just the logo has changed.
Bitte Wallet is a wallet built by Mintbase. When you register, it uses passkeys for authorization, and your keys live in your browser. If your device doesn’t support passkeys, you can use a password.
Once you have enough funds to worry about recovery of your account, you can create a seed phrase and use it in any other wallet.
Creating an account:
On Windows and Mac it will require a password or pin code, on phones it will require a fingerprint, Face ID, or other biometry options, and on Linux it doesn’t really work out of the box because of poor passkey support, so just use a password for now.
Tabs

NFTs
Here you can see your NFTs and go to Mintbase to transfer or sell them.
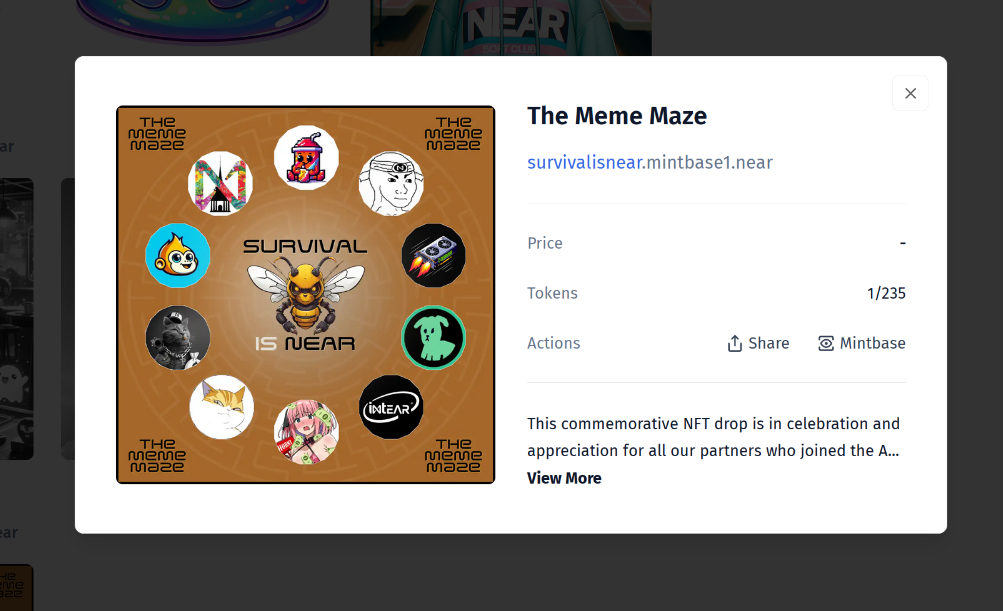
Bitte Drops
This feature allows you to create NFTs that can be minted by anyone for free.
TODO: Drops v2 soon with more features.
Let’s create an NFT drop:
Now you can claim the drop that we just created.
AI
Write what you want to be done, and the Bitte AI will try to help you.
During my research, I couldn’t find any particularly useful tasks that it can fulfill, but Bitte Wallet doesn’t support token swaps out of box, so you can use AI to swap tokens. But I’d recommend using Ref Finance instead of swaps inside wallets.
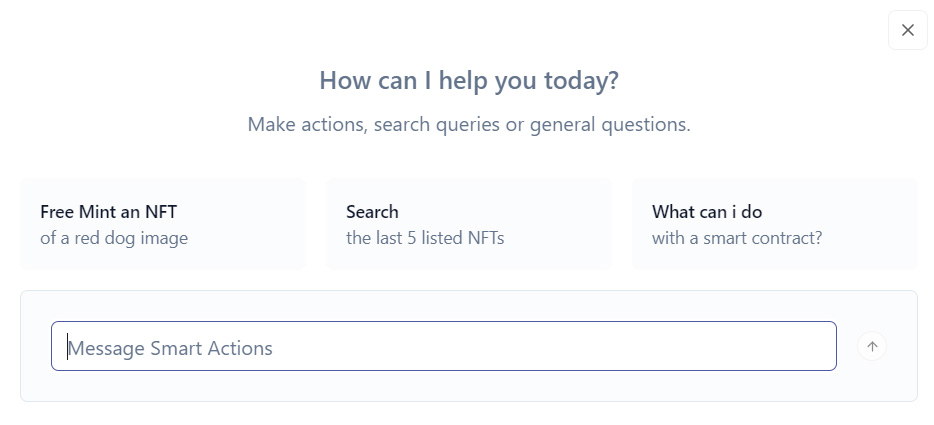
At the time of writing, Bitte AI can create drops, manage NFTs, swap tokens, and this list is rapidly expanding.
Activity
This just takes you to the NearBlocks page of your account.
Settings
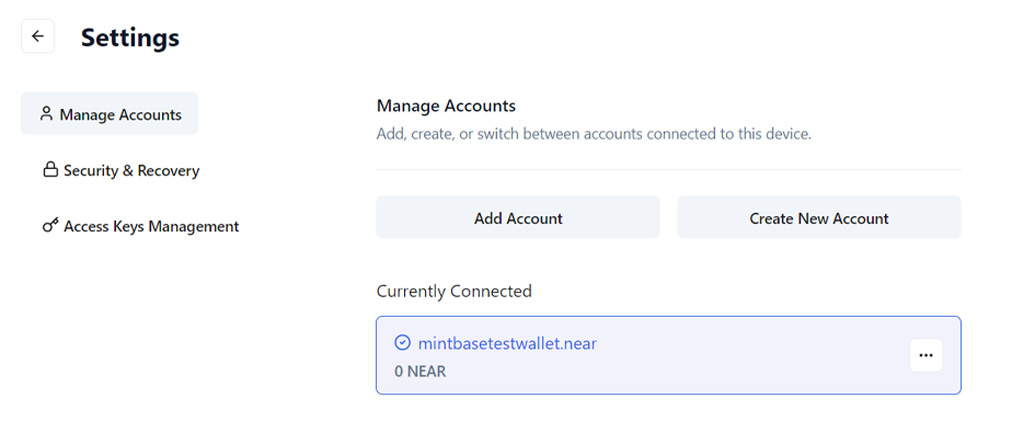
Here you can manage your keys, multiple accounts, disconnect connected apps.
MyNearWallet
MyNearWallet** is a web wallet, accessible at app.mynearwallet.com.
WARNING: Don’t google “MyNearWallet” and click on the first link you see. MyNearWallet is open source and anyone can create a website with absolutely the same name and design, and someone is promoting the fake website on google ads. Always double check the URL before logging in.
Creating a Account
Now there are several ways you can deposit tokens / NEAR in your newly created wallet.
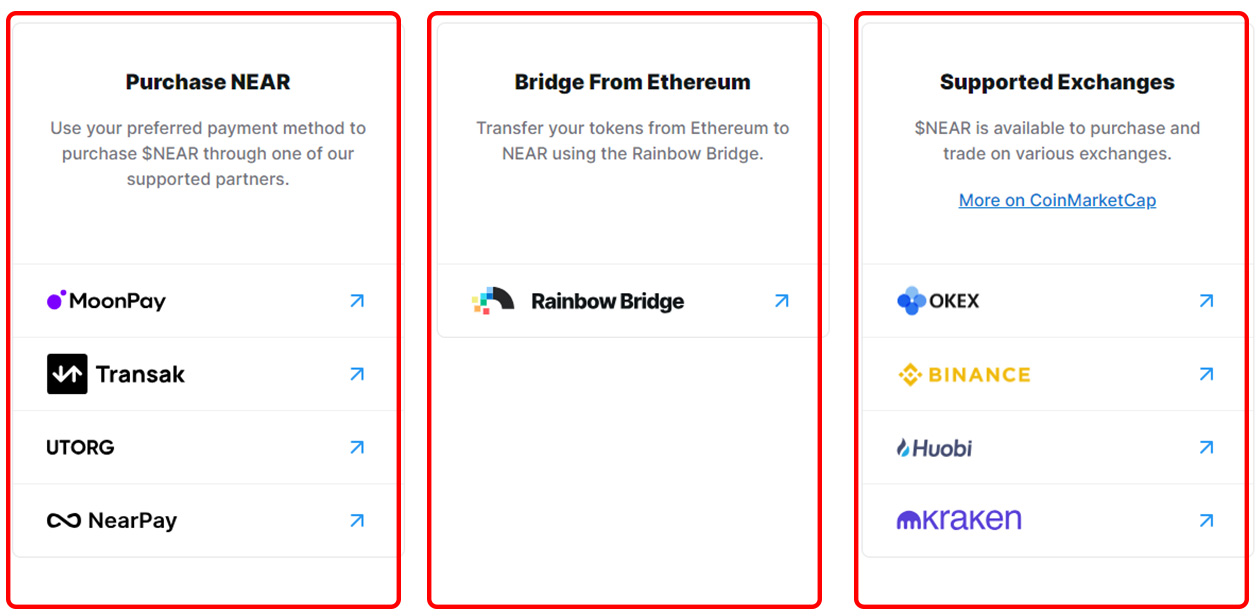
Named Address
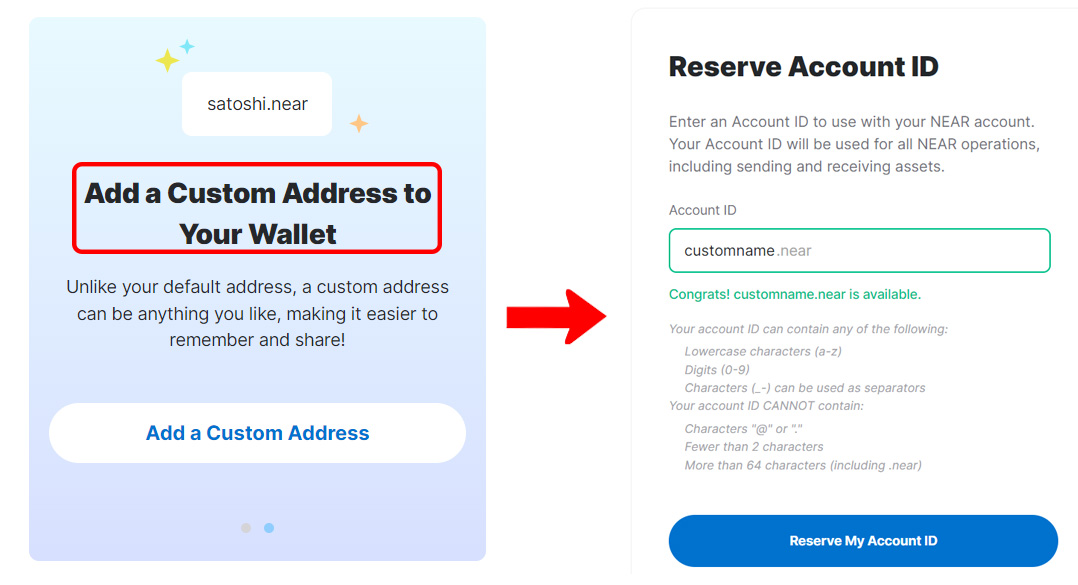
Unlike Meteor wallet, which lets you create custom named account from the first step, on MyNearWallet, you’ll need to reserve your named address after initiating the wallet.
To do this, first you will create an implicit account (64 characters) if you haven’t yet, and then click “Add a Custom Address” in the banner on the right, or click at the right top corner with accounts > Create New Account, and you will be able to choose a name. Note that you will be charged a small fee for this.
Staking
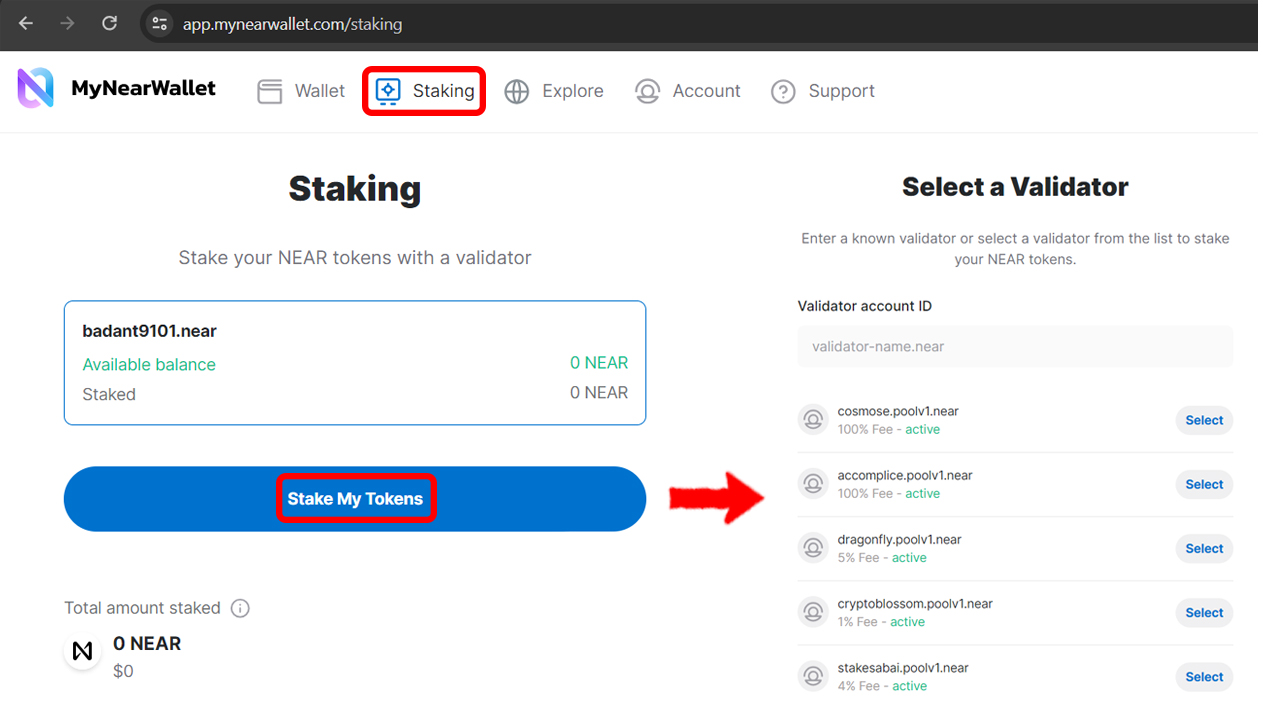
To natively stake NEAR, click the “Staking” tab in the top, and you will see a list of validators with different fees and APY, these are the options to choose from. To know more about staking, read the staking guide.

Main page
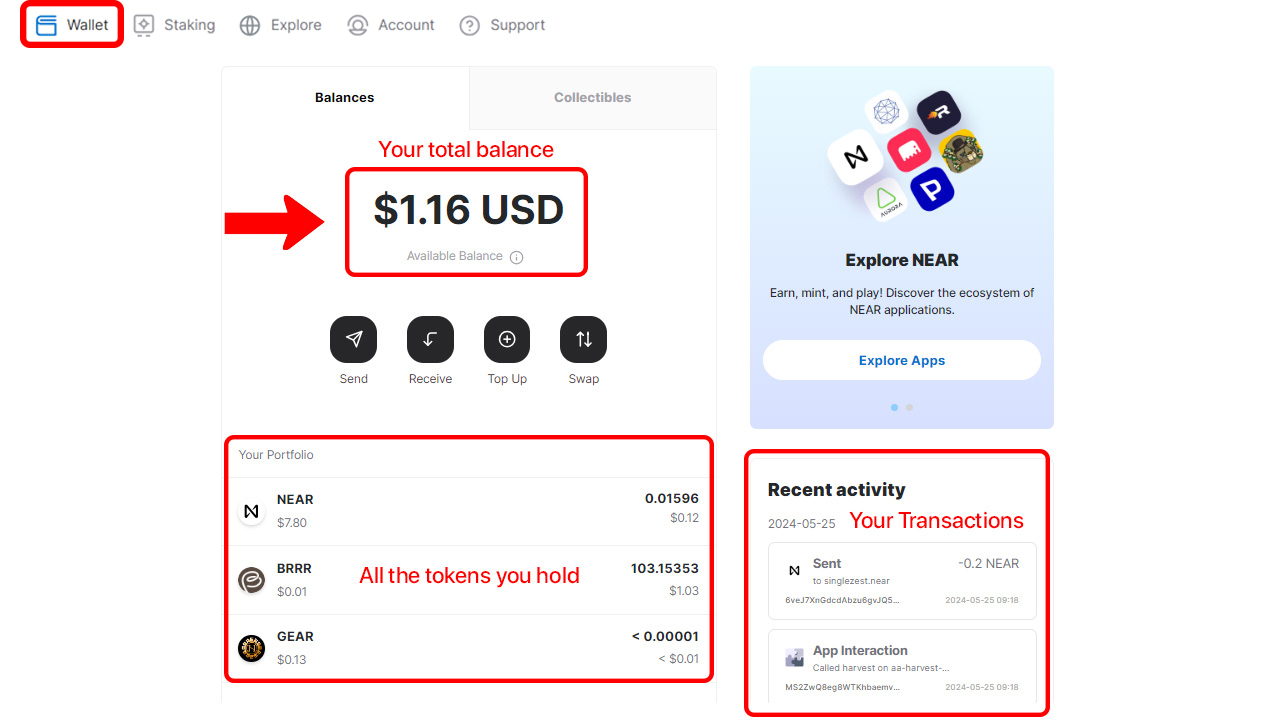
This main screen contains all the information about your total balance, all the different tokens you hold and your recent transactions.
NFT section
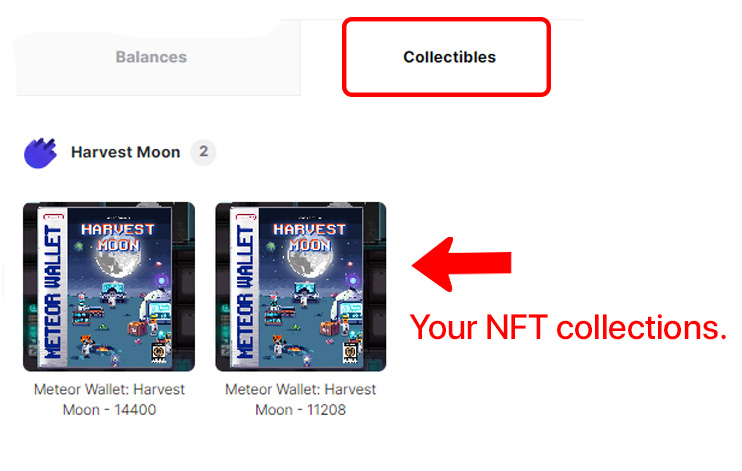
You can view your nfts and transfer them to other accounts.
Managing your Wallet:
The “Account” tab provides options to manage your selected account and recovery options in MyNearWallet:
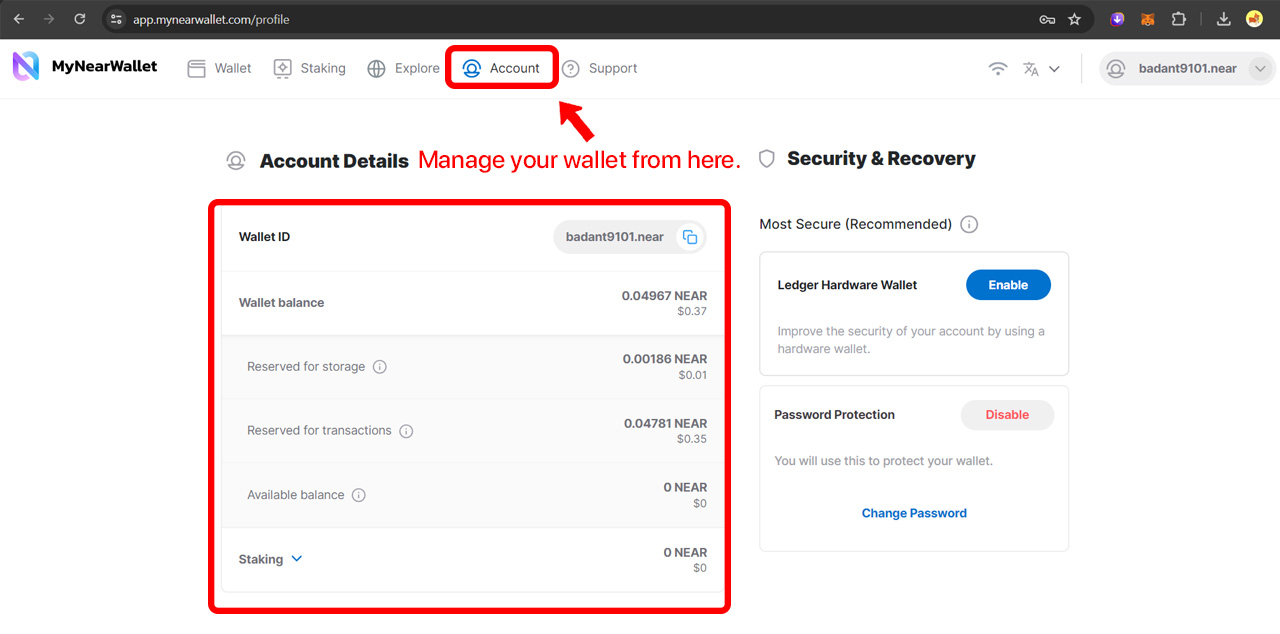
Here’s a list of things you can do in this settings tab:
-
View wallet balance breakdown and staking details
-
Change password
-
Connect to a hardware wallet
-
Export seed phrase and Private Keys.
-
Manage authorized apps and Access keys:
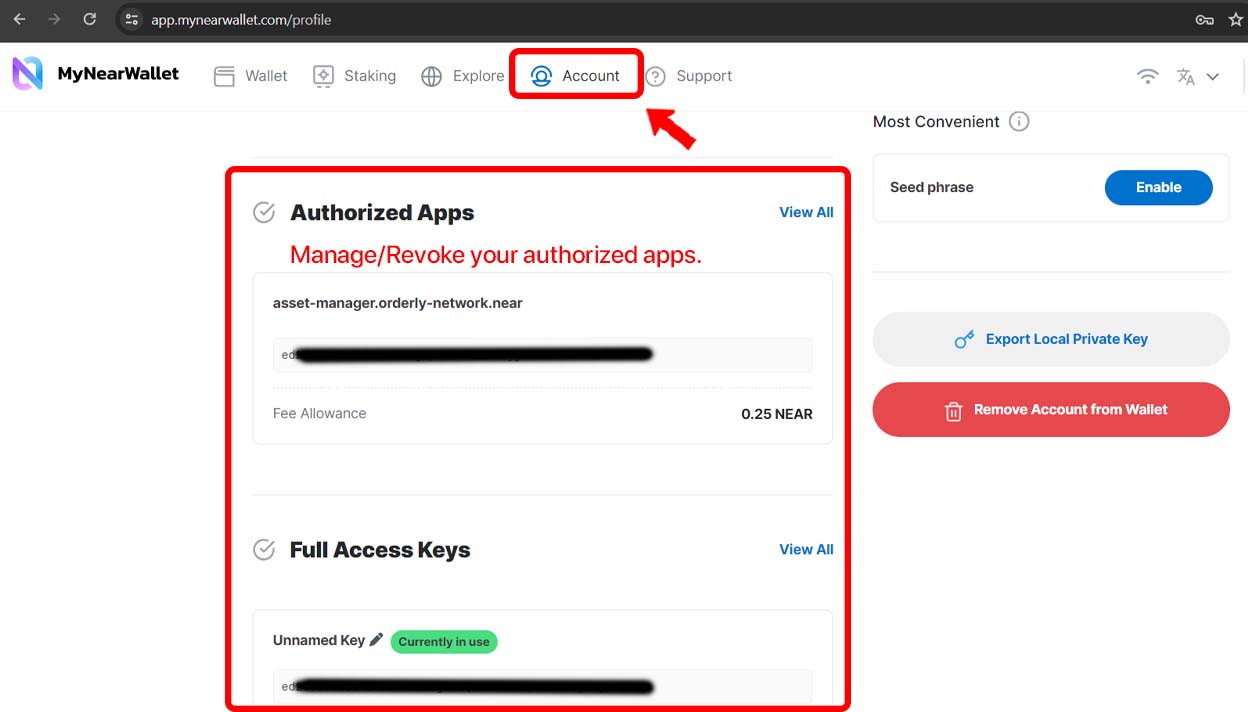
It also provides direct links to dapps in Near ecosystem under one page:
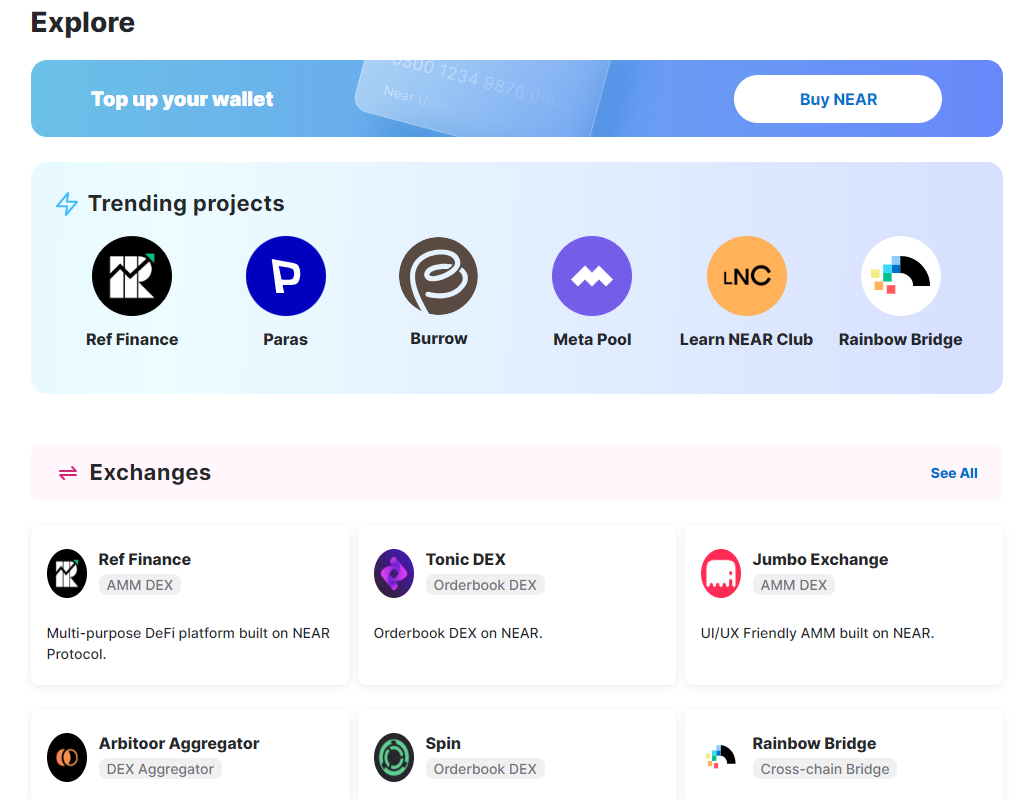
But I recommend using NEARCatalog for a more comprehensive and maintained list of applications.
Fungible Tokens (FTs)
Fungible Tokens (FTs) are tokens that are interchangeable with each other. They are identical in specification and value. For example, if you have 10 FTs, and someone else has 10 FTs, you are both holding the same thing. The same way as 1 dollar equals to another 1 dollar. They have the same properties as money:
- Can be split into smaller parts, 10 dollars = 10 * 1 dollar, 1 dollar = 100 cents
- Can be transferred to someone else
- Can be used to pay for goods and services, or as rewards for doing something
Examples of FTs:
- $NEAR is used to pay for transaction fees, storage, can be earned by staking and by developing an app that people use (part of transaction fees goes to the app owner and the rest is burned)
- $USDC and $USDT are stablecoins, they always cost 1 US dollar, and are used to transfer money between people and to pay for goods and services without worrying about the price volatility
- $REF is a token of the Ref Finance exchange, it’s used to reward liquidity providers (people who give money to the exchange) in REF tokens, and give REF token holders a share of the exchange’s fees
- $LiNEAR is a token that represents staked NEAR, that preserves both the staking rewards and the ability to use your money for other purposes
- $BLACKDRAGON is a memecoin that doesn’t have a particular use case as of yet, but some people like it and buy it for fun
If you see something like “NEP-141 token” on some website, don’t worry about a scary name,
NEP-141 is a technical standard for FTs on NEAR, all FTs on NEAR are NEP-1411 tokens.
How to get tokens
- Buy them on an online exchange or from someone who has them
- Earn them by doing something that the project rewards with tokens
- Mint them yourself, if the project allows it. “Minting” means creating new tokens and putting them into circulation. Some projects allow you to mint tokens for free, some require you to pay for it or to do something else in exchange for the tokens
- Create your own token. You can create a new token on NEAR, decide how many tokens there will be, what they will be called, and what they will be used for, add it to an exchange, and sell it to people, but you will have to convince people that your token is worth something
More about “earn”
Every project has its own way of rewarding people with tokens. Here are some of the most common ways projects reward people with tokens:
- Staking - you lock your tokens for a certain period of time and get rewards for doing so. If the token you want to earn has staking, you can find more details on the project’s website because it’s different for each project. From the list above, NEAR and REF have staking
- Providing liquidity - you give your tokens to an exchange, and in return you get a share of the exchange’s fees. Every token that is listed on an exchange can be used to provide liquidity, but the amount of fees you get depends on the token trading volume
- Liquidity mining - In addition to exchange’s fees, sometimes you can get additional tokens as an incentive, if the project wants to attract more liquidity. Usually, liquidity mining is temporary, since projects have a specific budget for the incentives, but new programs can be announced at any time
- Airdrops - some projects give away tokens for free to people who have a certain token, NFT, to people who used their product in the past, or to people who are active in the NEAR ecosystem. Follow the project’s social media and announcements to find out about future airdrops. Sometimes they are announced in advance, sometimes they are given to people who are already using the project, these are called “retroactive airdrops” or “retrodrops”
- Bounties - you do something that the project needs, and in return you get tokens. For example, you can write an article, a twitter thread, make a video, or help with the development of the project. Bounties are usually announced on the project’s website or social media. There are platforms like Heroes.build that aggregate bounties from different projects
- Referral programs - you invite people to use the project, and in return you get a share of the project’s fees or a one-time reward
- Trading - you buy tokens for a lower price and sell them for a higher price on an exchange. This is the riskiest way to earn tokens, because you can’t predict the future price of the token, and you always pay fees to the exchange. But if you closely follow the project and the market, or know something that most people don’t, you can increase your chances of earning tokens this way
Fees
Storage fee
When it’s your first time interacting with a token, you might need to pay a fee to receive it. This is because the token balances are stored in a smart contract, and the smart contract needs to store the information about your balance. This fee is usually small, 0.01-0.10 NEAR for most coins.
If you’re sending someone a token, and they don’t have a balance of that token, you may also be charged this fee. This is because the smart contract needs to store the information about their balance anyway, or the transaction will simply fail.
Transfer fees
Some tokens, especially memecoins, have a fee for every transaction. This makes it more expensive to trade them too often, and the fee is usually either burned, given to the project’s treasury, or distributed to the token holders. You should always check the token’s website or the exchange’s website to find out about the fees, because they are different for each token and exchange.
Creating your own token
If you want to create your own token, there are 2 main ways to do it:
- Use a platform that allows you to create tokens without coding
- Write a smart contract of your token
The first way is easier, but the second way gives you more control over the token. In this book, we will cover the first way, because it’s easier and more accessible. There are 2 popular platforms:
- Token farm (creates tokens with format
<token-name>.tkn.near) - once it was the most popular way to create tokens, but now it’s not actively maintained and can’t be used, as connecting a wallet simply doesn’t work. Maybe it’ll be fixed soon. - Jump DeFi Token Laboratory - a platform
by Jump DeFi that allows you to create tokens with format
<token-name>.laboratory.jumpfinance.near. There’s an instruction on the Jump DeFi page.
More info about fungible tokens: in nomicon
NFTs
NFTs are tokens that can not be divided into smaller units, are unique and not interchangeable. They can represent ownership of digital assets like art, music, but can also be used as tickets to real-life events, access keys, and more. Here are some properties of it:
- It’s unique and only one person can own it at a time
- It can be freely transferred to someone else
- It’s not divisible, you can’t use half of it
- Usually NFTs are part of a collection of similar NFTs, but each NFT is unique
- Anyone can create an NFT, or download a JPEG and call it an NFT, but anyone can see who created it and decide if it’s worth anything
- Usually they have an image that represents them and can be viewed on a marketplace, description, traits. For example, “green hair” can be a trait of an NFT, if the NFT collection contains multiple NFT characters with different hair colors. But it’s not a requirement, some NFTs don’t have an image at all
They can have more applications than simply being an image, here are some examples:
- Some projects issue NFTs that give access to beta versions of their games, airdrops of their tokens
- There are blockchain games that use NFTs as “items” that can be bought, sold, and used in the game
- Proof of ownership of a physical object, like a car or a house (as long as it’s legally recognized, of course, which is not common in most countries yet)
- You can wrap your crypto account into an NFT and sell it, so the buyer will get access to your account, account ID, and all the assets in it
- A musician can sell an NFT of a song, and the buyer will get royalties from the song’s sales
- NFTs can be used as tickets to events, and the event organizers can control who can enter by checking the NFTs
One more example would be a ticket to a flight, let’s analyze its properties:
- It’s unique, the same ticket doesn’t exist twice
- You can (depending on the airline’s policy) give or sell it to someone else, or buy it from someone else
- It’s not divisible, you can’t use half of it to fly half the distance
- It’s not interchangeable, you can’t use it to fly with a different airline
- There are many similar tickets, but they are not completely the same. For example, they can have different prices, conditions, seats, etc.
- Anyone can “print a ticket” and sell it, but only the airline can issue a valid ticket, and you can’t use a fake ticket to fly
Also, if some website has “NEP-171” in it, it simply means “NFT”. NEP-171 is a
technical standard for NFTs on NEAR, all NFTs on NEAR are NEP-1711 tokens.
How to get NFTs
You can buy them on a marketplace, or mint them for free. Here are the most popular NFT marketplaces on NEAR:
There is also an NFT aggregator TradePort
Free mints
Minting is a process of creating an NFT. It’s usually done by the creator of the NFT, but sometimes the creator allows anyone to mint their NFTs. If the creator allows anyone to mint their NFTs for free, it’s called a “free mint”.
Sometimes creators give away their NFTs for free, either to anyone or with some conditions. You can find them on Twitter, Discord, and other social media. A good place to start would be the Slime Community Discord server. As much as I’d like to have a list of all free mints here, I wouldn’t be able to keep it up to date, so you should look for them yourself.
One of the main platforms that provide free mints is Shard dog, and there’s an NFT that is always given away for free for a subscription to a newsletter – NearWeek NFT. By the way, NearWeek is also a good source of information about the NEAR ecosystem.
Usually unlimited freemints like NearWeek NFT are not worth anything, but you might still want to mint them for fun or for memories of some events.
When you mint an NFT, you may be charged a small storage fee, usually between 0.01 and 0.05 near, keep that in mind. But your wallet will warn you about this, anyway.
NFT analysis
Back in 2021, people were buying useless NFTs for a lot of money, they were just expensive pictures. Now that the market is more mature, popular NFTs usually have a clear use case. If you’re looking to buy an NFT that will do something for you (give access to airdrops, increase in price, etc.), you should do a thorough research and not base your decision on the price and the picture alone. Of course, if you want to buy an NFT from your favorite digital artist just to support them, that’s a different story.
Some good indicators:
- Trading activity on the marketplace. If the last NFT purchase was 2 weeks ago, it’s probably not liquid and people are not interested in it
- The creator’s reputation. If the creator is a well-known person in the NFT space, a well-known artist or company, it’s more likely that the NFT will have some value
- The NFT utility. If it gives you access to something, it’s more likely to be valuable than if it’s just a picture
- The NFT supply. If there are 1000 of the same NFT or just 10, it’s more likely that the 10 will be more valuable, because they are more rare
- Community. If there’s an active community around the NFT, it’s more likely that the NFT will have some value, because the community will support it
Some flags that indicate that the NFT needs more research:
- There are 10000 NFTs, but only 30 of them are listed on marketplaces. They could all be owned by the creator (red flag), or in NFT staking contracts (green flag), or burned (green flag), or no one cares about them and people gave up trying to sell them (red flag), or something else
- The NFT creator claims that the NFT will give you some benefits, but there’s no information about it or it’s explained in technical words that you can’t understand. Usually, good creators can explain things they’re building in simple words, and bad creators use a lot of technical words to confuse you into thinking “it’s too complicated for me to understand, but looks like a smart investment”. In these cases, you should ask for help from someone who understands the topic and who you trust, or just skip the NFT
- The NFT creator is anonymous. It’s not a red flag by itself, but it’s a good reason to do more research. Try to assess the ability of the creator to deliver what they promise, and the likelihood of them running away with your money
- The NFT provides huge benefit that seem to be impossible to deliver. For example, 100% APY in a stablecoin. You need to analyze the business model, where the benefits come from, and if it’s sustainable. If you can’t understand it, it’s a huge red flag
- The NFT is a meme. There’s a 0.5% chance of doing a 100x, and a 99.5% chance of losing all your money. With experience, you can start to tell the difference between a good meme and a bad meme, but that’s not something I can teach you in the book because I have no idea how people do it, lol
Soulbound NFTs
Soulbound NFTs (also called SBT, Soul-Bound Tokens) are NFTs that can’t be transferred to another account. They can be used as proof of ownership of a physical object, like a car or a house, where the transfer process is more complicated than just sending an NFT to another account due to legal reasons. The NFT creator can make it soulbound if they don’t want you to sell it, or if they want to make sure that only you (or other specific people) can own it. But it’s not a guarantee that you can’t sell it, because you can sell the whole account that owns the NFT, and the NFT will be transferred with the account.
Staking
Some NFTs allow you to stake them to receive rewards. For example, you can stake “NEAR Tinker Union” and get $GEAR tokens, or stake El Cafe Cartel to get $CAFE. This mechanism makes the NFT more valuable, because it gives you a way to earn money with it, increasing its demand. At the same time, the supply is decreased, as more NFTs are staked and less are available for sale.
To stake an NFT, you would usually navigate to the project’s website, connect your wallet, and follow the instructions in the project’s documentation, or ask in the project’s community.
Sometimes projects partner with NFT staking platforms, such as Jump DeFi or Paras, and you can stake your NFTs there. In this case, you would need to connect your wallet to the platform, and follow the instructions of that platform.
Creating your own NFT
If you want to create your own NFT, there are 2 main ways to do it:
- Use a platform that allows you to create NFTs without coding
- Write a smart contract of your NFT
Most people use the first way, because it’s easier and more accessible. The second way provides more control over the NFT, but it’s not needed for most use cases. Here are some popular platforms for creating NFTs:
- Paras - a marketplace that allows you to mint NFTs
- Mintbase - a platform that allows you to mint NFTs and create your own marketplace
- Enleap and Bodega are NFT launchpads, but at the time of writing, Enleap doesn’t work, and Bodega is only available for whitelisted projects with no public information. If you want your project to be on a launchpad, I recommend contacting them directly to discuss the terms
More technical info about NFTs: in nomicon
Receiving NEAR
Generally, there are 4 ways to receive NEAR:
- From another NEAR account
- From an exchange
- From a different blockchain
- Earn NEAR
From another NEAR account
If you’re receiving NEAR from another NEAR account, you need to give them your account ID. Let’s find it:
Meteor Wallet:

HERE Wallet:
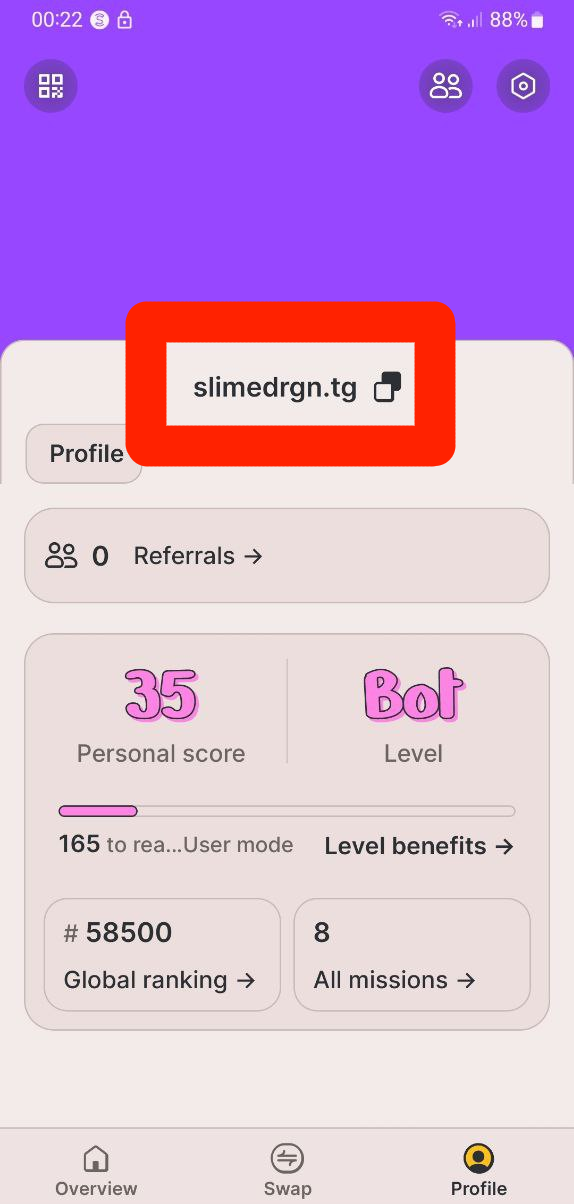
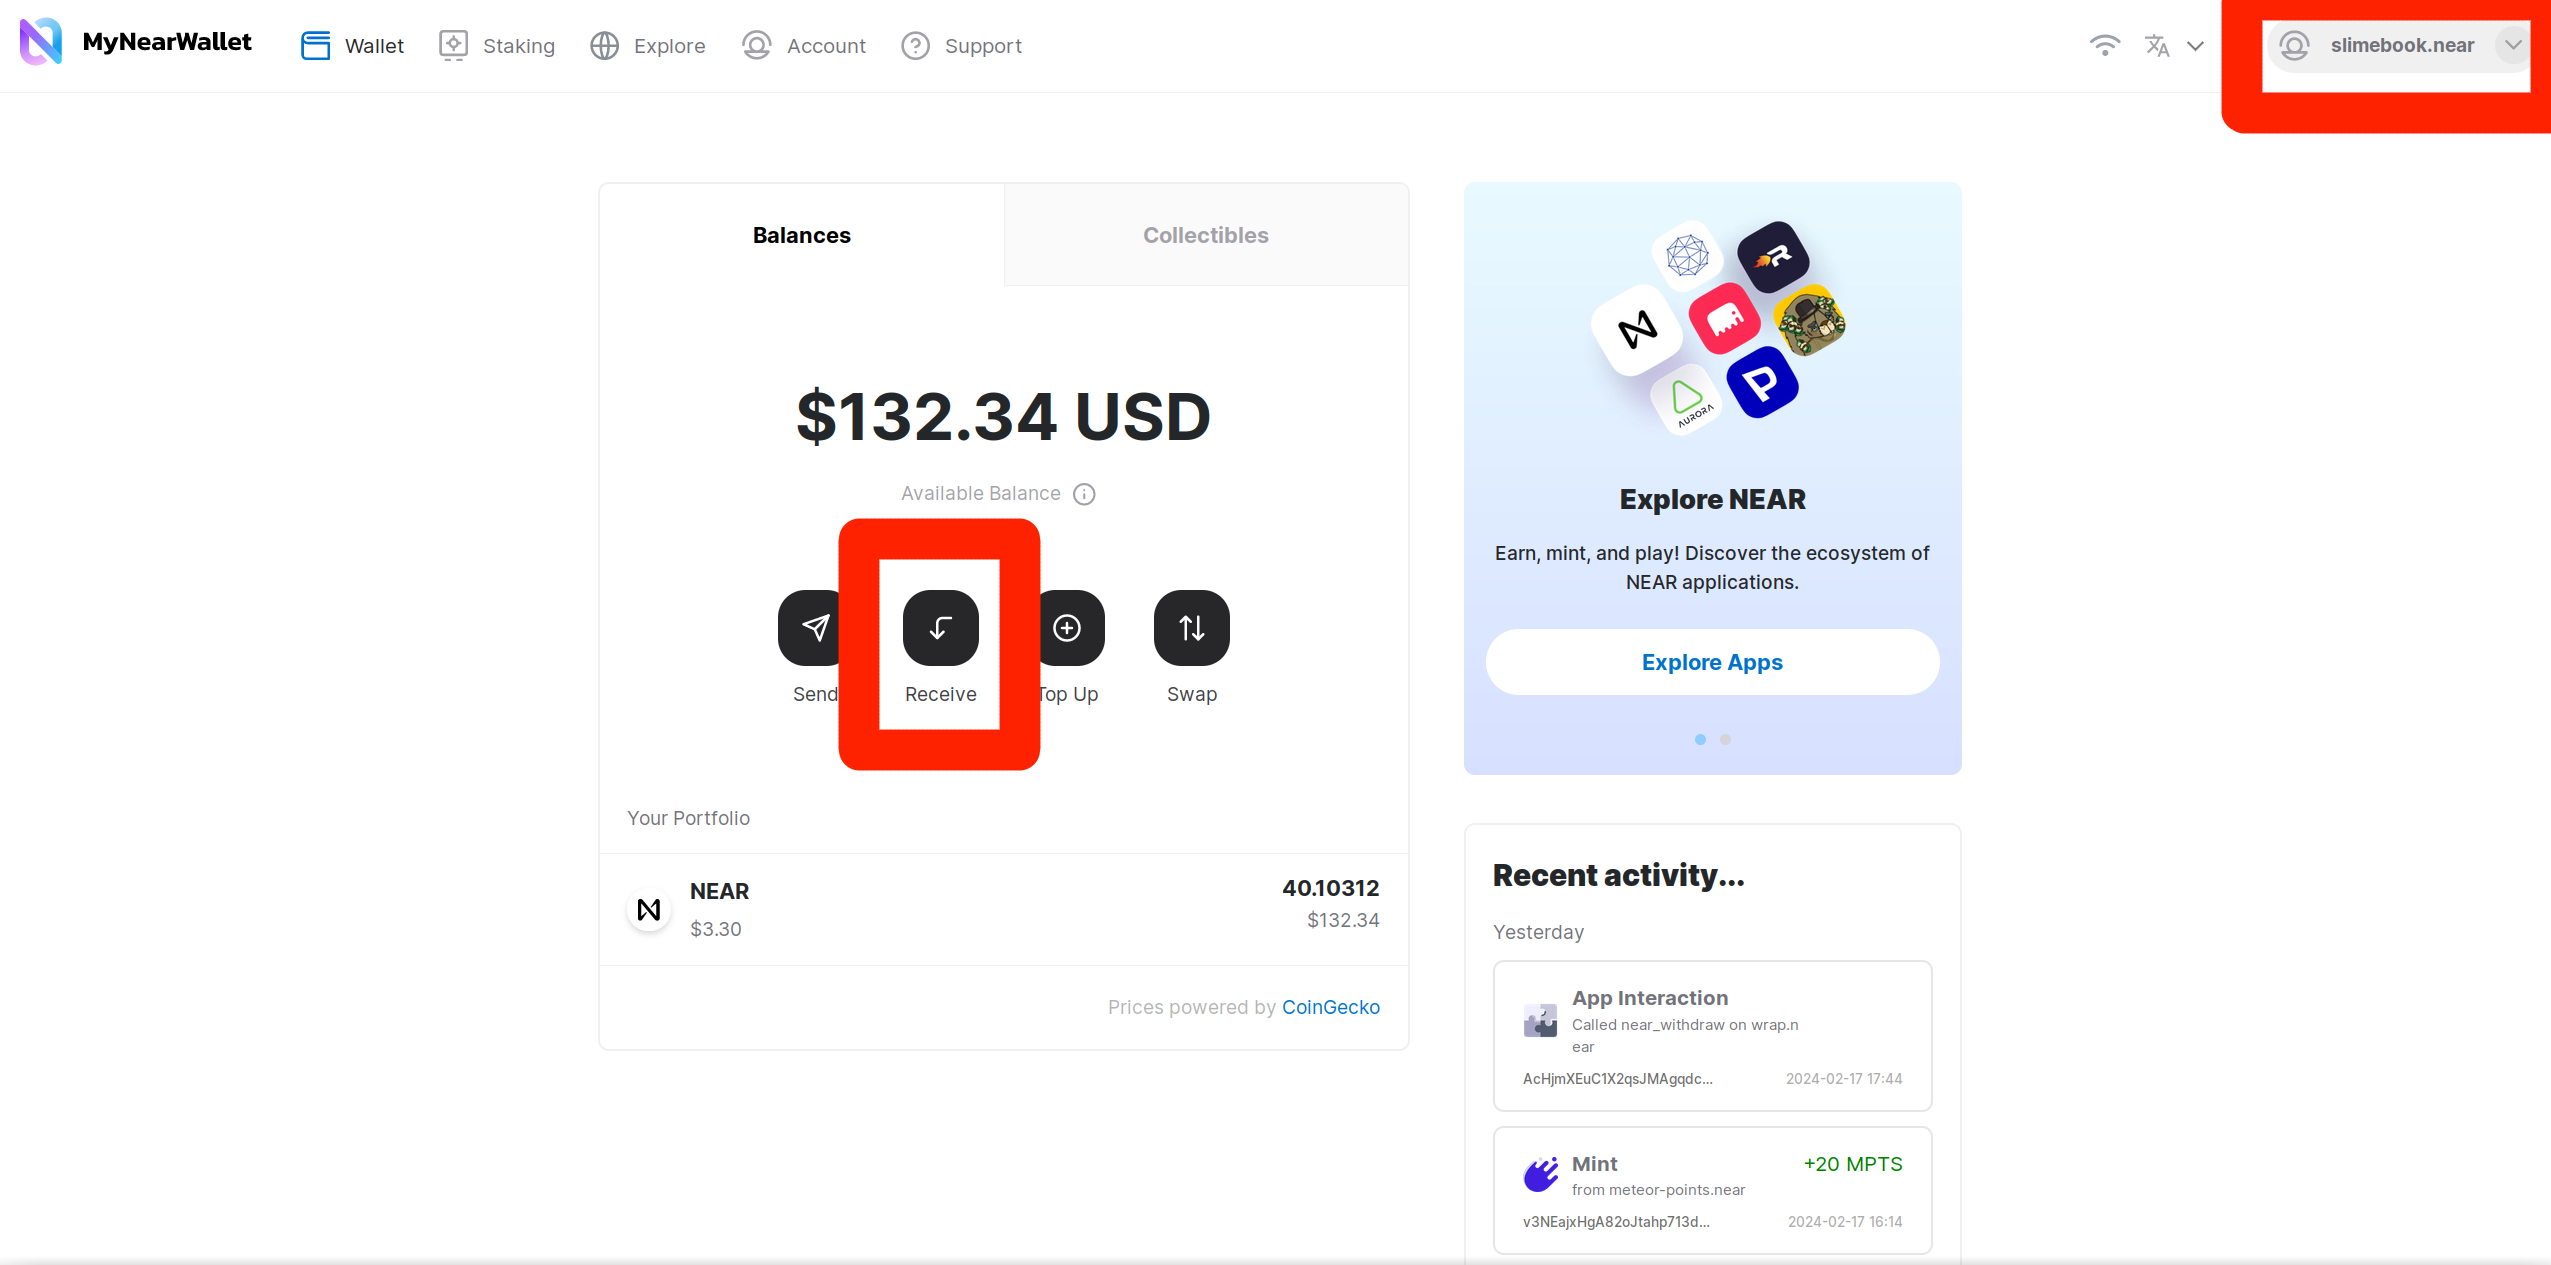
MyNearWallet has 2 ways: It’s displayed in the top right corner, or you can click “Receive” to open a page with your address and QR code:
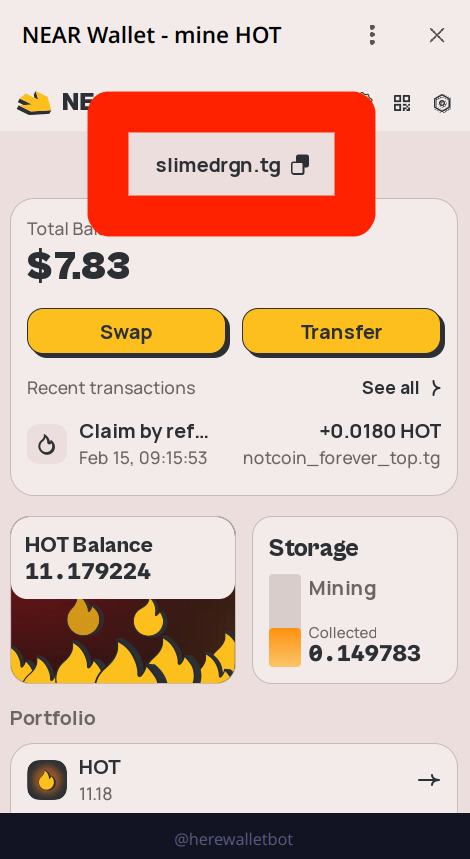
HOT Wallet:
If you’re coming from a different blockchain, you might be used to having a long string of random characters as your address. NEAR mostly uses human-readable names instead, and you can have multiple accounts under the same name. Don’t confuse this with ENS or similar services, NEAR names are not a good-looking mapping to an address - it IS your address. More information about addresses: NEAR Accounts
From an exchange
If you’re transferring from an exchange, depending on the exchange, it can take 1-30 minutes for the transfer to come, but transfers between wallets usually take 1-2 seconds. As an address, you can use the same NEAR account ID as you would for receiving from another NEAR account. Here’s how to do it with Bybit and Binance, but the interface is more or less the same on other exchanges:
-
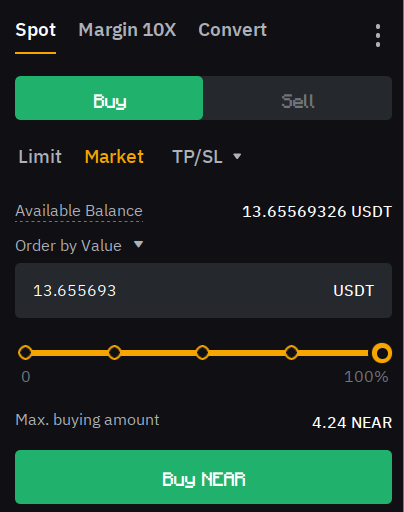
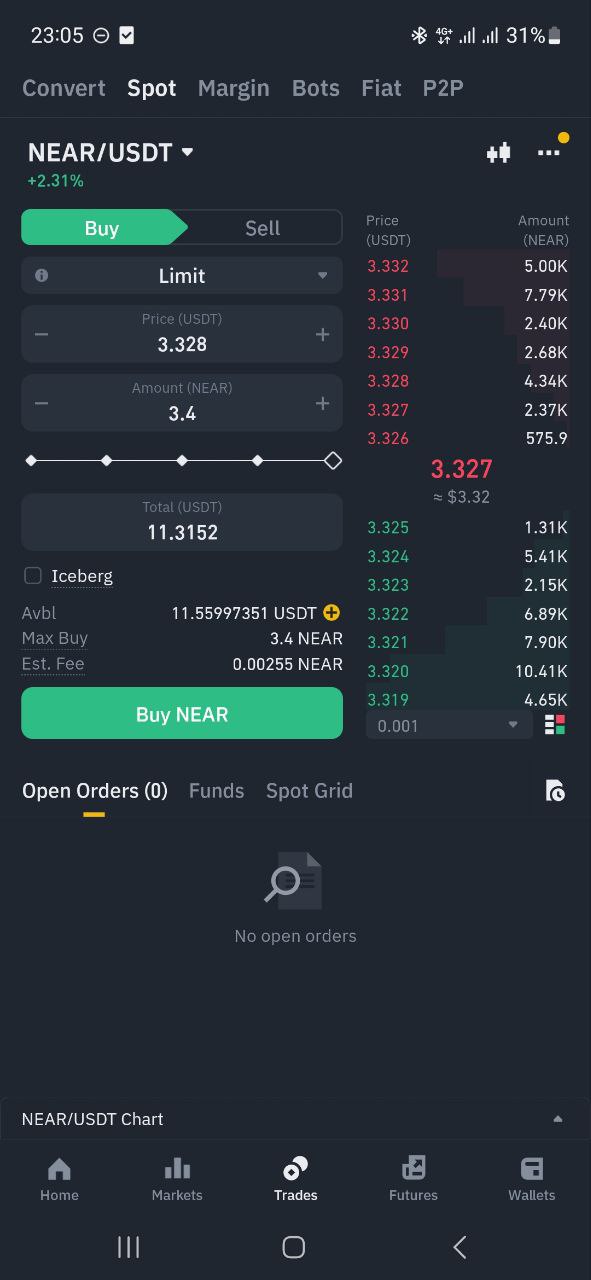
Buy NEAR (you may need to deposit some other currency first):
Bybit:
Binance:
-
Navigate to “Assets”. Some exchanges may have a “Trading balance” and a “Funding balance” - usually you would need to transfer from the “Funding balance” to the “Trading balance” first. But if you’re not sure where to find it, you can just skip this step, some exchanges do it automatically.
-
Find “NEAR” in your assets and click “Withdraw”. On some exchanges, you may need to click “Withdraw” first and then select “NEAR” from a dropdown.
-
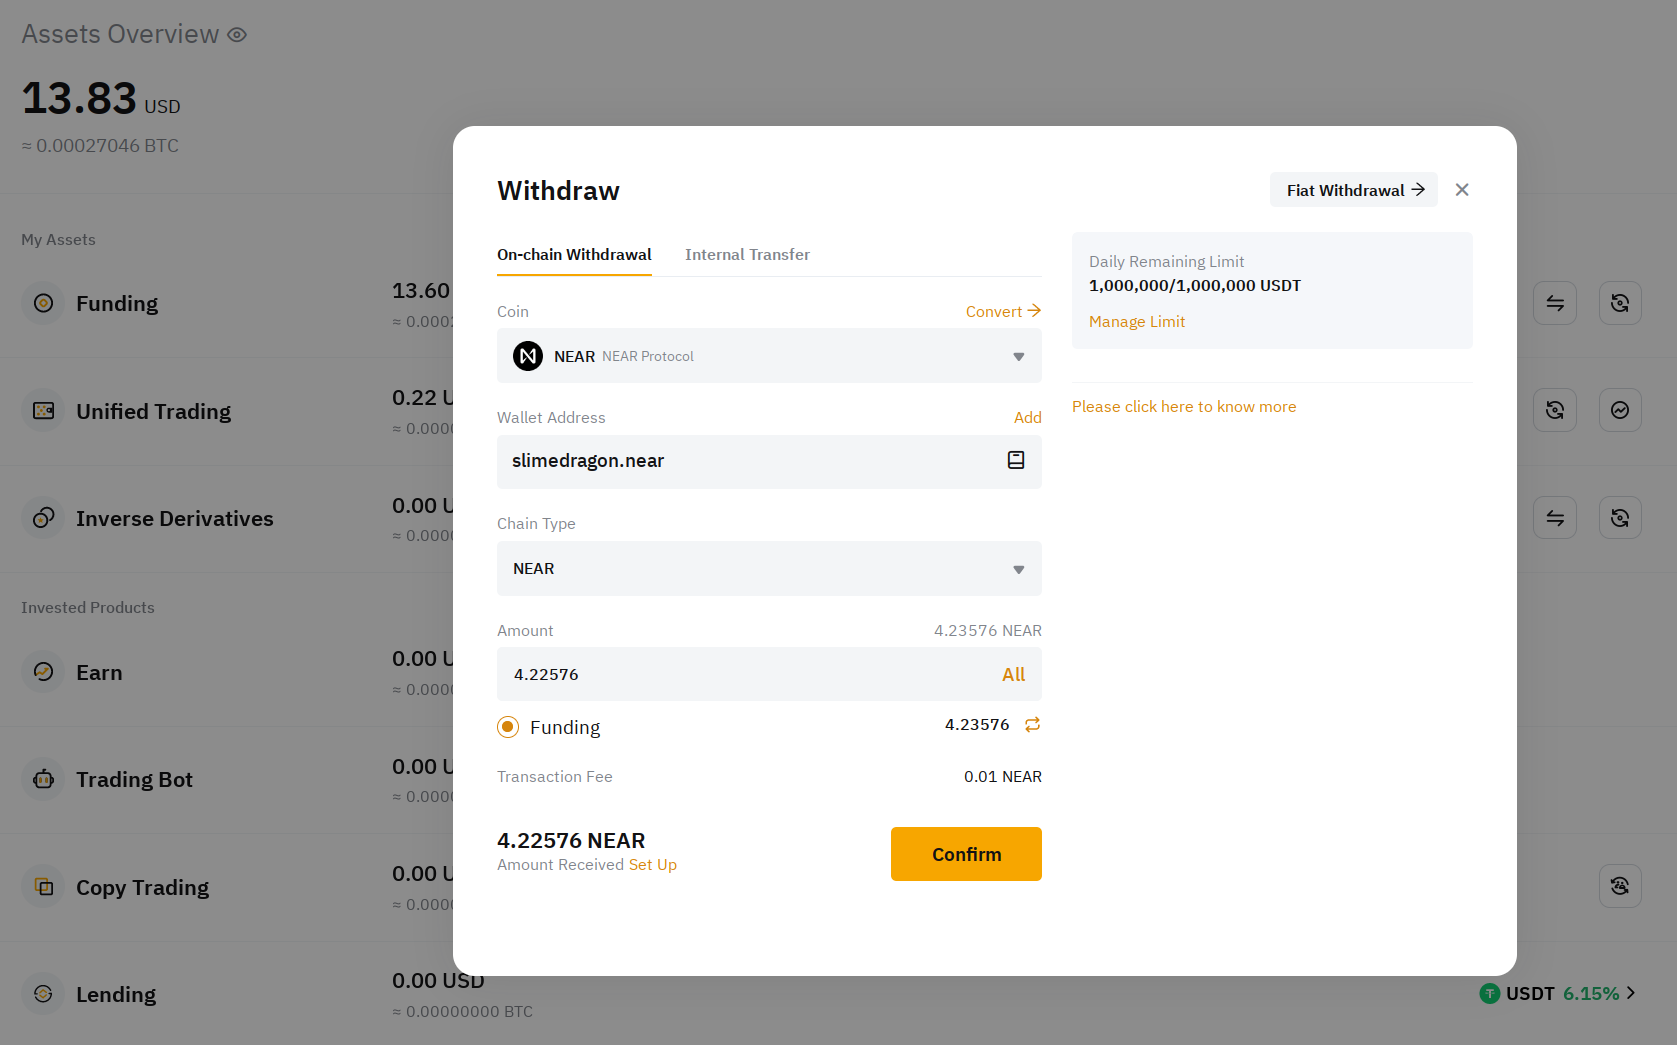
Enter your NEAR account ID and the amount you want to withdraw:
Bybit:
Binance:
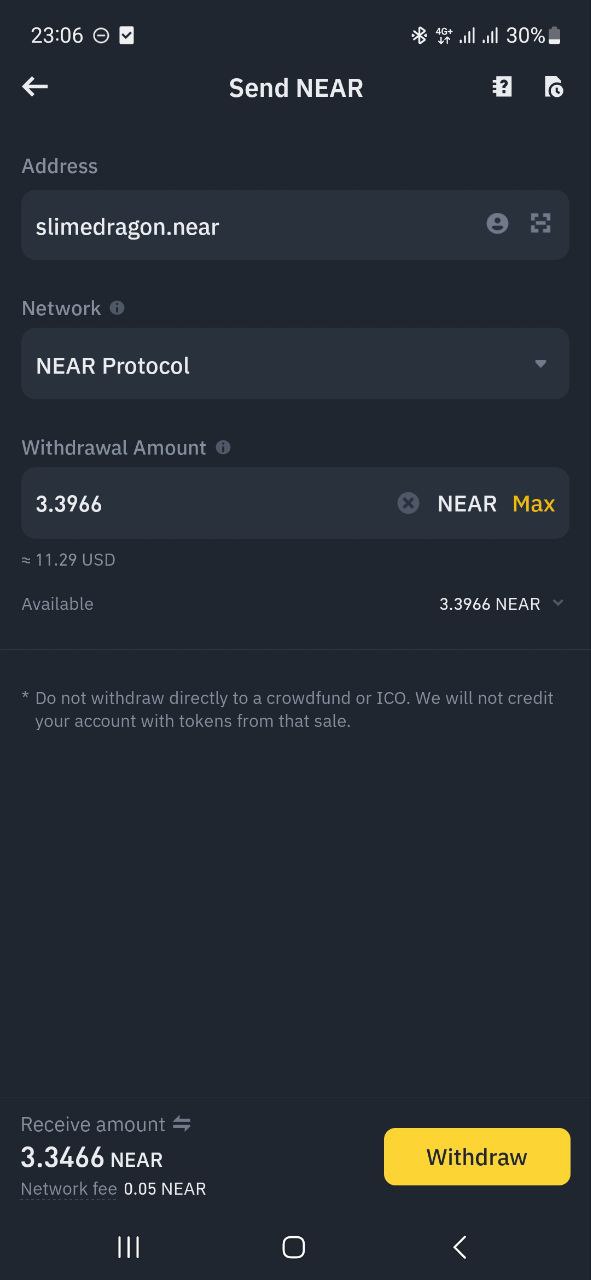
-
Confirm the withdrawal. You may need to confirm it via email, 2FA, and password.
From a different blockchain
If you’re transferring from a different blockchain, you need to use a bridge. The best bridge for Ethereum is Rainbow Bridge. It’s an official trustless two-way bridge, meaning that you don’t need to trust the company that runs it, and it’s less prone to hacks. If you want to bridge from BNB Smart Chain, Solana, Polygon, or another blockchain, you need to use a different bridge or an exchange. For small amounts (less than $1000), you can use Allbridge Classic or Rubic Exchange, but you can easily lose a good percentage of your money due to slippage. I recommend using a centralized exchange for larger amounts. And for small amounts, too, if you have an account on an exchange, in most cases it’s the cheapest option.
Earn NEAR
You can earn NEAR by:
- Contributing to this book 💚 If you found a mistake, broken link, wrote a new page, added new information on an existing page, or something else, read Contributing guide and you’ll be rewarded.
- Completing tasks on heroes.build, there are a lot of bounties for different skills, and you can earn NEAR for completing them.
- Doing something useful for the community and applying for a grant in DevHub (for developer-related projects), Marketing DAO (for marketing-related projects), Creatives DAO (for creative art-related projects), Public Degens (for near content makers), OnboardDAO (for wallet developers and other projects related to onboarding new users), Globe DAO (for projects targeted at local communities, non-blockchain communities, etc., maybe your country / region also has a DAO), Near Foundation, NEAR Horizon, and other organizations.
- Earn other tokens using other ways and then exchange them for NEAR.
Exchanging Tokens
If you want to do various things in the NEAR ecosystem, you can’t just have NEAR tokens and do everything with it. Some NFTs can be bought only with a specific token, some DAOs require a specific token to vote, or maybe you just don’t want to worry about the price of NEAR and want to use a stablecoin.
Since we’re covering the NEAR ecosystem, we’ll focus on DEXes (decentralized exchanges) that are available on NEAR, but there are other ways to exchange tokens, like centralized exchanges and OTC.
At the time of writing, the biggest DEX on NEAR is Ref Finance. To start using it, you have to connect your wallet and then you can start swapping tokens.
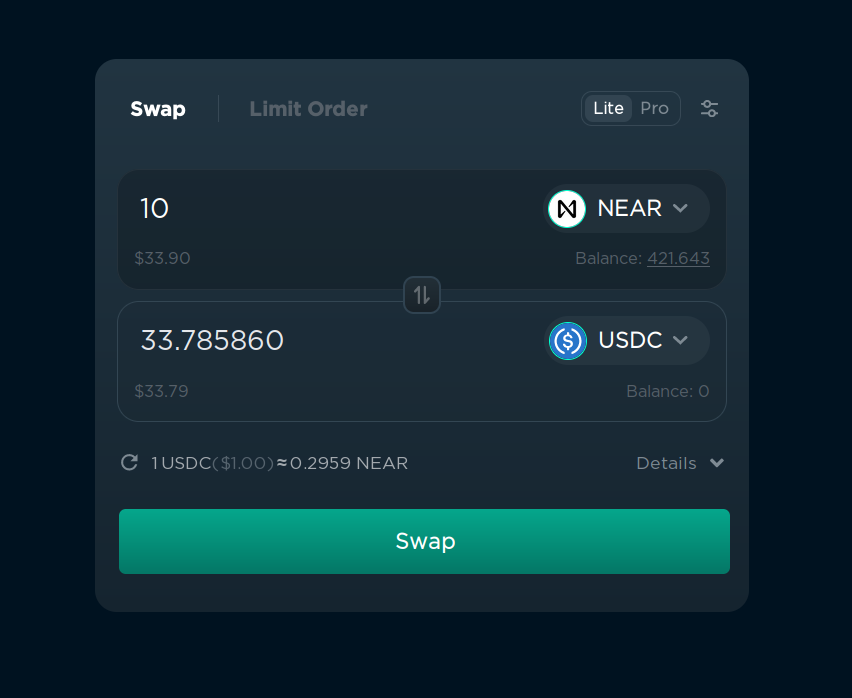
To convert one token into another, follow these steps:
- Choose the token you want to swap from on the right of the first input field (“NEAR” on the screenshot).
- Choose the token you want to swap to on the right of the second input field (“USDC” on the screenshot).
- Enter the amount of the tokens you want to swap.
- Click “Swap” and confirm the transaction in your wallet.
Yes, it’s that simple. But if you’re going to do it often, you should be aware of these things:
How prices work
The price of a token depends on how much people buy and sell the token. If a lot of people are buying a token, the price goes up, and if a lot of people are selling a token, the price goes down. If you want to know more about technical details and the formula, you can read about liquidity.
Price impact
If you’re buying or selling a lot of tokens at once, the price can change a lot, depending on the liquidity of the token. If the token has a low liquidity, the price can change by a lot, even if you’re swapping just $10. If the token has a high liquidity, the price will not change by much, even if you’re swapping $10,000 at once. This could potentially lead to a situation where you change the price by 10%, and your average buy price is 5% higher than the current price.
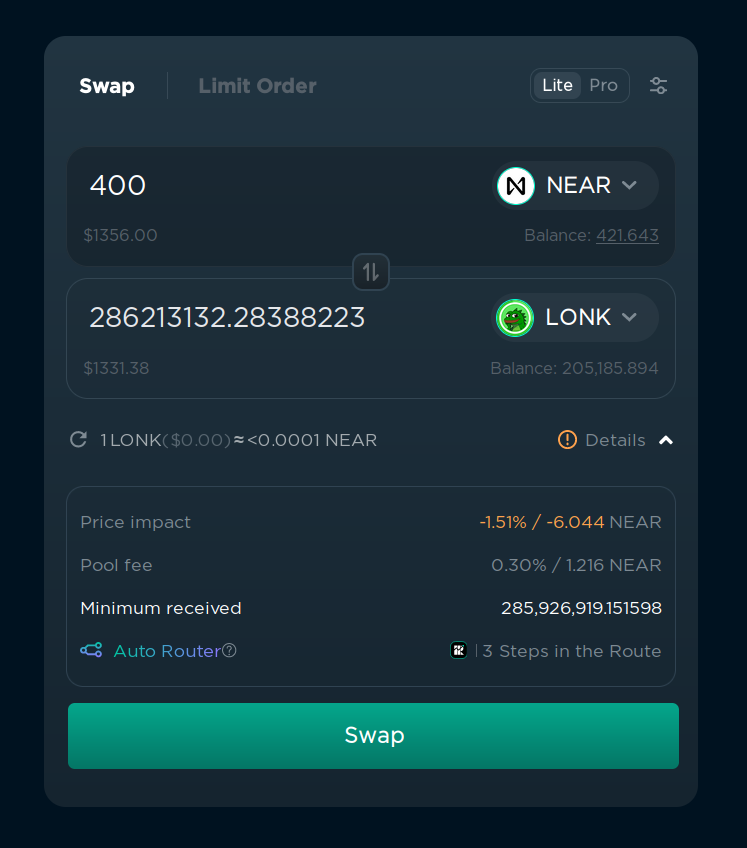
If the price will be changed by more than 1%, ref.finance will show you a warning about the price impact and an estimated loss under “Details” in the bottom right corner. You can ignore it if you’re sure that you want to swap the tokens, but be aware that you’ll get a bad price.
Slippage
Slippage is the difference between the expected price of a trade and the price at which the trade is executed. It can happen when the market is volatile and the price of the token changes between the moment you click “Swap” and the moment the transaction is confirmed. If the slippage is too high, the transaction will fail. You can set the maximum slippage in the settings in the top right corner.
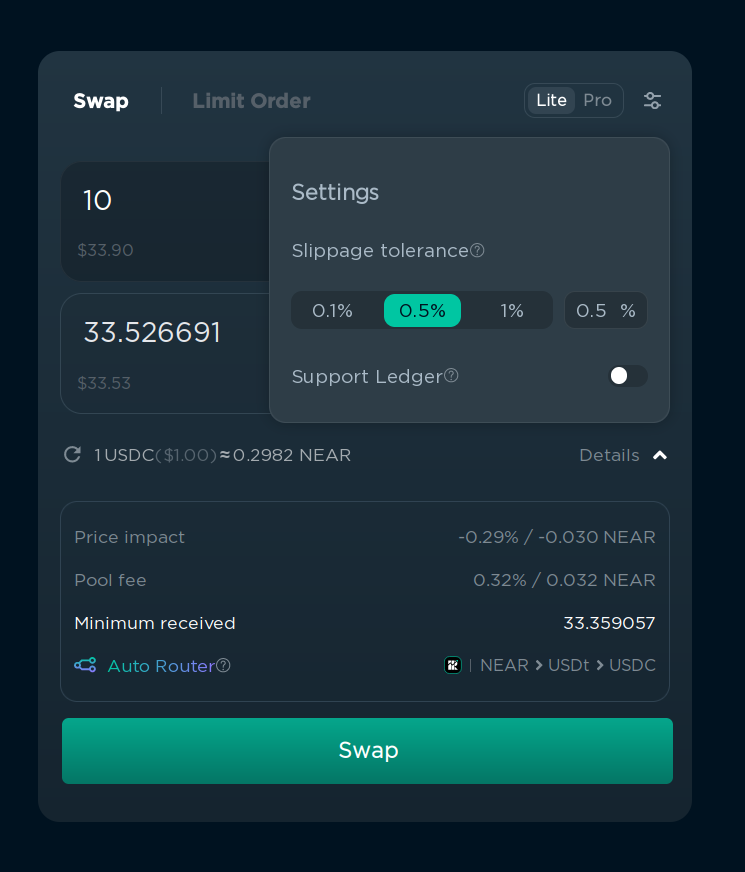
This is done to prevent you from losing money when the price changed too much between the moment you clicked “Swap” and the moment the transaction was confirmed. For example, if you want to swap 1 NEAR for 3.37 USDC, and the price of NEAR changes from $3.37 to $3.10, the transaction will fail, because the price has changed by a lot. It also protects you from “sandwich attacks”, where someone can manipulate the price of the token by buying right before your transaction and selling after your transaction, so you buy for a higher price. These attacks are not common because they’re much harder to execute on NEAR, but it’s still better to set slippage to a reasonable value.
I recommend setting it to 0.1% for popular tokens, and 0.5% for less popular tokens, but if the swap constantly fails because of “slippage error”, you can increase it farther. If you’re trading a token that has transfer fees, you can also increase the slippage to cover the fee. You can see the amount you are guaranteed to receive under “Details”, and if the amount is less than you expect, the transaction will be reverted and you will get your tokens back.
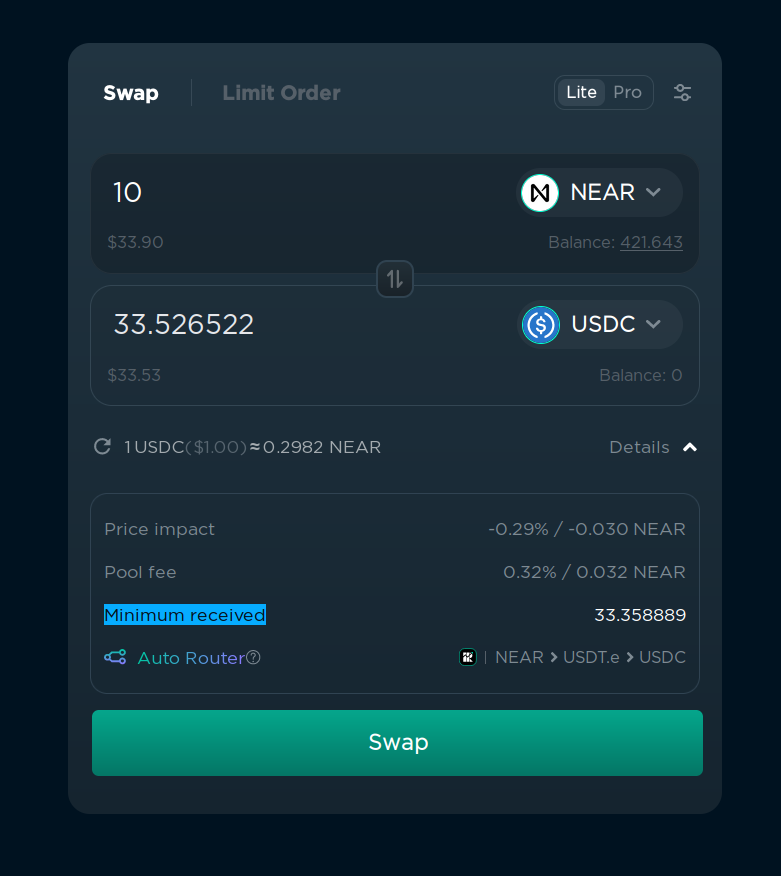
If you want to buy a token just after the launch, you should set the slippage to 5-10% because the price can change a lot in a few seconds.
Routing
Ref.finance will try to get the best price possible by combining multiple tokens pairs. For example, sometimes instead of swapping NEAR -> UDSC, it will be better to swap NEAR -> ETH -> USDC. This is called “routing”. You can see the routing details if you enable “Pro” mode in the top right corner.
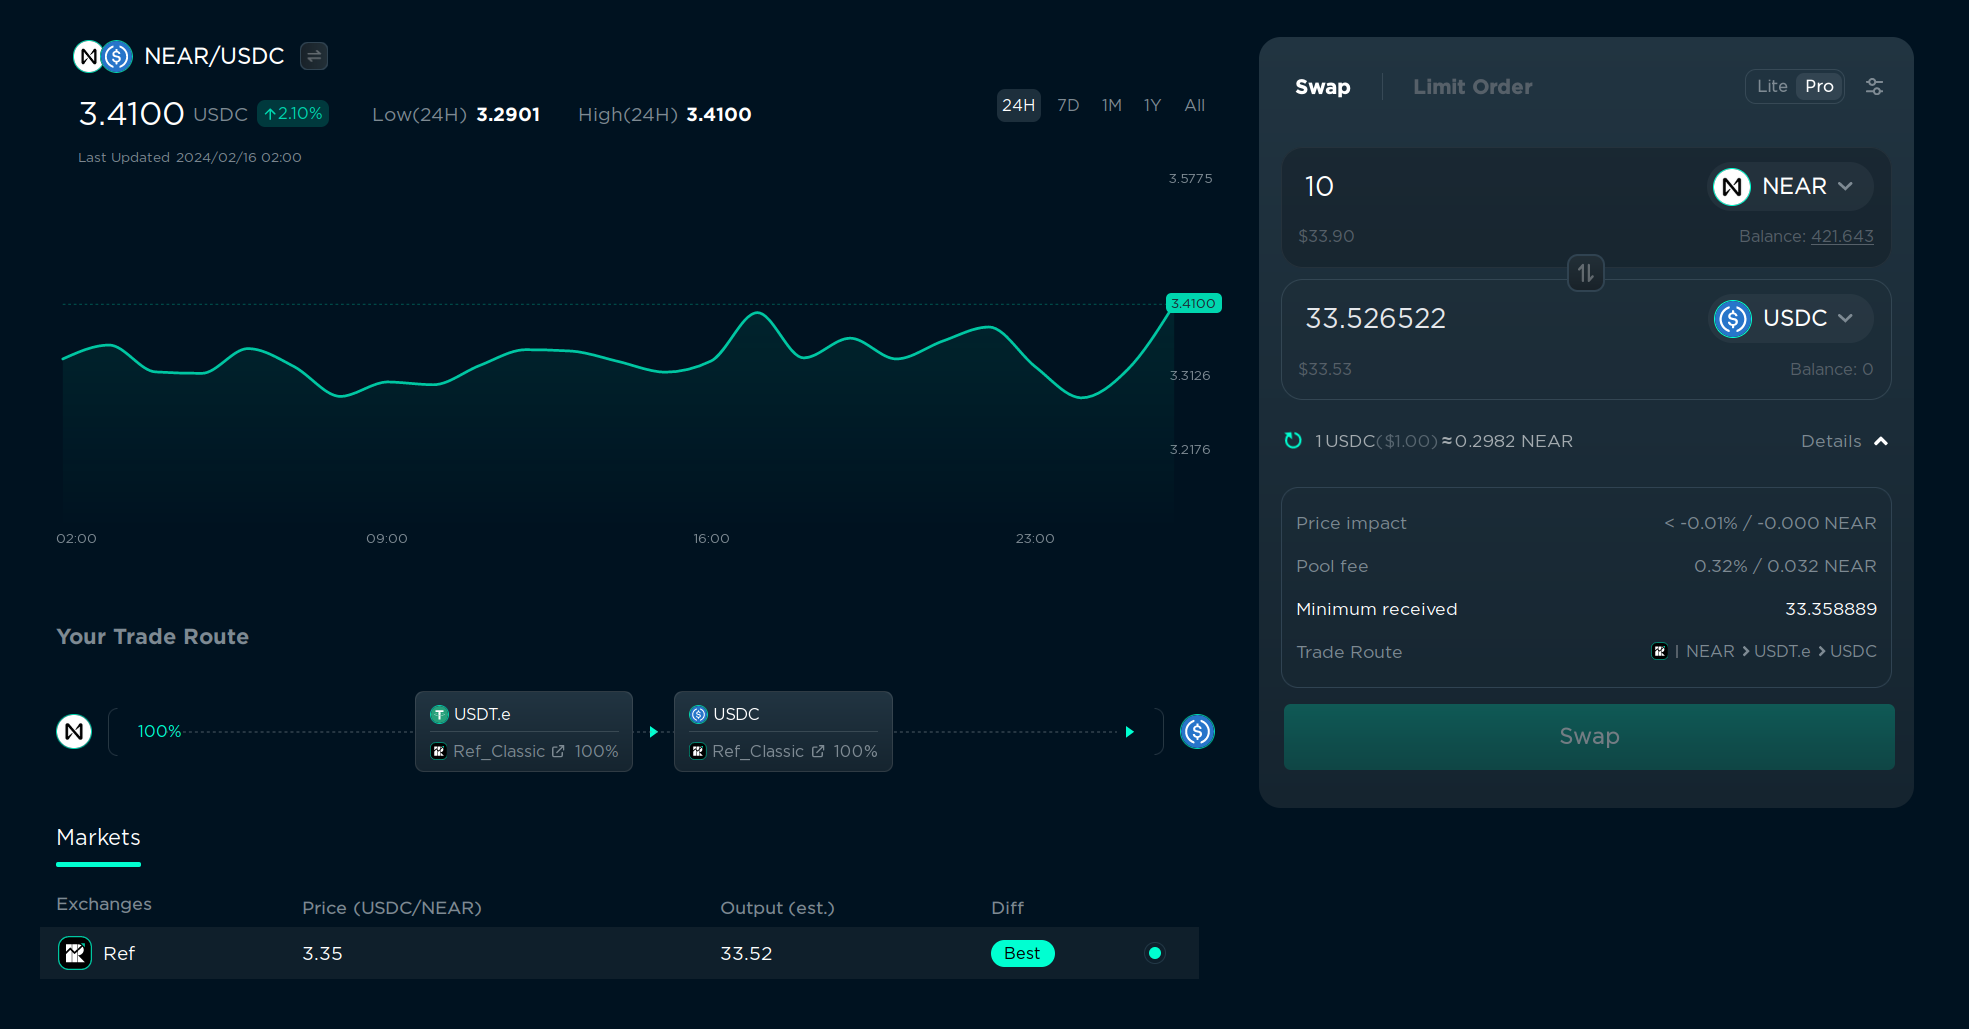
In this example, it will swap NEAR to USDT.e, and then USDT.e to USDC. It can also route using the transaction using different paths, for example, swap 14% directly to USDC, and 86% to USDT.e, and then swap USDT.e to USDC. This is done automatically, so you don’t have to worry about it, but it’s good to know that it’s happening.
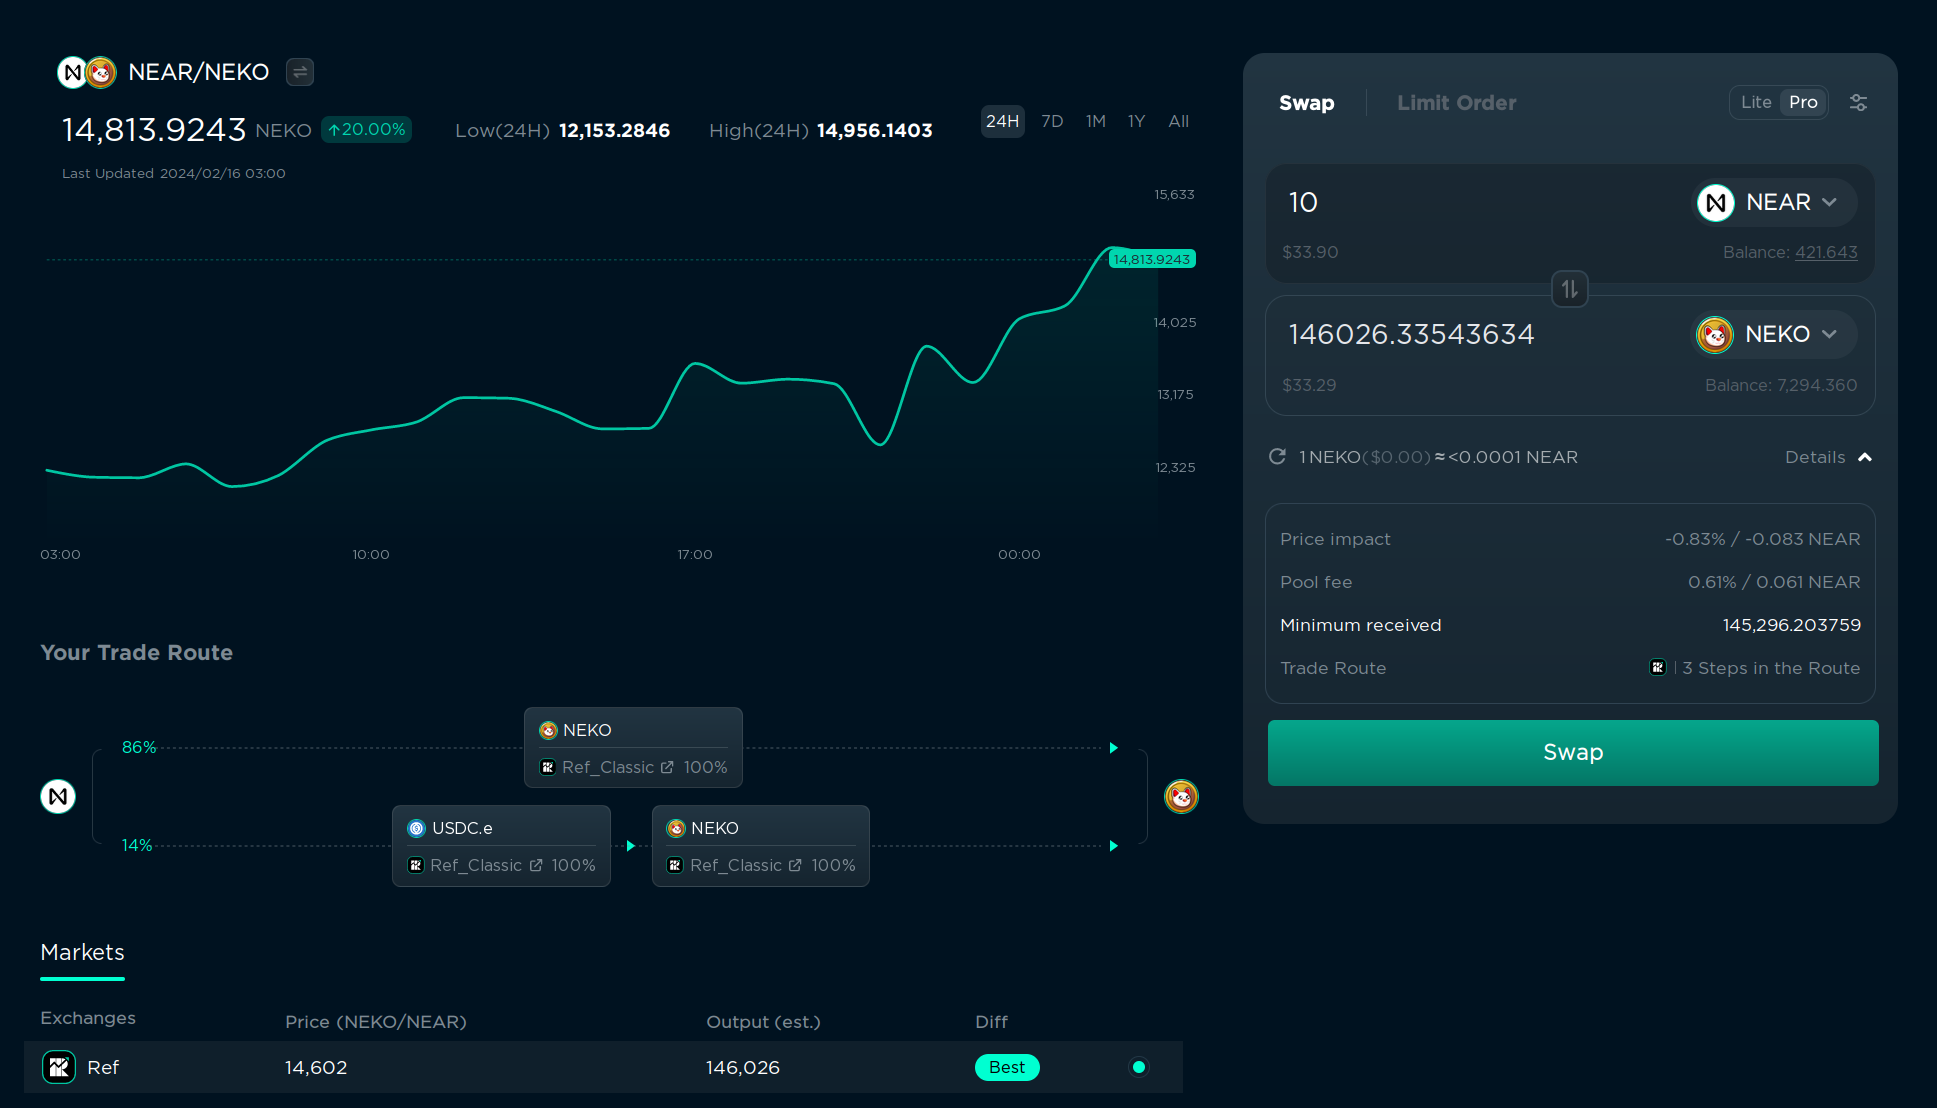
If you enabled Pro mode, you can also enable Trisolaris routing. Trisolaris is the most popular DEX on Aurora, and if the token is available on both NEAR and Aurora, it will try to find the best between both chains. This is also done automatically, but you can choose the route manually in the left bottom corner if you want.
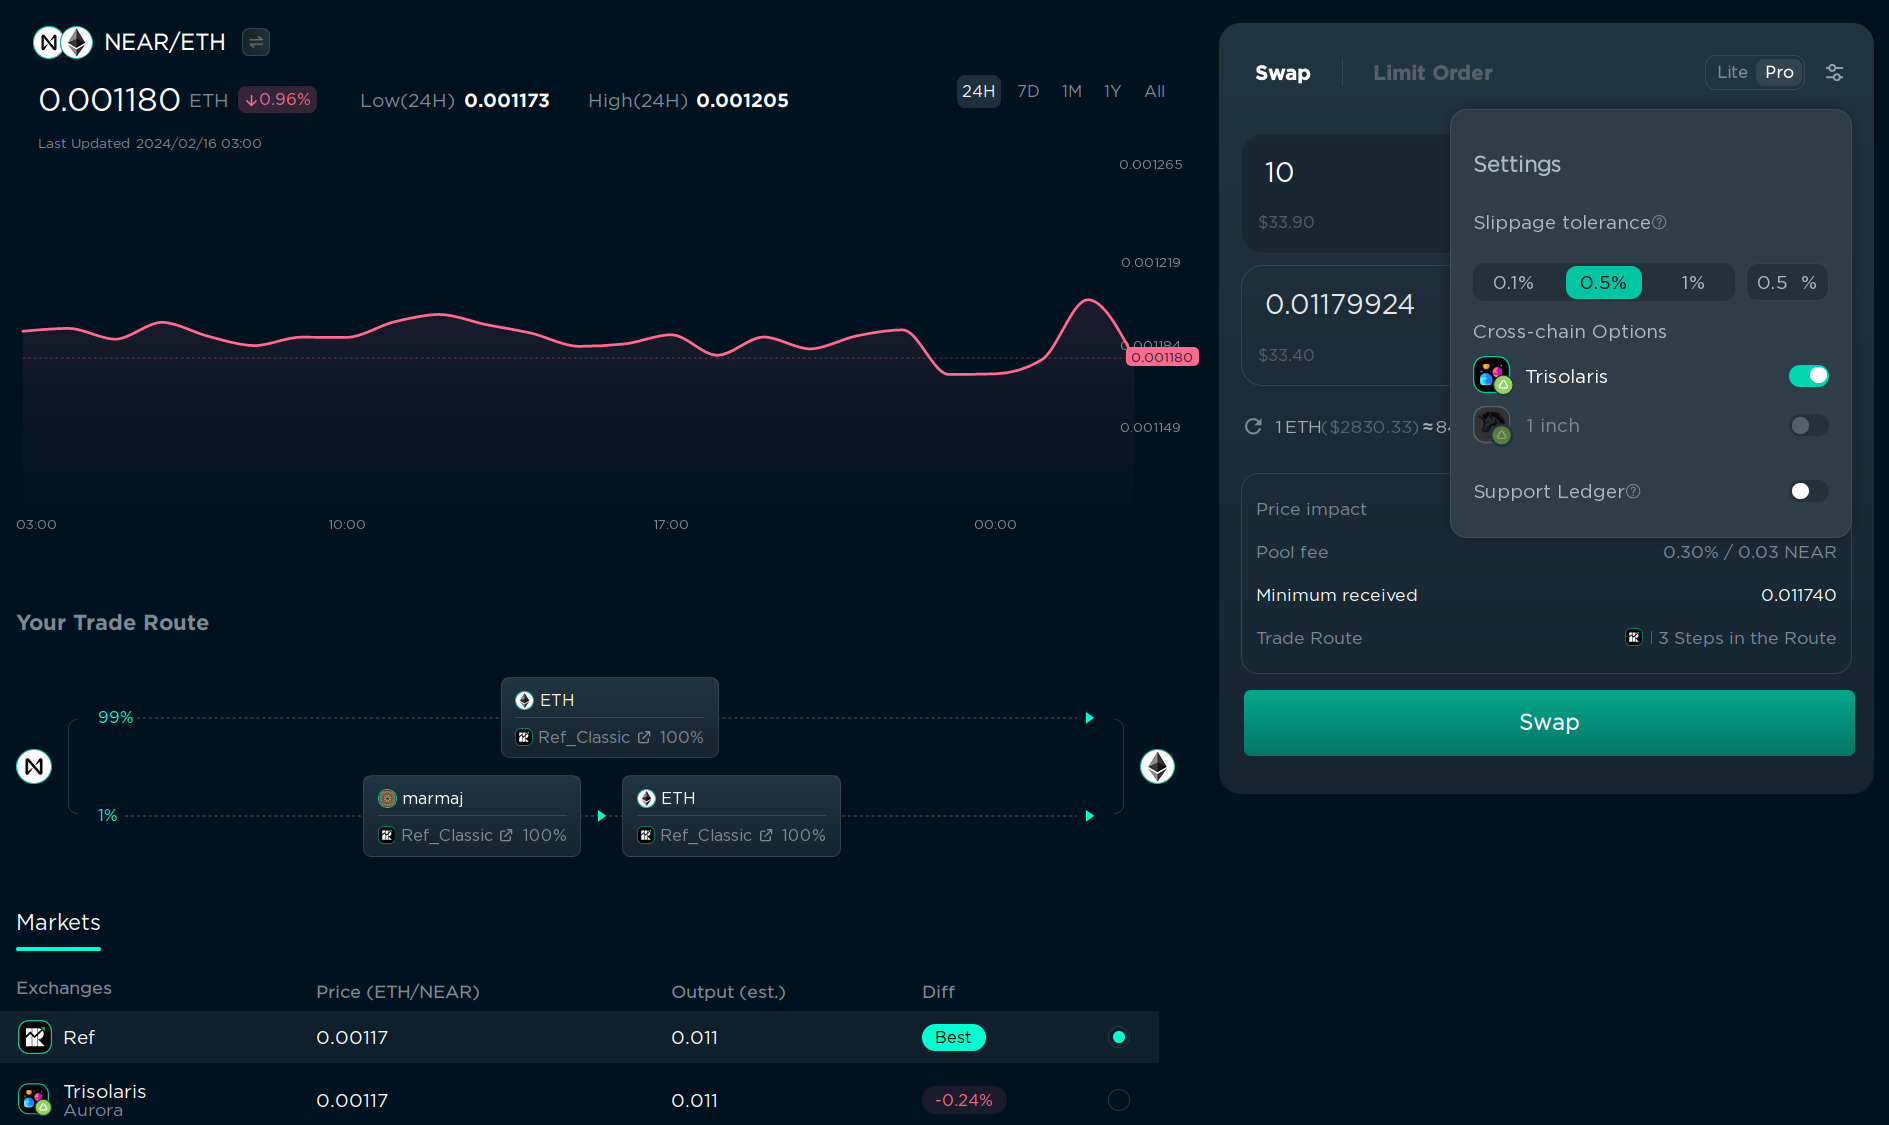
Trading less popular tokens
Not all tokens are available in “Select a token” menu, but if you have a token address (or contract address), you can enter it manually in the “Search name or paste address…” field. After that, click the “Add token” button and confirm the transaction. The transaction is needed to save the token in your list of tokens, and it will cost a small storage fee. After that, you will be able to find the token in the “Select a token” menu. As the project gains more recognition, Ref’s team might whitelist it so that this action is no longer necessary.
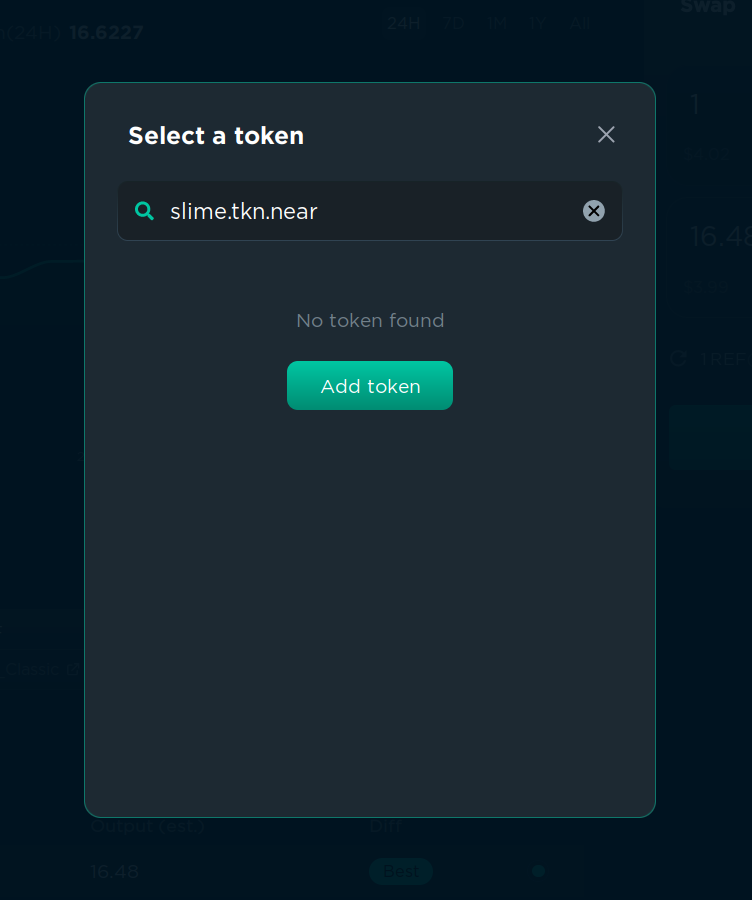
Limit orders
If you want to buy a token for a specific price, you can use a limit order. This will create a transaction that will be executed when the price of the token reaches the price you specified. This is useful if you want to buy a token, but you think that the price is too high right now, and you want to buy it only if the price goes down. You can toggle between “Swap” and “Limit Order” in the top left corner of the swap menu.
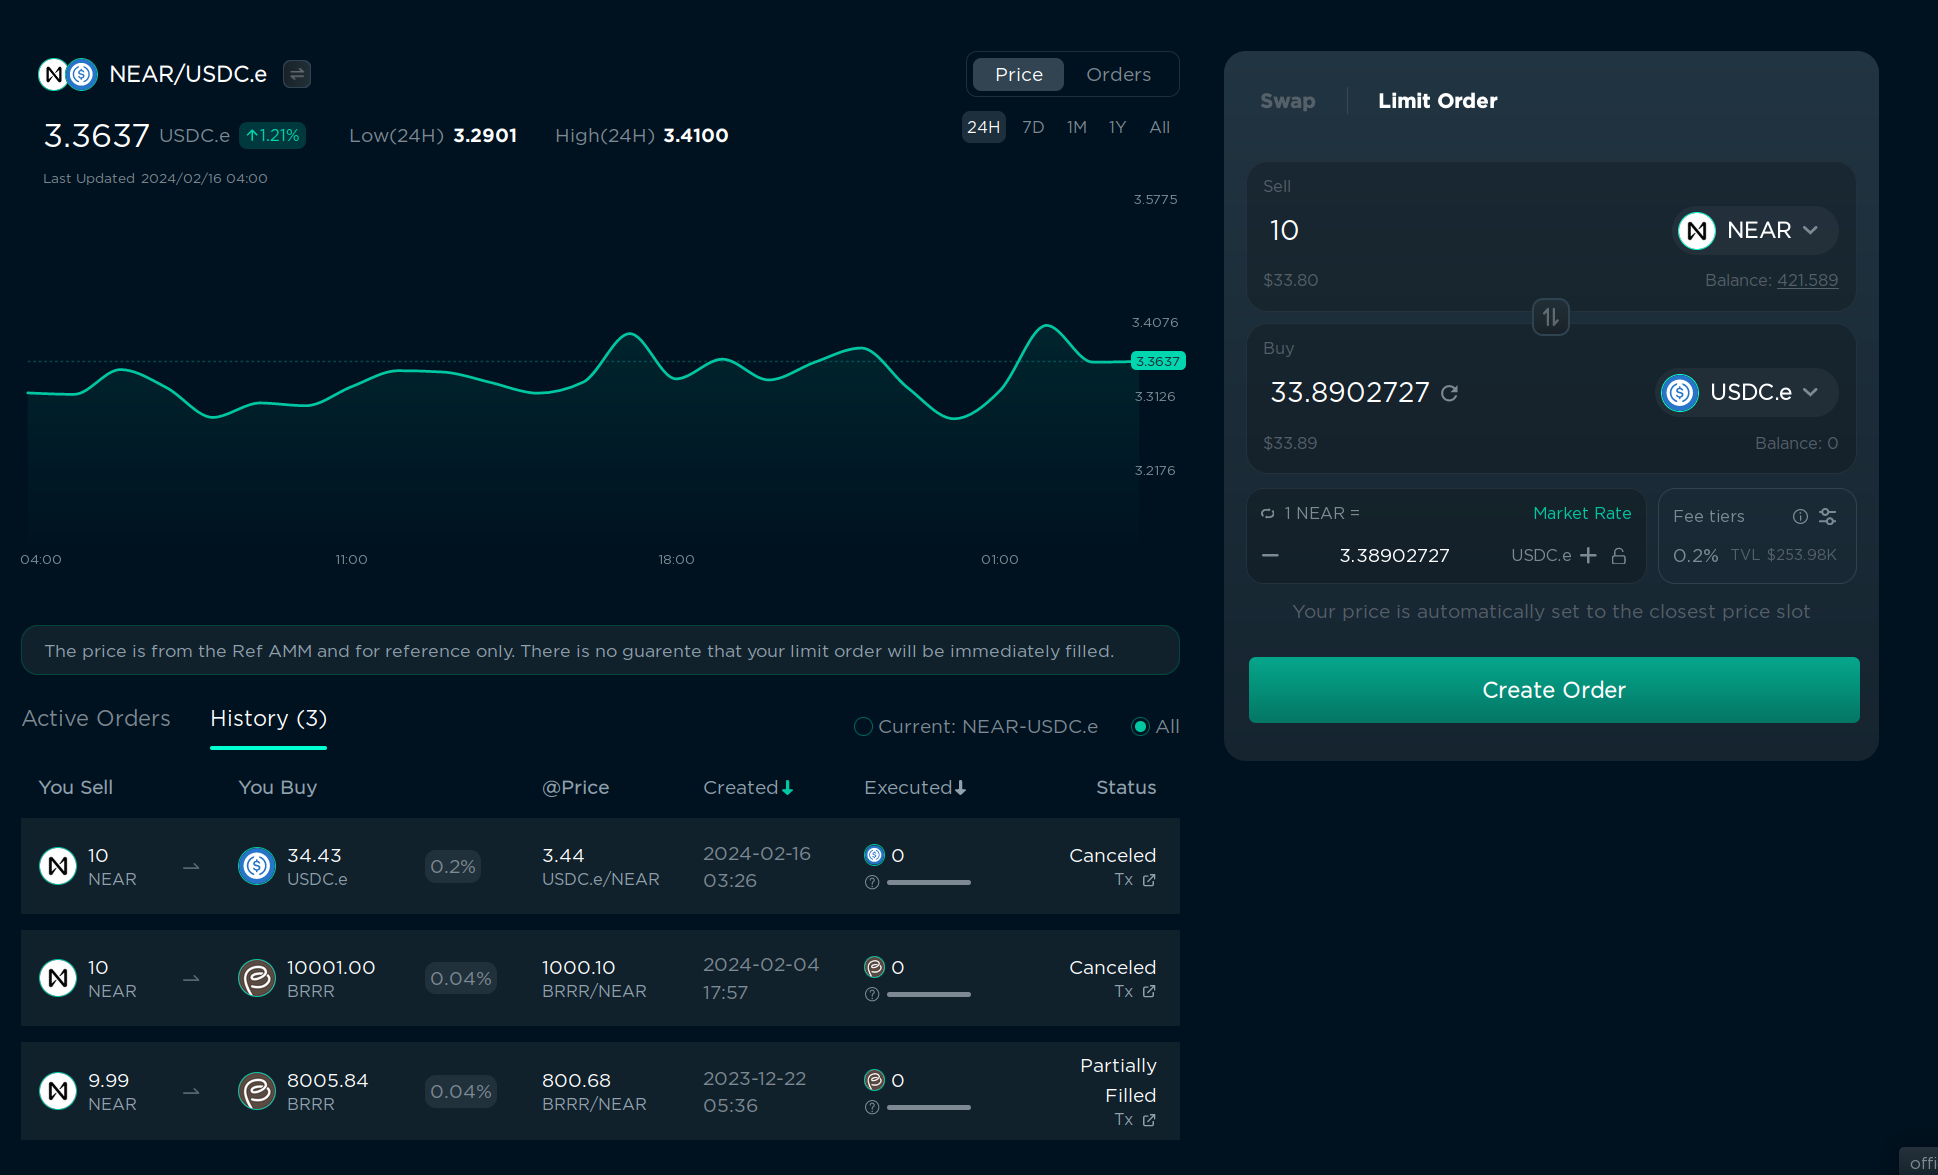
You can see a chart and order history on the left, but let’s focus on the right side.
- In “Sell” you specify the tokens to buy/sell and the amount you want to sell, it’s just like in the “Swap” menu, but the choice of tokens and buy/sell combinations is very limited.
- In “Buy” you can specify the token you want to buy and also the amount. The order price will be calculated automatically. Or you can set the order price in the bottom left corner and the receiving amount will be calculated automatically. You can click “Market Rate” to set the order price to the current market price, and then increase/decrease it as you want.
- In “fee tier” you can choose the fee you want to pay for the order. But usually there is only 1 active tier with all orders, and it’s selected by default, so I don’t recommend changing this.
- Click “Create Order” and confirm the transaction in your wallet. You will need to pay a storage fee of 0.1 NEAR, and the fee will not be refunded when the order is executed or canceled, so for small transactions it could better to use “Swap” instead of “Limit Order”.
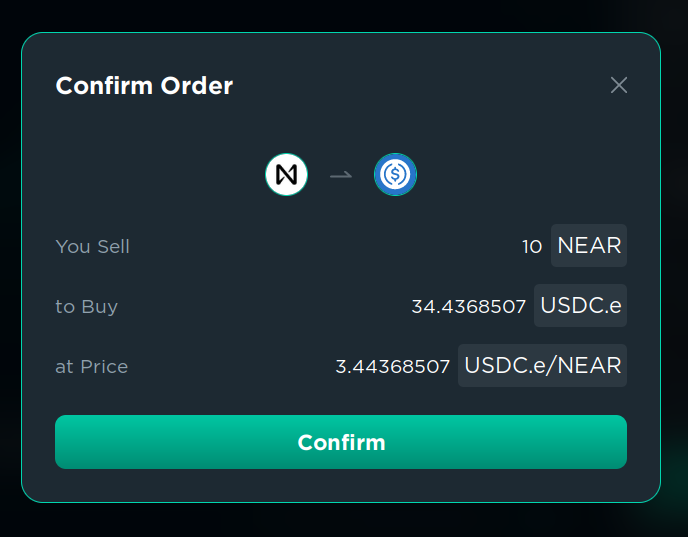
Done. Now you can wait for the price to reach the price you specified.
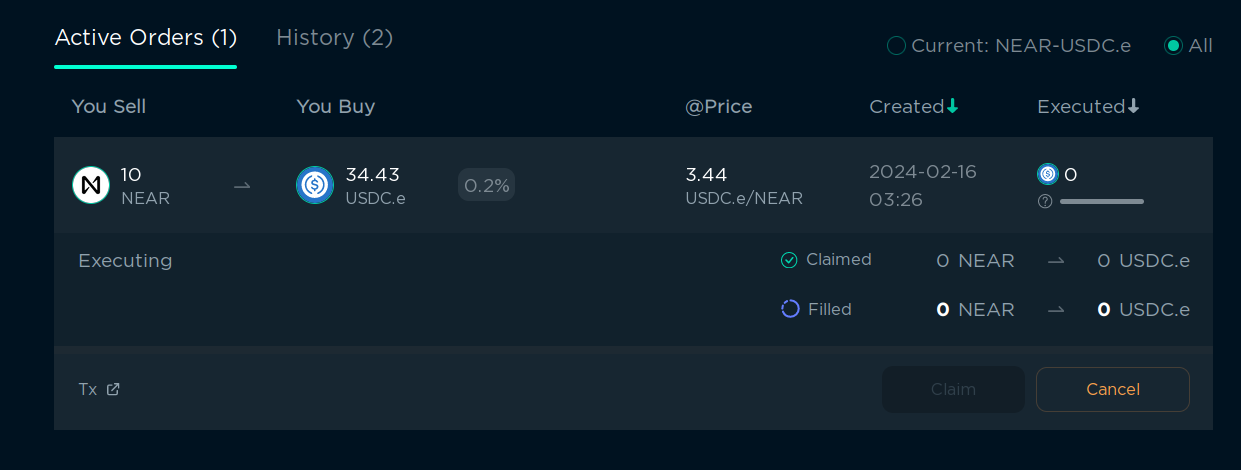
You can see your active orders in the right bottom corner. You can cancel them at any time, or claim the tokens you wanted to buy if the order was executed. It will be executed automatically when the price reaches the price you specified.
You can learn more about Ref in the official documentation
Orderly spot/perpetual trading
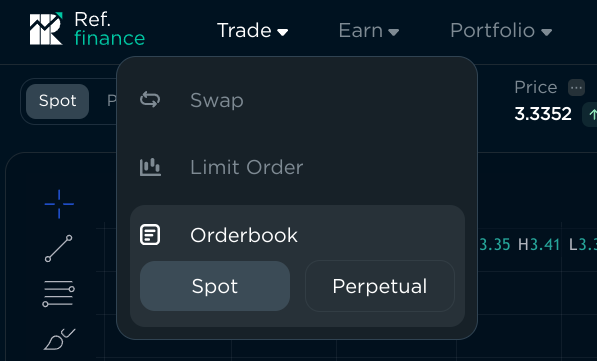
Orderly is a protocol that allows you to trade spot and perpetual tokens with more efficient liquidity. It’s a separate product, but the interface in hosted on ref.finance. You can find Orderly as “Orderbook” in the top left corner of the ref.finance interface:
Warning you probably don’t need to use Orderly if you’re not a professional trader. It’s more complex than ref.finance, and it’s designed for high-frequency traders. Feel free to skip this section if you’re not interested in it.
I’ll only cover the “Spot” section on this page, but they interface is quite similar on perpetual trading.
Experienced traders may find the interface familiar: It has a chart, order book, open orders, and trade history. To start trading, you have to connect your wallet and make a one-time storage deposit of 0.027 NEAR.
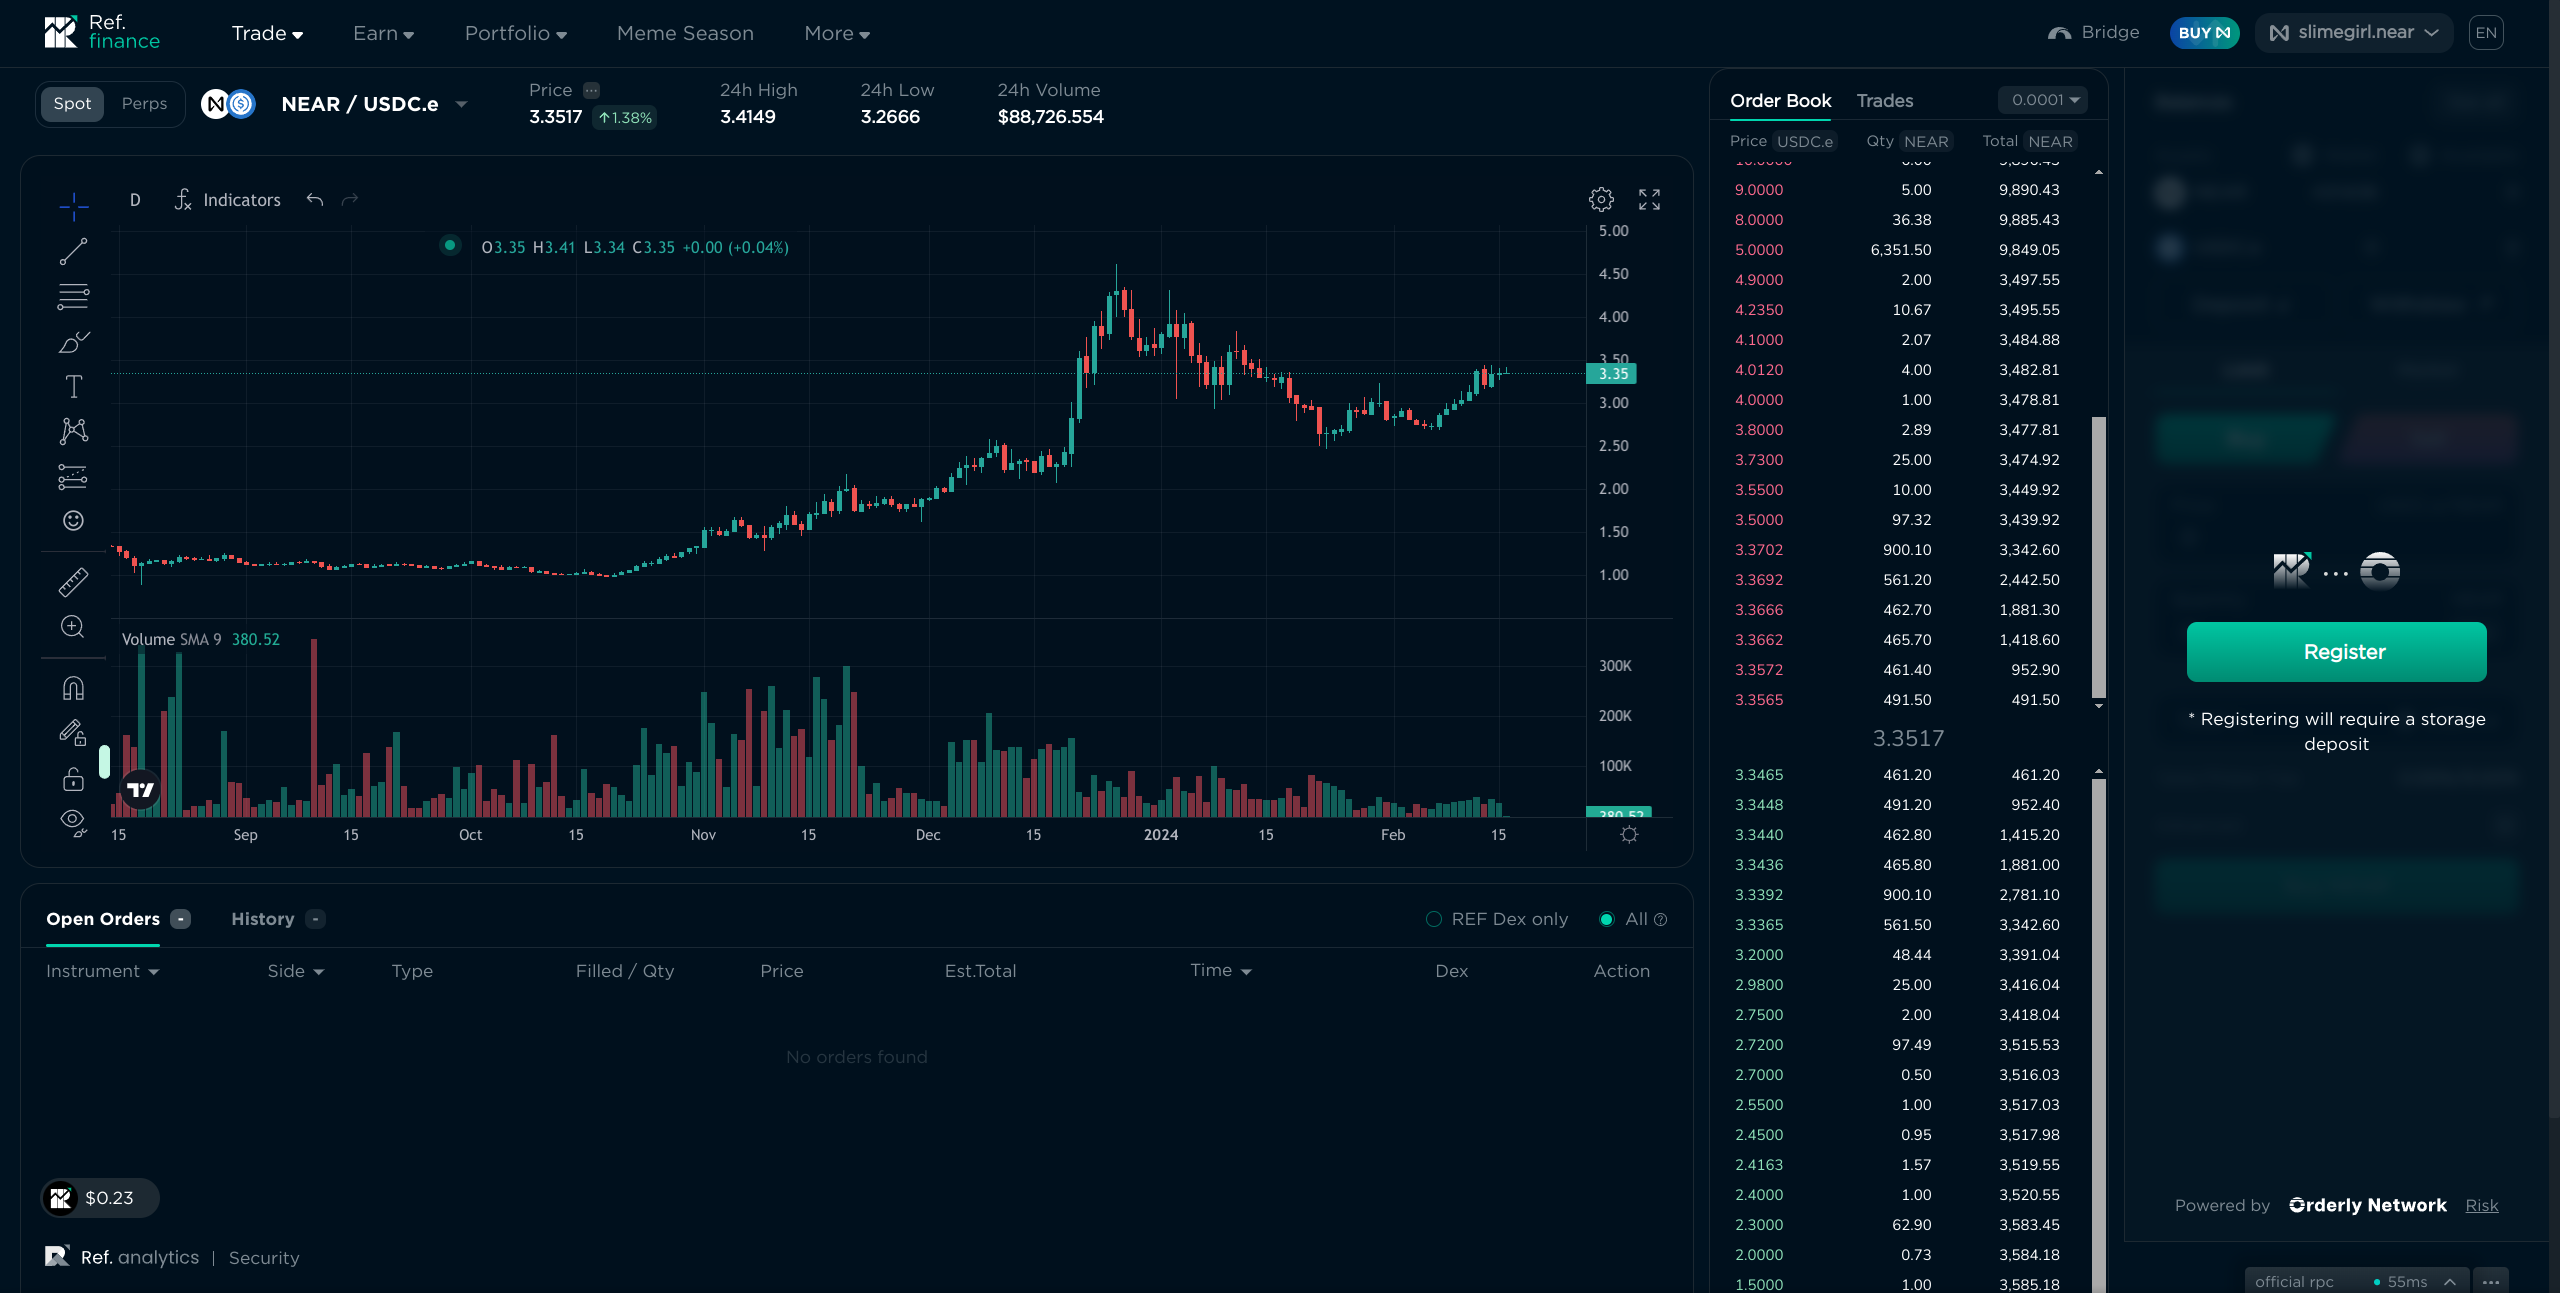
I have selected the pair NEAR/USDC.e, and in the top right corner we can see the balance of my wallet and the balance of my Orderly account. Yes, earlier I said that the money is taken from your wallet and is transferred directly into your wallet, but in Orderly the money is taken from your wallet and is transferred to your Orderly account, and then you can withdraw it to your wallet. This is done to make transactions execute faster and to reduce the fees, which can be important for high-frequency traders.
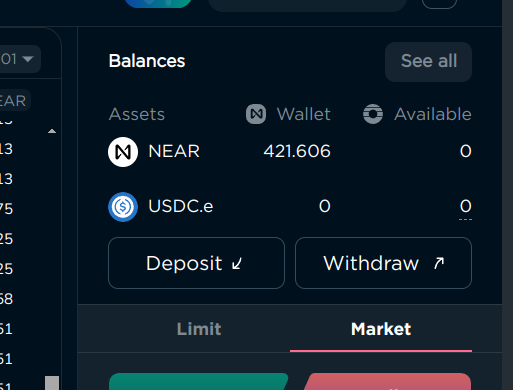
Let’s deposit some NEAR to my Orderly account. Click “Deposit”, specify the amount, and confirm the transaction in your wallet:
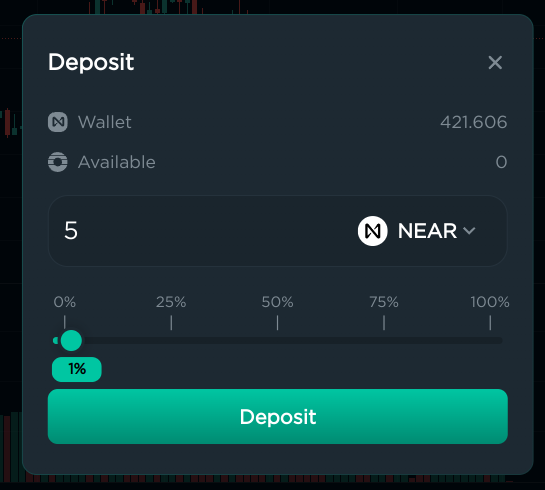
It may require a small (0.005 NEAR) storage deposit if it’s your first time depositing this token to your Orderly account.
Now that we have 5 NEAR in the Orderly account, we can start trading. You can see that there are 2 tabs: “Limit” and “Market”. “Limit” works the same as the limit order in the ref.finance swap menu, and “Market” works the same as “Swap”. Limit has a few advanced options:
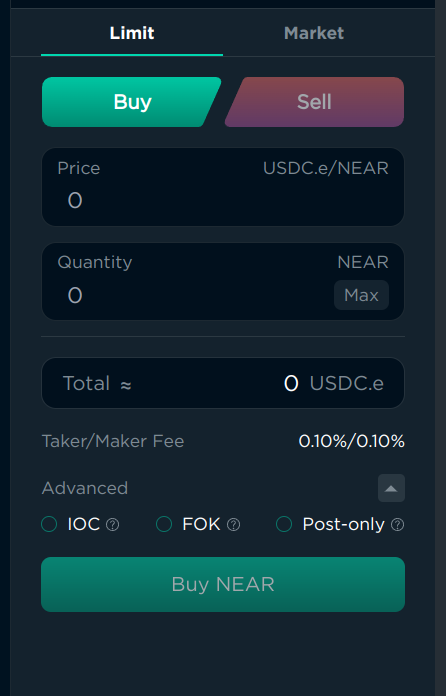
- “IOC” (Immediate or Cancel) will either execute the order immediately, or cancel it if it can’t be executed immediately, if you don’t want to wait for the price to change. It can be useful if you want to “Swap” but set the “Minimum received” manually. But I understand that it could be too hard, so I recommend using “Swap” or “Market” instead if you’re a beginner.
- “FOK” (Fill or Kill) is similar to “IOC”, but it will also not execute the order partially. This is also an advanced feature, and I recommend using “Swap” or “Market” instead if you’re a beginner. If you’re not a beginner, you probably already know what these options are used for, as they exist on all exchanges for professional traders.
- “Post Only” will only execute the order after it was added to the order book, and cancel if it would execute immediately. This is useful if the fees are lower for “maker” orders than for “taker” orders, but on spot trading the fees are the same, so it’s almost useless, here, but useful on perpetual trading.
Fees
You can see the fees under “Total”, and they are separated into “Maker” and “Taker” fees. You are a “Maker” if you add an order to the order book using “Limit” order that is not executed immediately, and you are a “Taker” if you use “Market” order or “Limit” order that is executed immediately. In our case, for NEAR/USDC.e at the time of writing it’s 0.1% for both.
You pay this fee when you buy or sell tokens, and the other person also pays this fee, so when you buy and sell $10, you pay $0.02 and other traders also pay $0.02.
Order book
When you add an order, it’s checked against the order book, and if the price can be matched with an existing order, the transaction will be executed immediately. If not, your order will be added to the order book, and it will be executed when someone else adds an order that matches your price. You can see the order book in the middle of the interface, and you can see the price, amount, and total amount of the orders for the specific prices.

When you add a “Market” order, it will always match with the best price available in the order book.
Chart
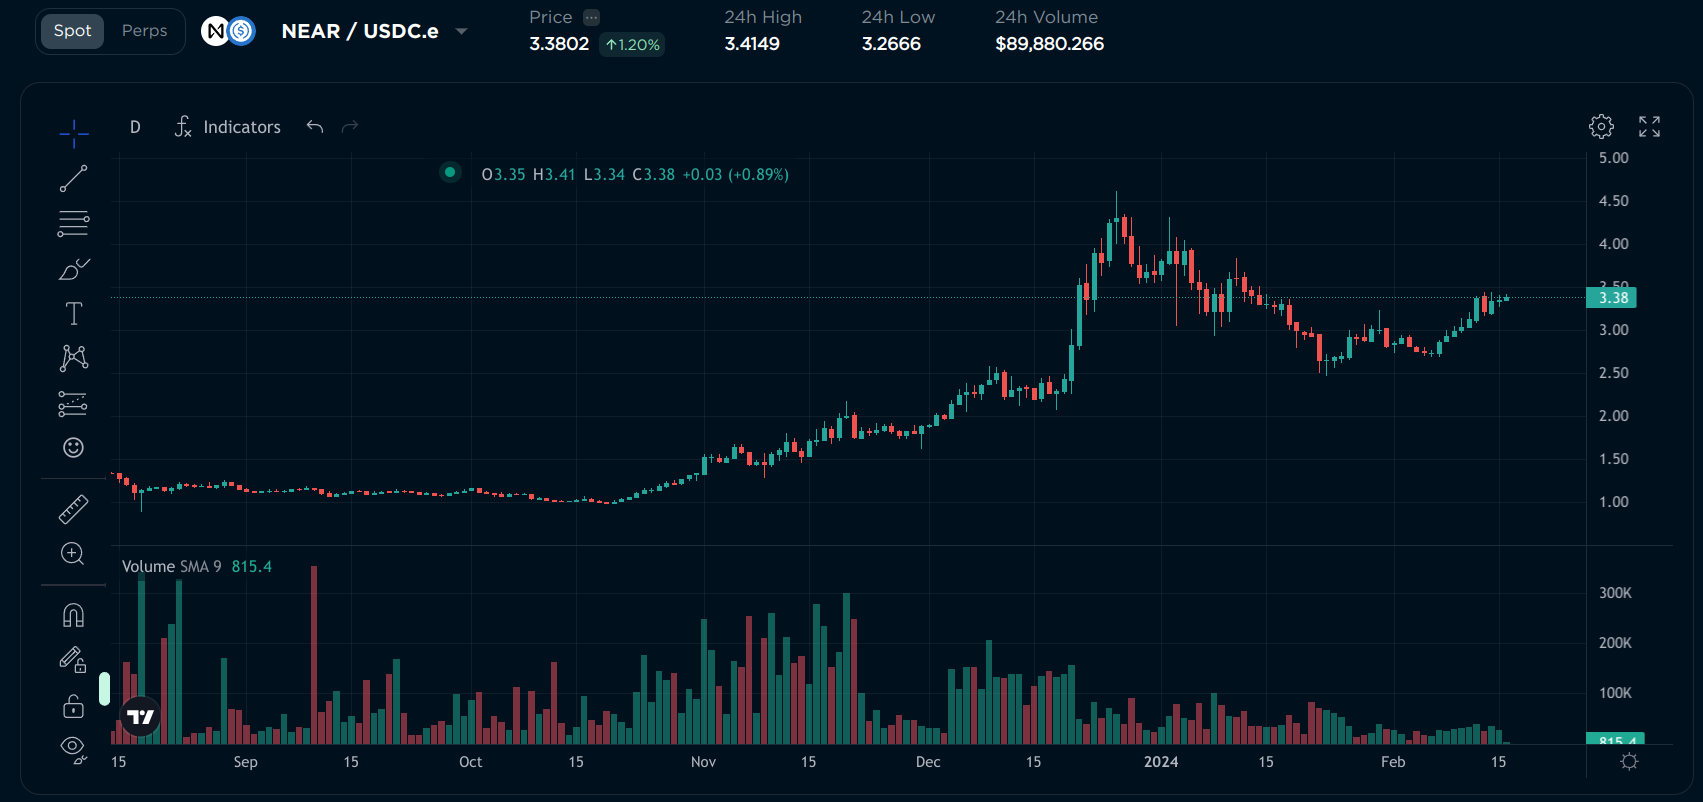
I won’t teach you how to read candlestick charts or use TradingView, there are a lot of tutorials on the internet about it. But above the chart, there are some useful statistics:
- Price: The current price of the token
- 24h High: The highest price of the token in the last 24 hours
- 24h Low: The lowest price of the token in the last 24 hours
- 24h Volume: The total amount of this token traded on Orderly in the last 24 hours. High volume means that the token is popular and the prices are more stable, while low volume means that the token is not popular and the prices can differ from other exchanges.
Opening orders
When you add a “Market” order, it will be executed immediately. When you add a “Limit” order, it will be added to the order book, and you can see your active orders below the chart. You can modify the order quantity and price by clicking the number (I know it doesn’t look clickable, but it actually is). You can also cancel the order by clicking the “Cancel” button on the right.

Withdrawal
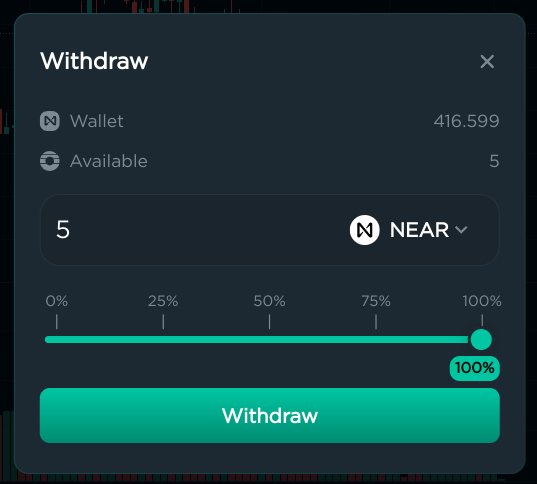
When you’re done trading, you can withdraw your tokens to your wallet. Click “Withdraw” in the top right corner, specify the amount, and confirm the transaction in your wallet.
Buying crypto with fiat
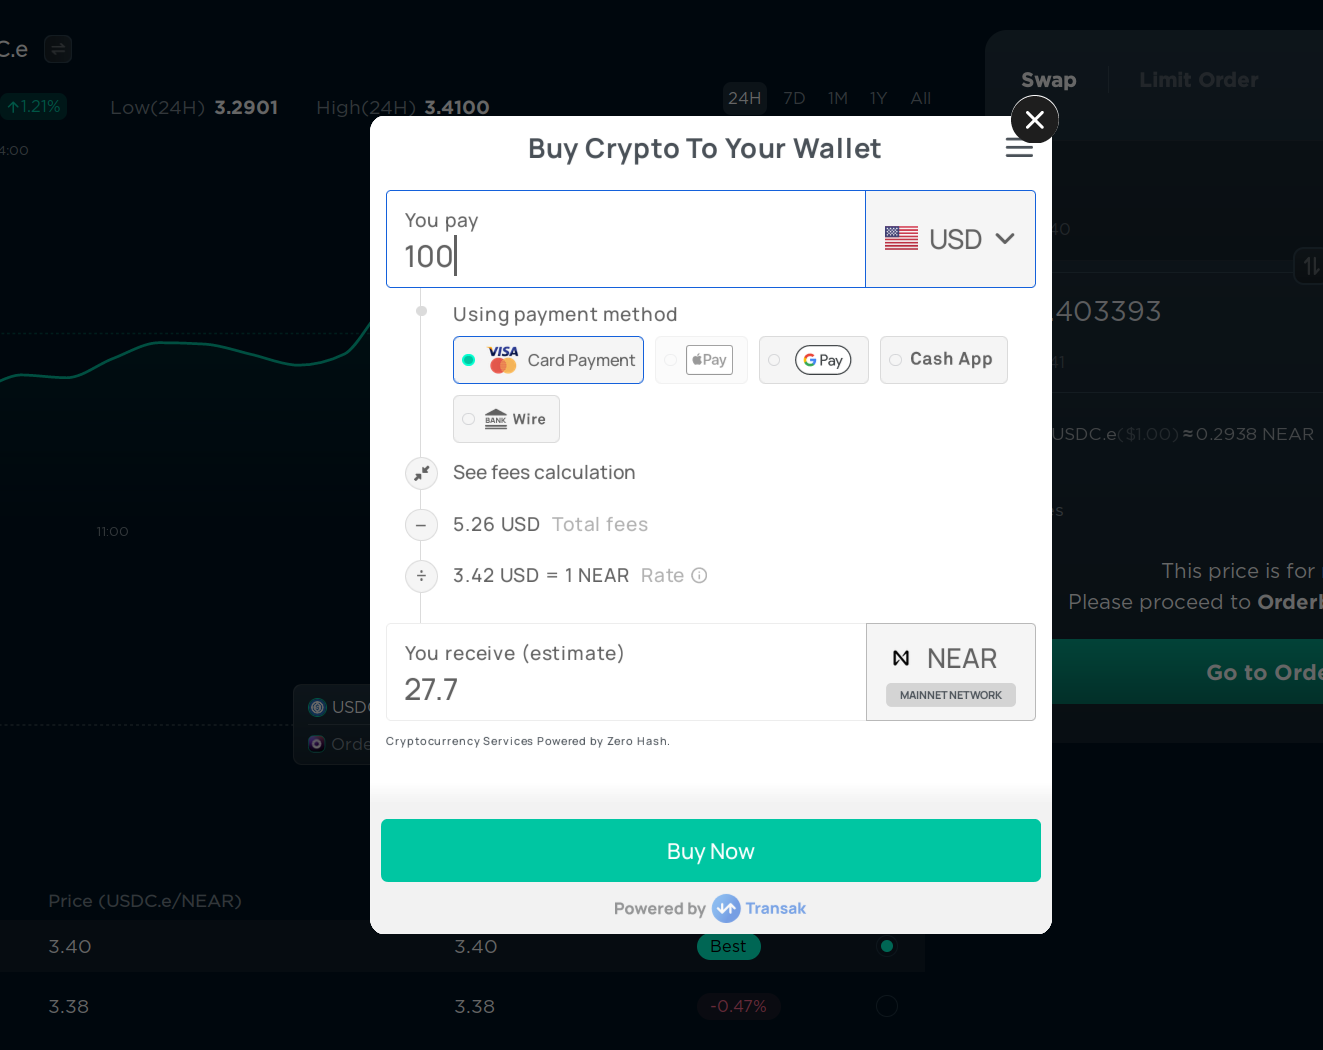
If you have USD or EUR or any other fiat currency, you can buy cryptocurrencies with it on ref.finance using the “Buy” button in the top right corner. This is done using Transak, a third-party service that allows you to buy cryptocurrencies with fiat. It’s not available in all countries, and the fees are usually higher than on exchanges, but it’s one of the easiest ways to buy cryptocurrencies with fiat without leaving ref.finance. Currently, only NEAR can be bought with fiat, but you can always swap NEAR for any other token.
CEX
CEX (centralized exchanges) are exchanges that are owned by a company, and they have control over your tokens. They are usually faster and have more features than DEXes, but they are also less secure and you have to trust the company that owns the exchange.
Here’s the difference between DEXes and CEXes:
| Feature | DEX | CEX |
|---|---|---|
| Registration | Connect your wallet | You need to create an account on the exchange, deposit money, and then you can swap tokens from your account on the exchange. Usually exchanges also require you to verify an email, set up 2-factor authentication, complete KYC (upload your ID or other government-issued document + record a video of your face), and sometimes even wait for a few days for the verification to be completed. Some territories may be banned from using the exchange. |
| Ownership | When you swap, the money is taken from your wallet and is transferred directly into your wallet | The money is taken from your wallet and is transferred to your account on the exchange, and then you can withdraw it to your wallet |
| Speed of exchange | Usually 3-5 seconds | Usually 1 second |
| Speed of deposit and withdrawal | Doesn’t need a deposit or withdrawal | Usually less than 1 hour |
| Fees | Usually 0.3% for 1 exchange (but can be changed for each token) | Usually around 0.1% for an exchange, and around $1 for withdrawal |
| Security risks | Can be hacked, but if you’re only exchanging tokens there, your money is in your wallet, so it probably won’t affect you much. There are security guarantees that the DEX’s creator or developers can’t access your funds | Can be hacked, and if all your money is in the exchange, it can be lost. Also, you have to trust the exchange to not block your account or to not steal your money (which happens quite often, even with the biggest exchanges) |
| Tokens available | Anyone can add their tokens to a DEX, so a lot of NEAR-based tokens are available. But you need to be careful, because some tokens can be scams or have a very low liquidity. | Usually only the most popular tokens are available, because the exchange checks if the project is legit. But it doesn’t mean that the token is good, it just means that the project has money to pay for the listing and is not an outright scam. CEXes support tokens from multiple blockchains, not just NEAR |
| Ease of use | Specify an amount and the token you want. But DEXes usually lack advanced trader tooling | Usually CEXes have more advanced features. Could be hard to use for beginners who never traded anything, but experienced traders in other markets will find the interface familiar |
| Fiat currencies | Usually not available, some DEXes may have a partner that allows you to buy tokens with fiat, but usually the rate is not the best. | Usually available, you can buy or sell your cryptocurrencies for your national currency |
OTC
OTC (over-the-counter) is a way to buy or sell tokens directly from another person, without using an exchange. It’s useful if you want to buy a lot of tokens at once without changing the price, or if you want to buy a token that is not available on any exchange (for example, directly from the founder before listing). When you use OTC, you have to trust the person you’re trading with, or use a trusted third party to hold the tokens until the transaction is completed, which usually costs a fee. It’s slower and less secure than using a DEX or CEX, so it’s used very rarely.
Paras
Paras is an NFT marketplace on NEAR. It allows creators to mint NFTs and collectors to buy, sell, and trade them. As far as I know, the Paras team is currently working on another project, and Paras is not being actively developed, has many broken links and outdated content, but it’s still usable, lists new collections, and is probably the most popular NFT marketplace on NEAR, followed by Mintbase.
Discovering collections to buy
Probably the best way to find NFTs to buy is to follow the creators you like on social media and see if they have any NFTs for sale. If you are actively monitoring social media, you will quite often find new NFT collections that will increase in price when the masses find out about them.
But if you are not actively monitoring social media, you can also use the Paras marketplace to find NFTs to buy. On the homepage, you can see the top collections in 7 days, sorted by trading volume:
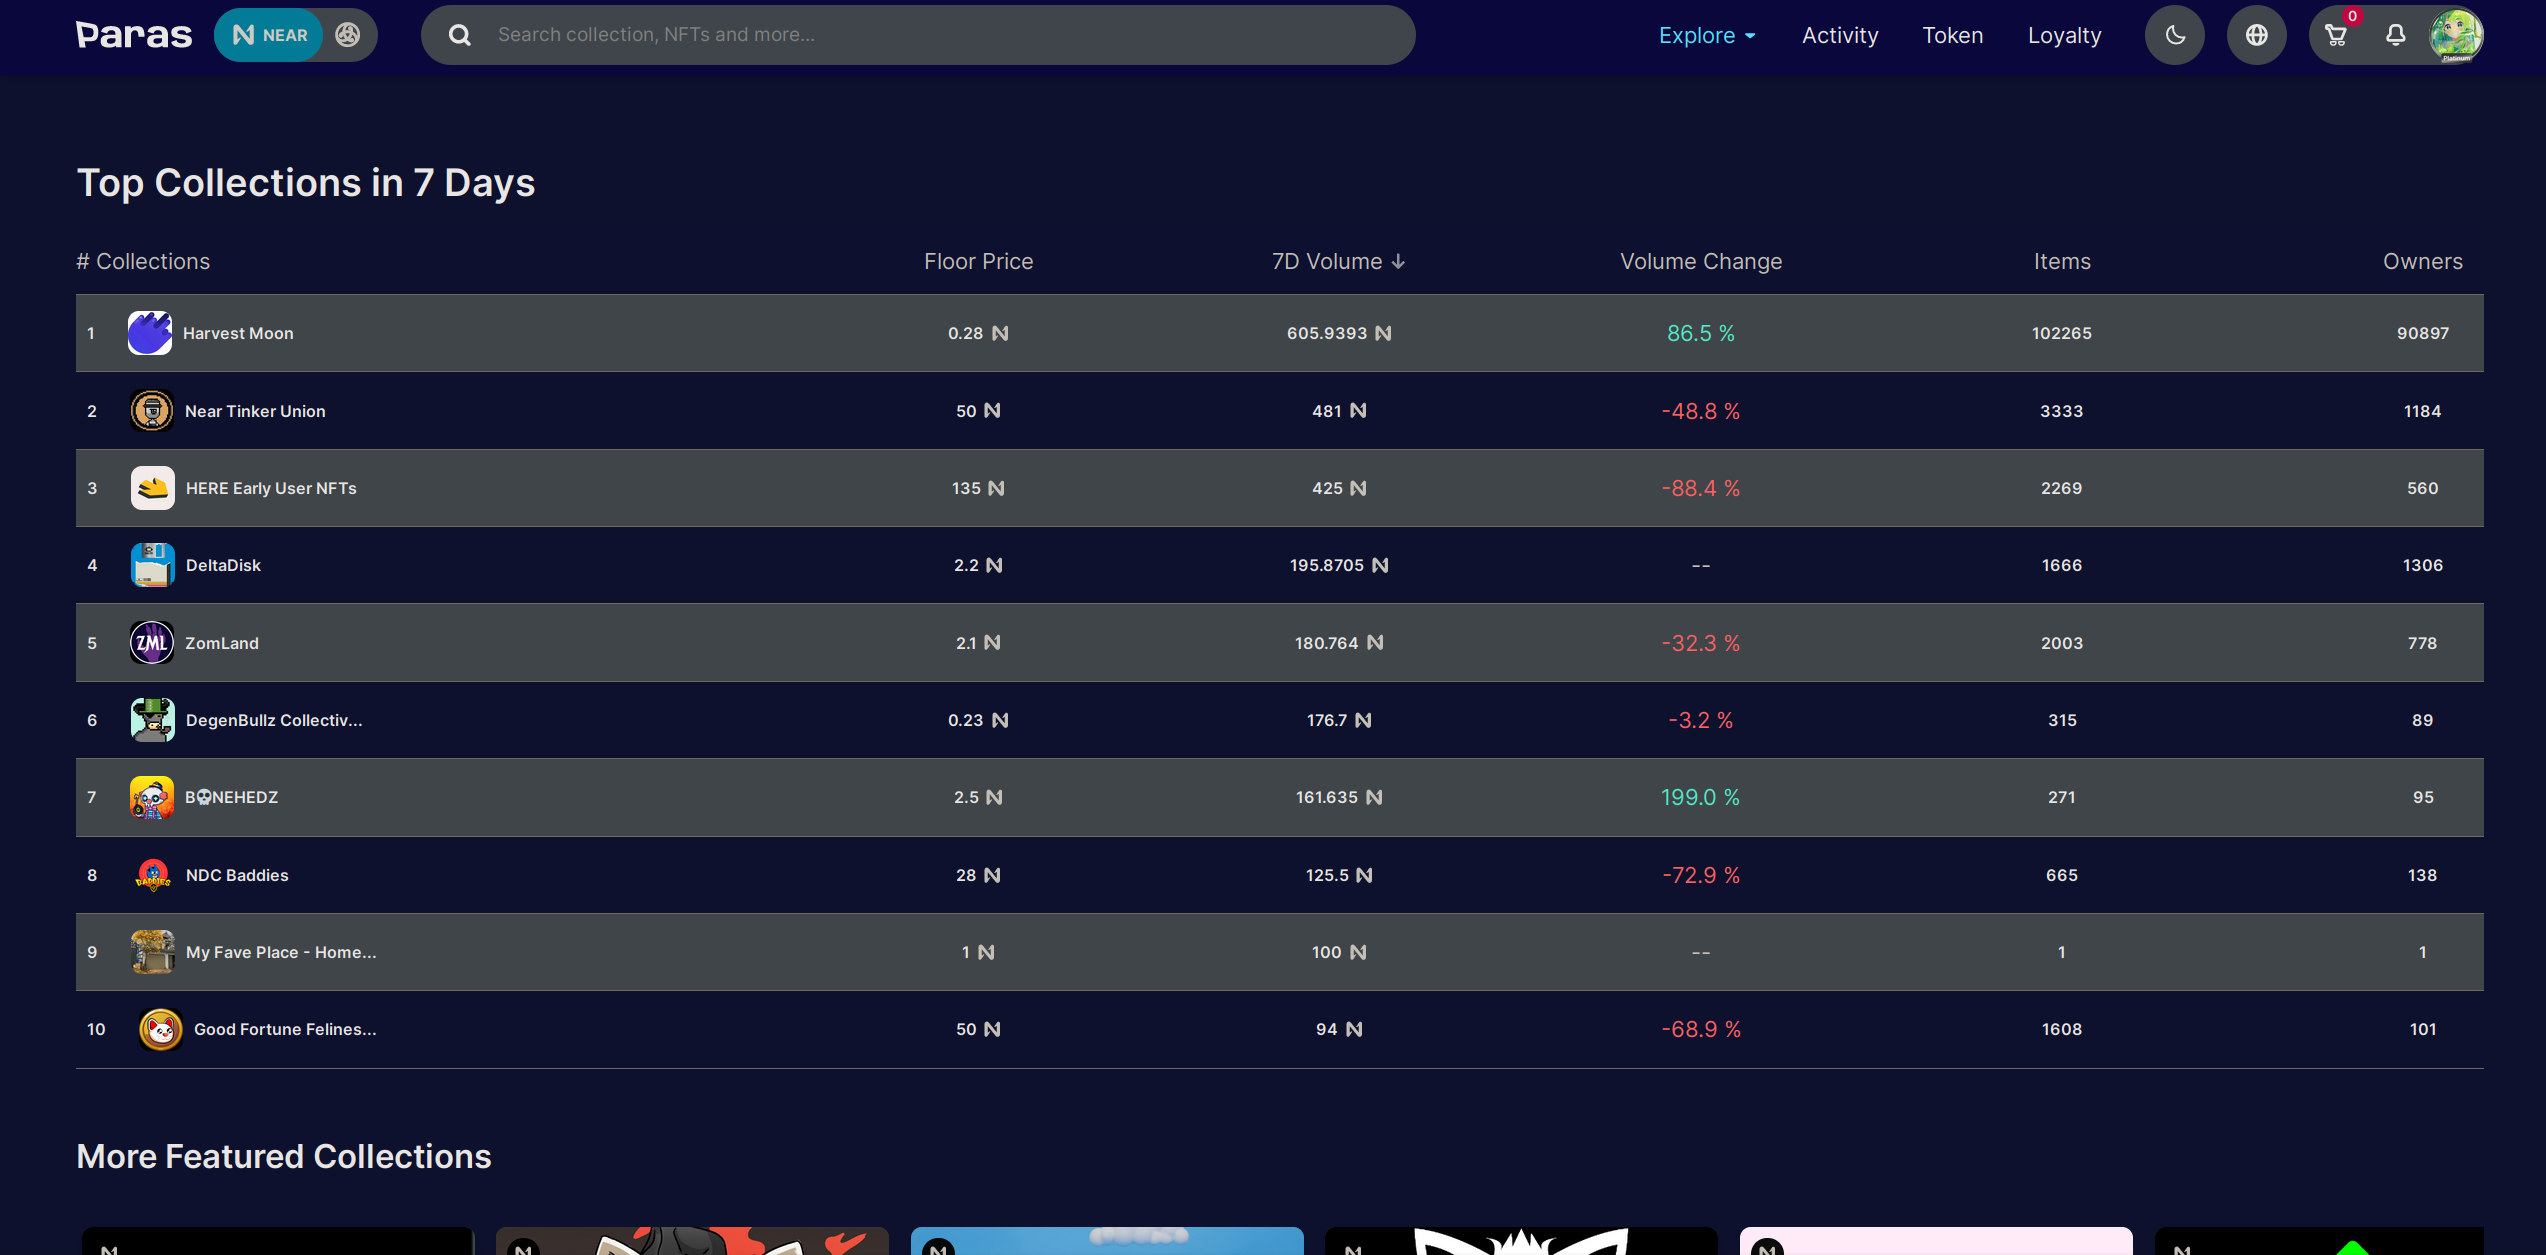
Below the top collections, you can see “More Featured Collections”, “Apex Collector Buys Today”, “Highest Sales”, “Whats Happening”, but I don’t recommend using these to find NFTs to buy, because some of them are not updated frequently and some of them are just not meant for discovering new NFTs to buy.
Which NFT to buy in a collection?
First of all, decide the reason why you are buying an NFT:
- Do you want to just support the creator and buy the NFT you like? Then just buy the one you like.
- Does it have a utility, like access to a community, a game, or can be staked to get FT? Buy the cheapest one with the utility you want. The cheapest NFT price in a collection is called the collection’s “floor” price.
- Do you want to buy it to sell it later for a profit? Most likely, you will want to buy the cheapest one, but it’s not always the case. Sometimes the rarest NFTs have the highest potential for profit.
Most NFTs are not the same: they have a rank, traits, or other attributes that make them unique. For example, let’s take Near Tinker Union:
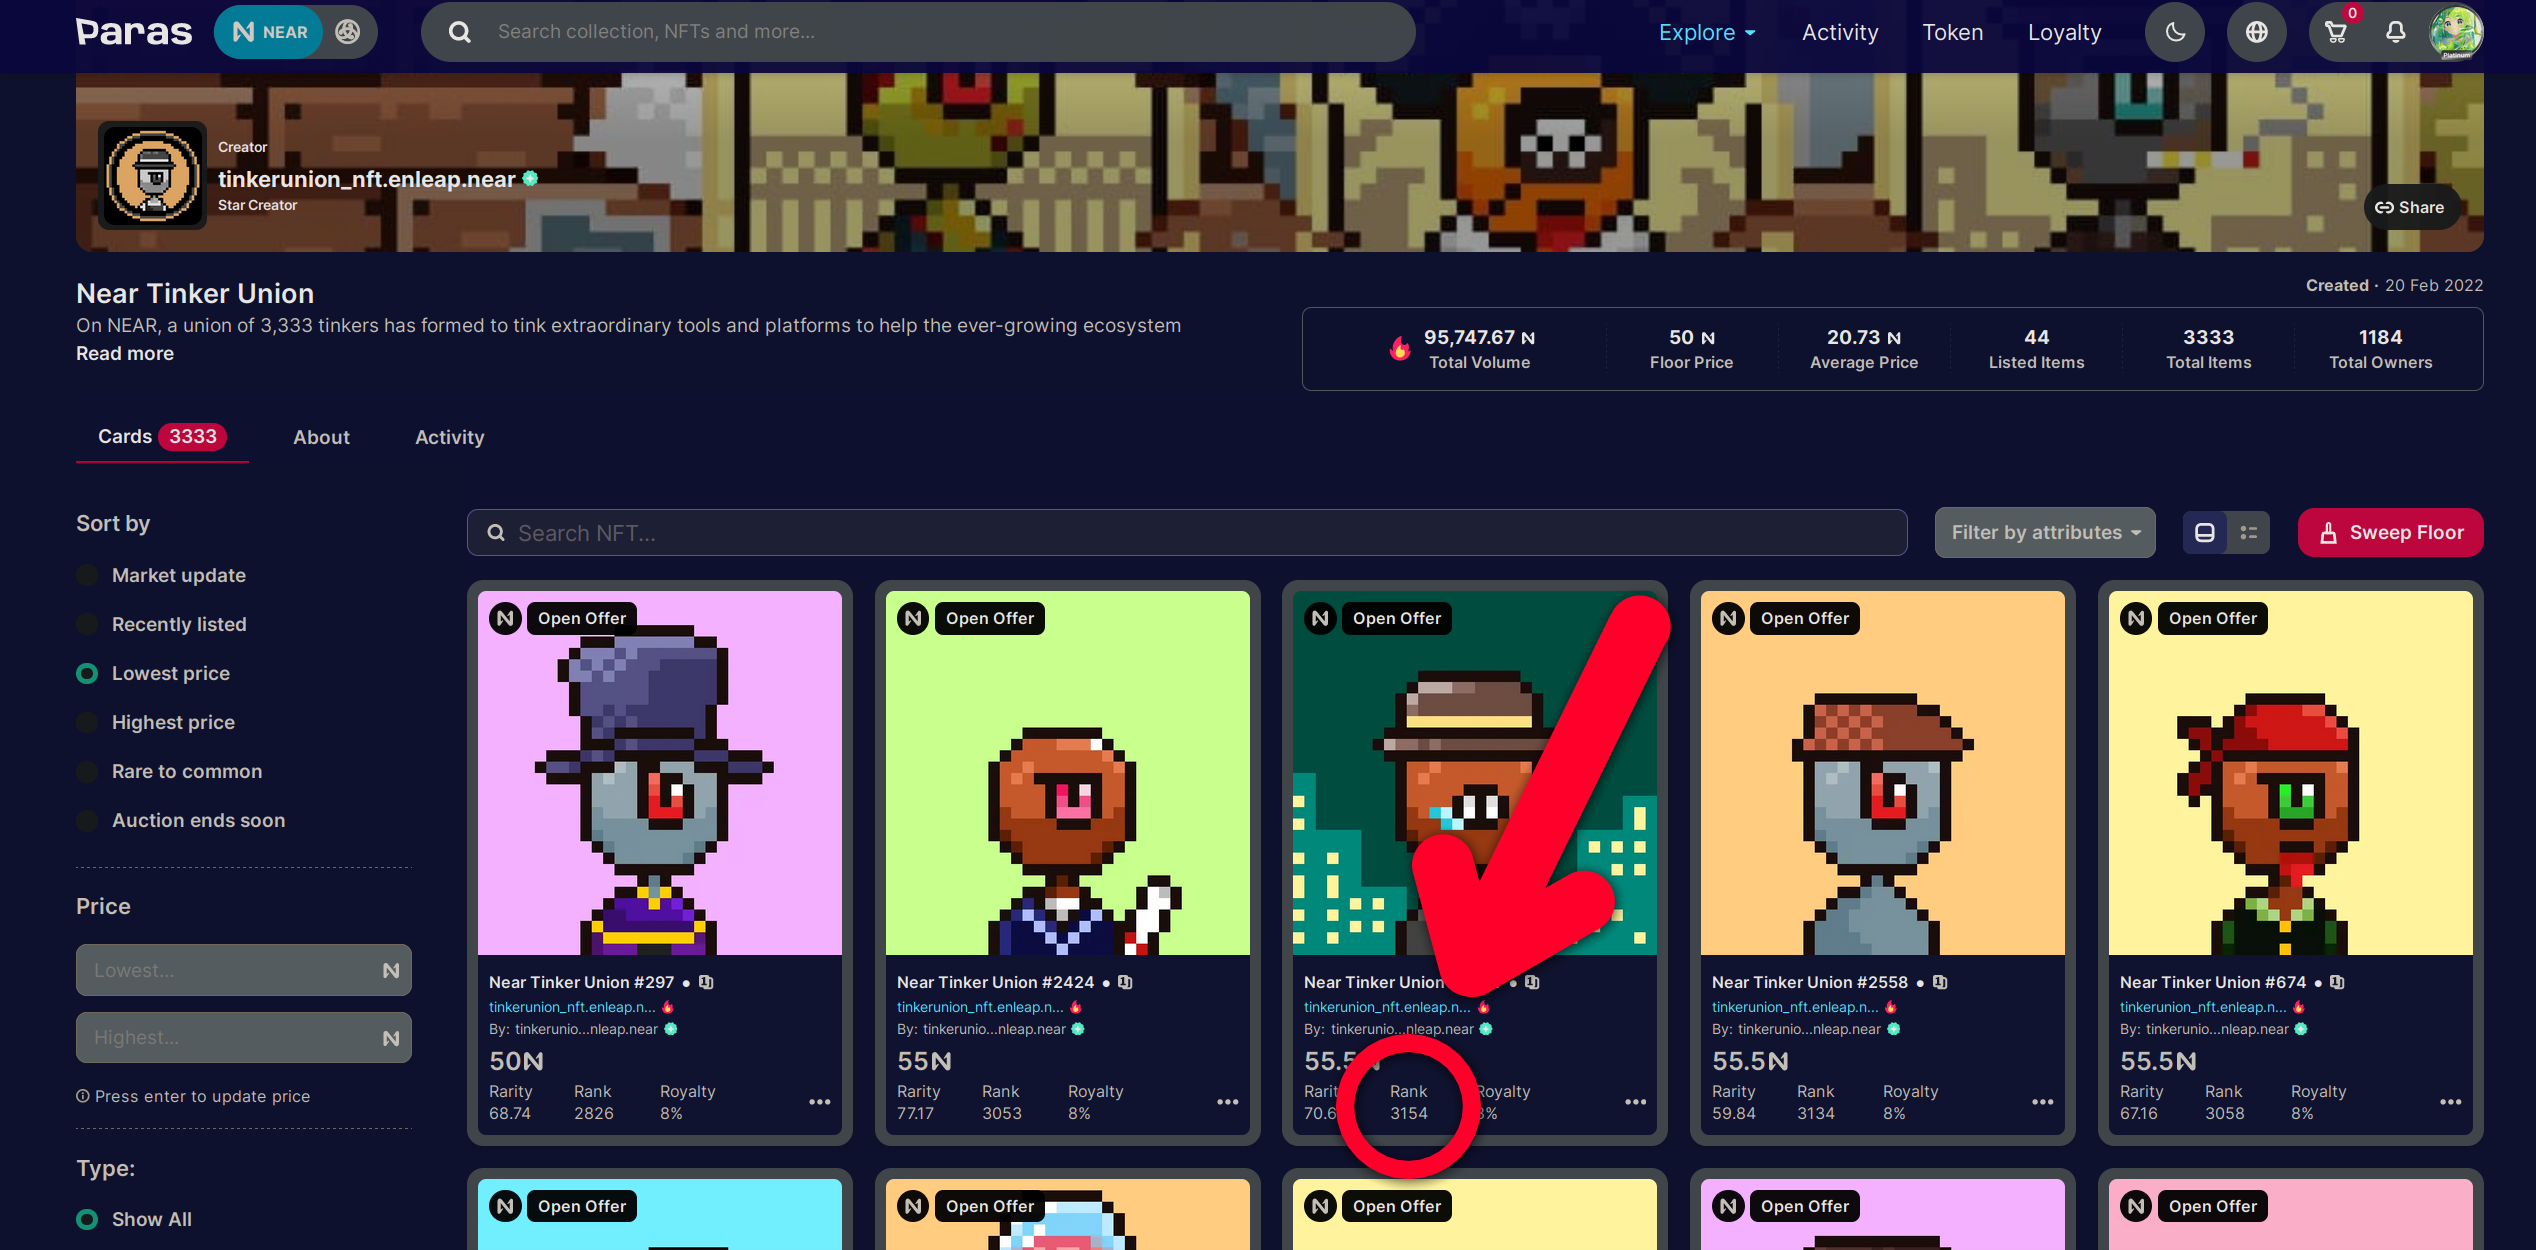
If you do some research, you will find out that these NFTs can be staked to get $GEAR, and the amount of GEAR depends on the rank of the NFT. The rank is visible below the price on the NFT card. Let’s take another example, NDC Baddies:
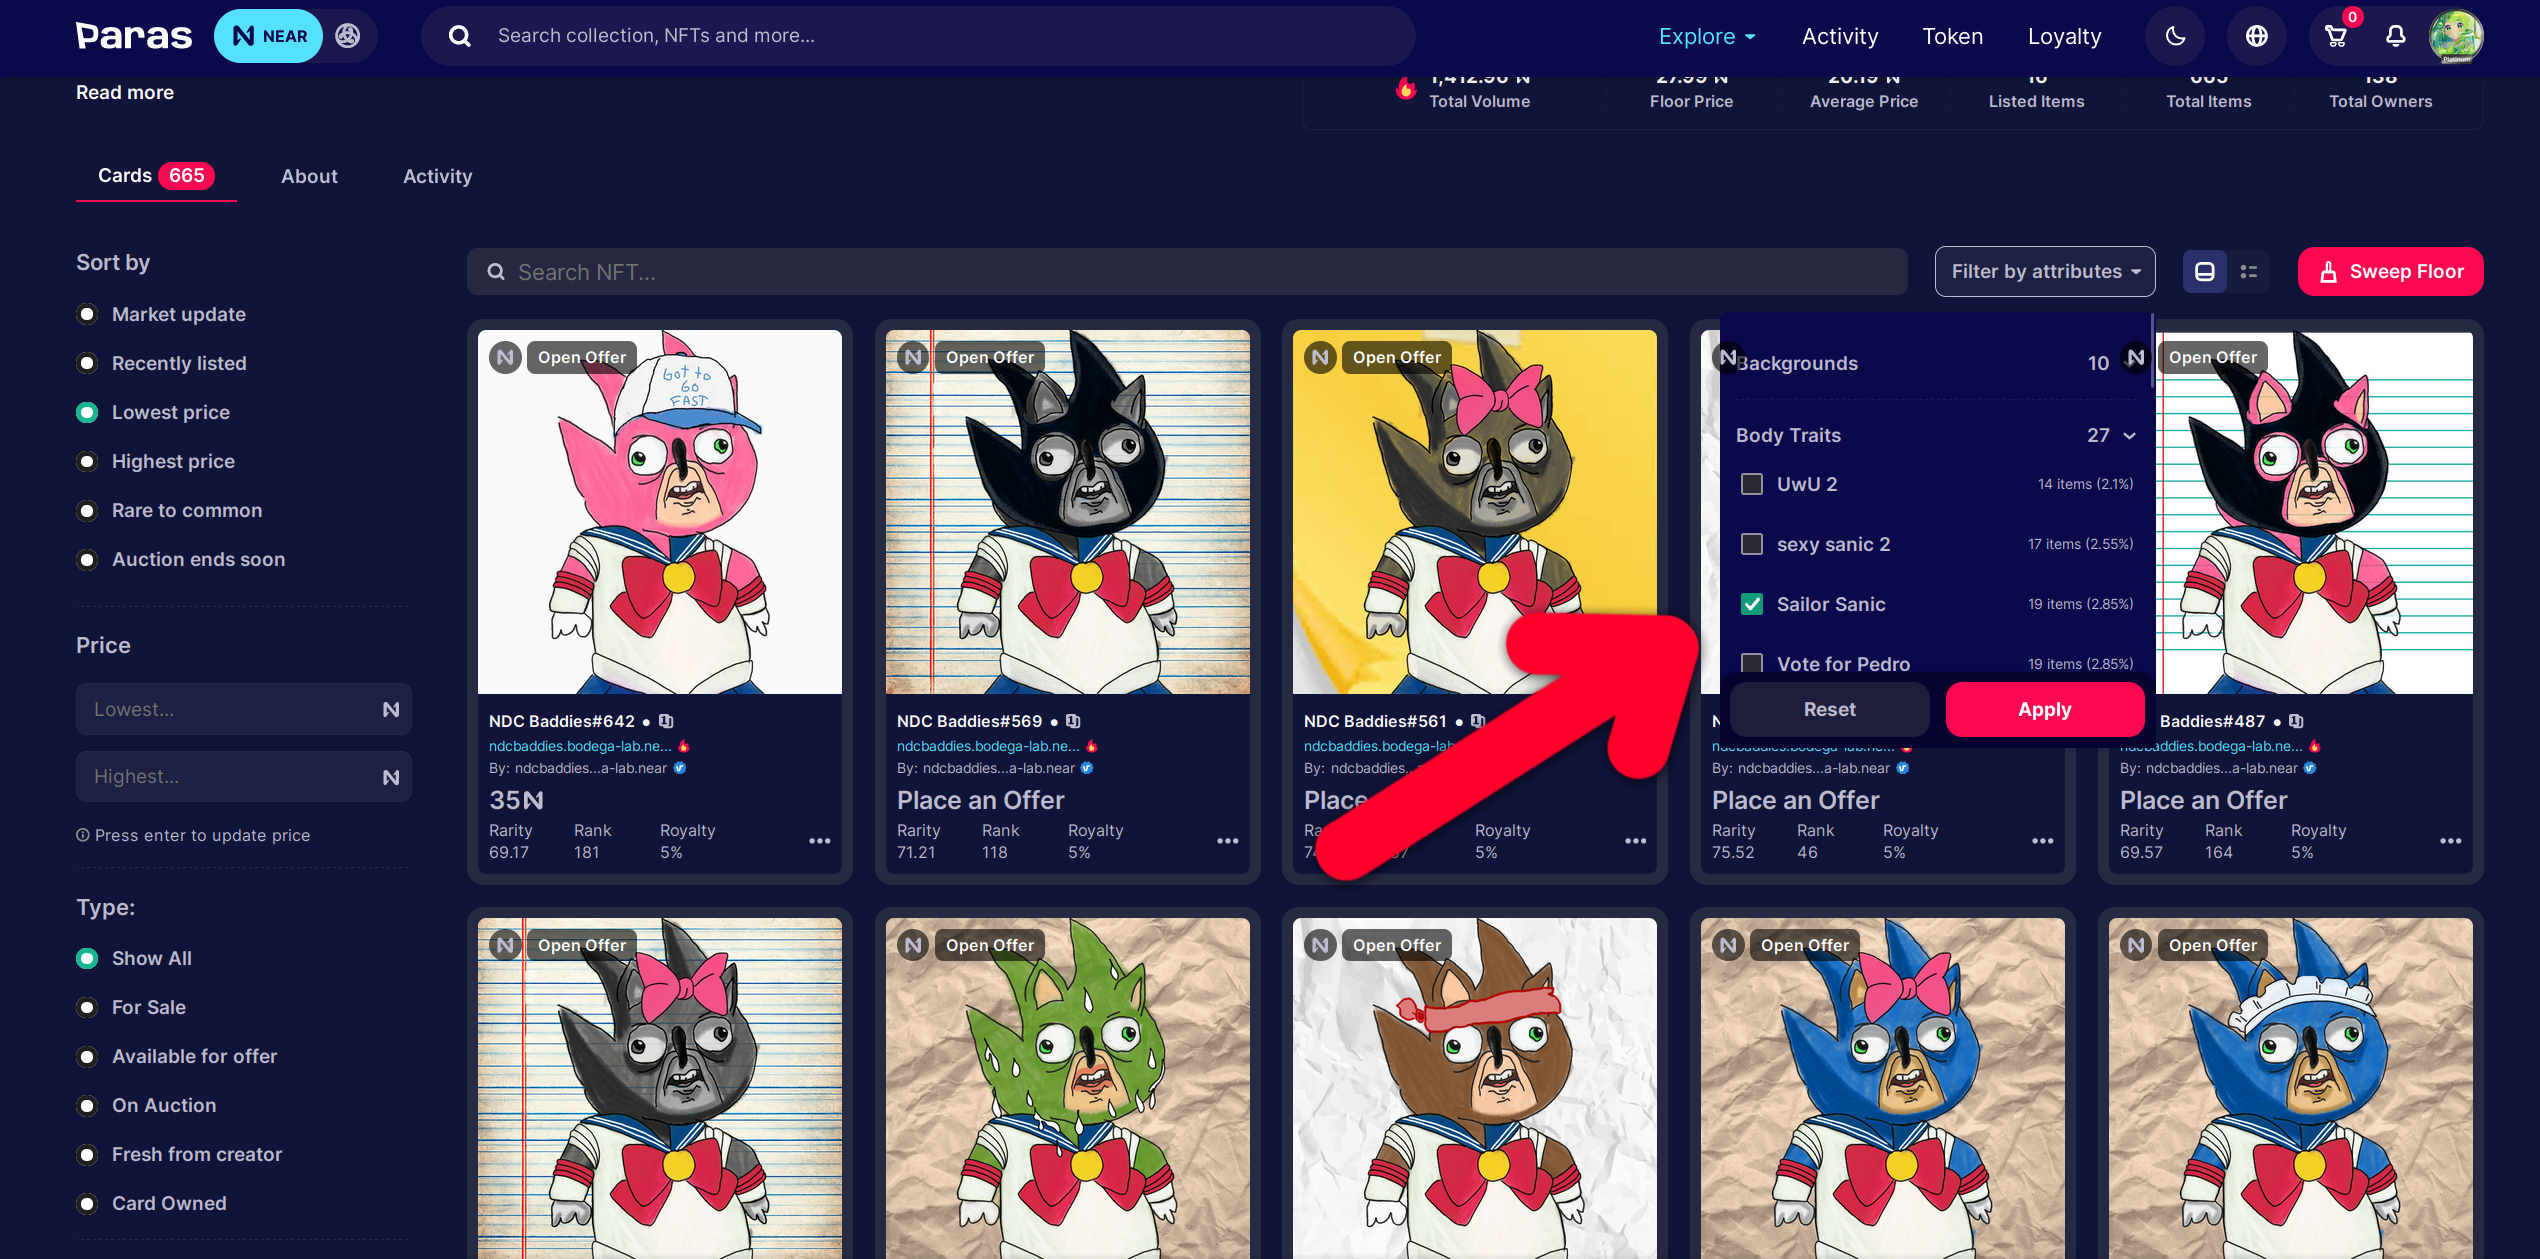
These NFTs don’t have a utility as of writing, purely a speculative asset, but they have attributes - you can filter NFTs by “Body Traits: Sailor Sanic” and see all NFTs with this trait. They will usually have something in common, like the same clothes, and they may be more or less valuable depending on their attributes and uniqueness. But most people just buy the cheapest one and don’t care about attributes, so don’t overthink it. Here’s another example, B💀NEHEDZ:
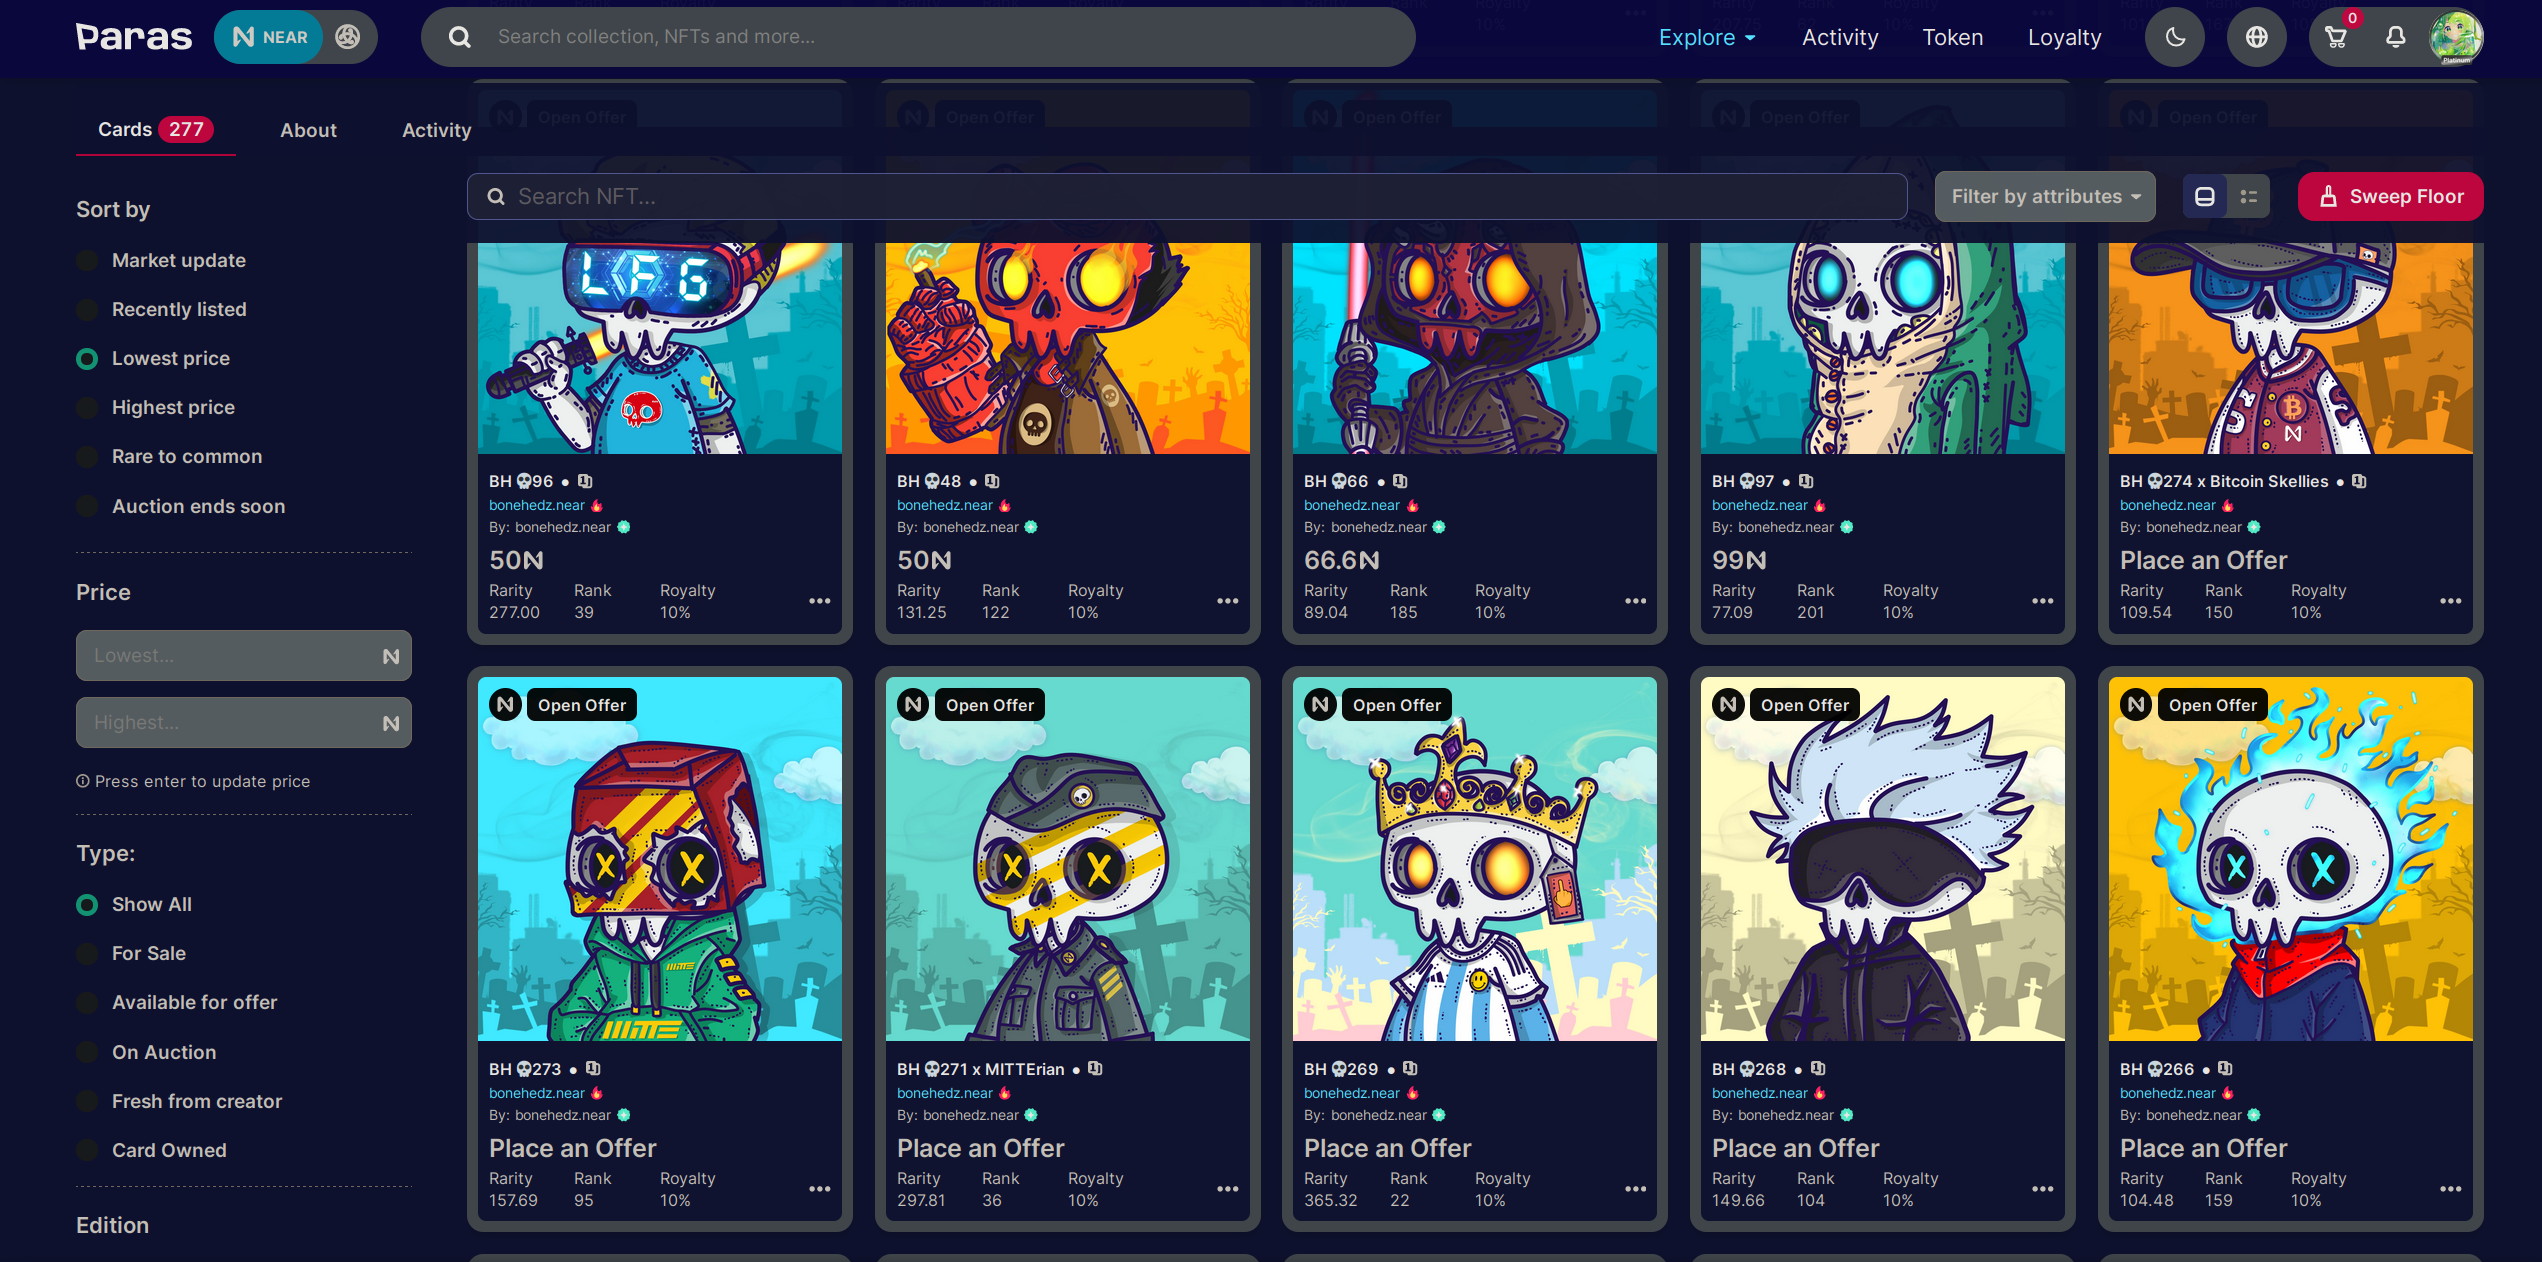
Personally I don’t care about the rarity of this NFT or its rank, I just want Gojo Satoru, so I buy him and enjoy the rest of my life.
It’s very important to check the NFT activity in the “Activity” tab. If the NFT has a lot of sales, it’s probably a good buy, but if you see that there’s a good volume but it’s all from the same person, it could be wash trading - the person is buying and selling the NFT to themselves to increase the volume and make it look like the NFT is popular. But it’s always a good idea to check the project’s social media and double-check the activity.
Buying an NFT
Click the NFT to open its details:
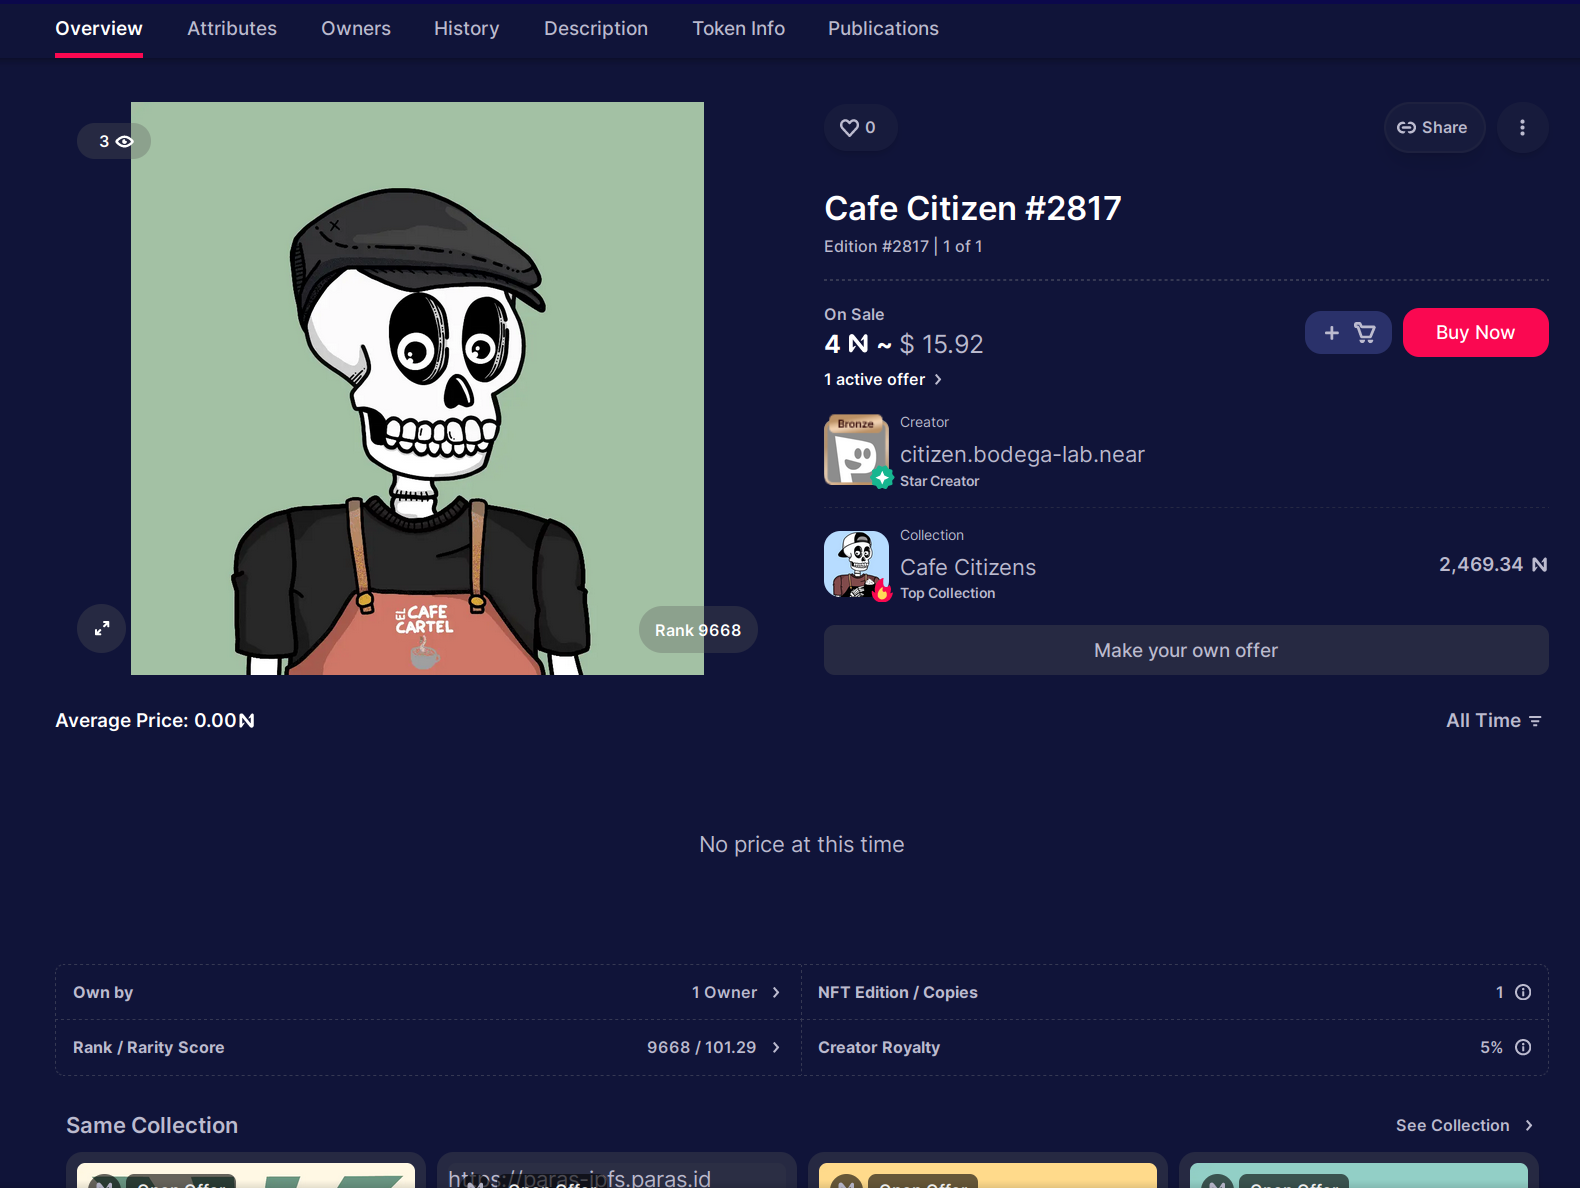
You can see the price, the rank, rarity score (no one really uses it as of writing), royalty percentage, and the owner. If you want to buy it, click “Buy Now” and confirm the transaction in your wallet.
If you scroll down, you can see the NFT’s attributes, transfer history, and other information.
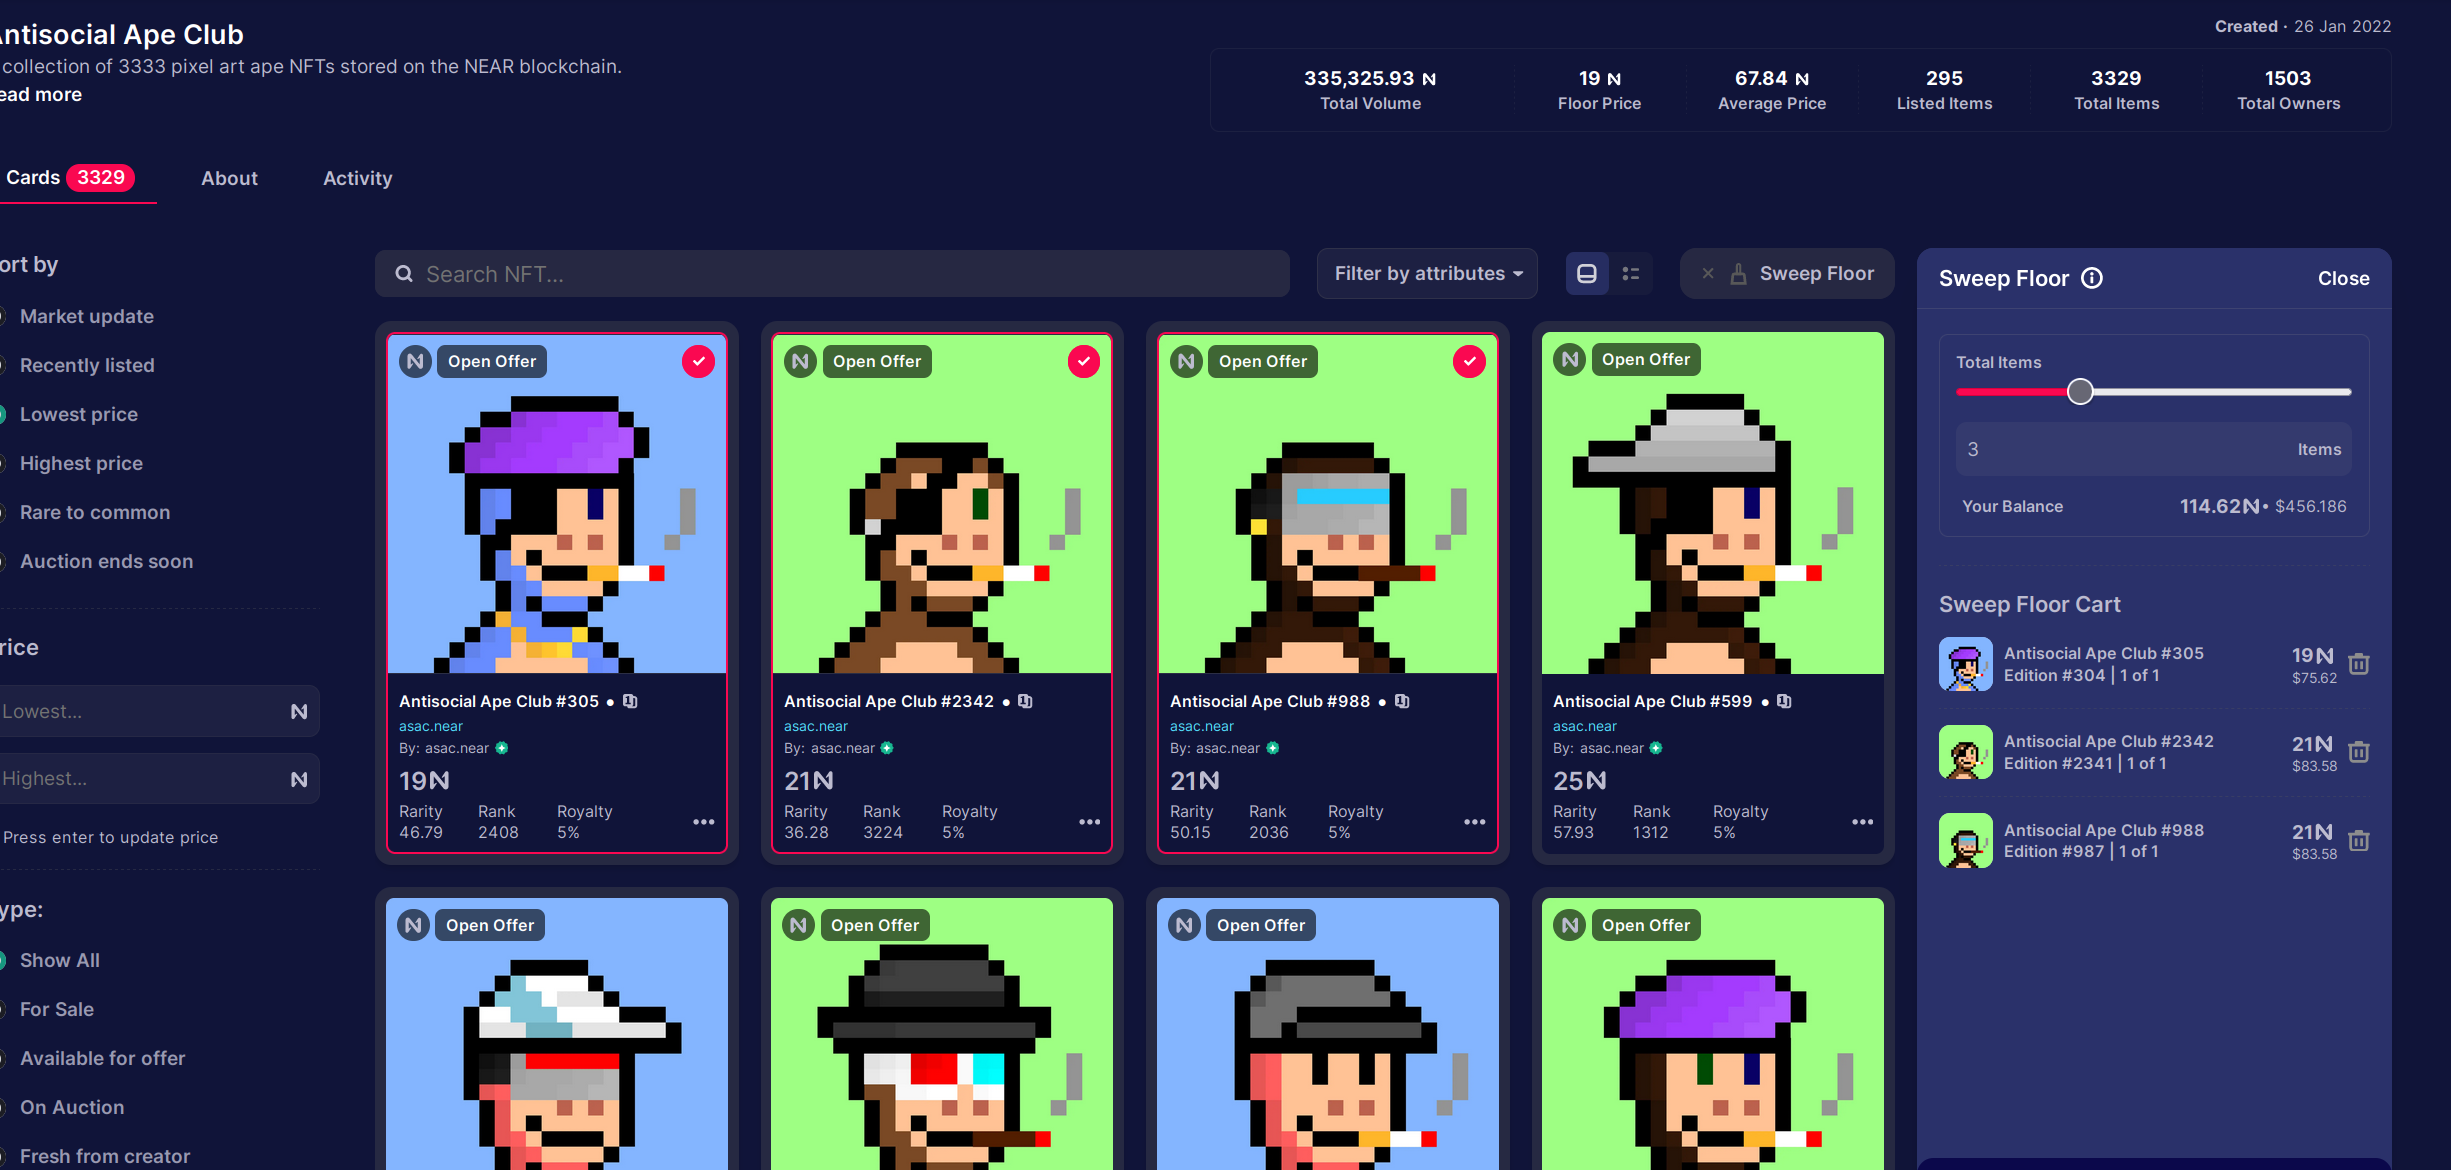
Sweeping floor
If you want to buy a lot of the cheapest NFTs in a collection, you can use the “Sweep floor” button. It will buy all the NFTs with the lowest prices in the collection.
Adding an offer
While buying an NFT is a simple way to get it right now, using offers is a very underrated way to get NFTs for a lower price. If you are not in a hurry, you can add an offer (using “Make your own offer” button) and wait for the owner to accept it. I recommend setting the offer to 10-20% lower than the current price, but it’s up to you. If you’re adding an offer to a floor NFT, there’s a good chance the owner is desperate to sell it here and now, so quite often it actually works and you get the NFT for a lower price.
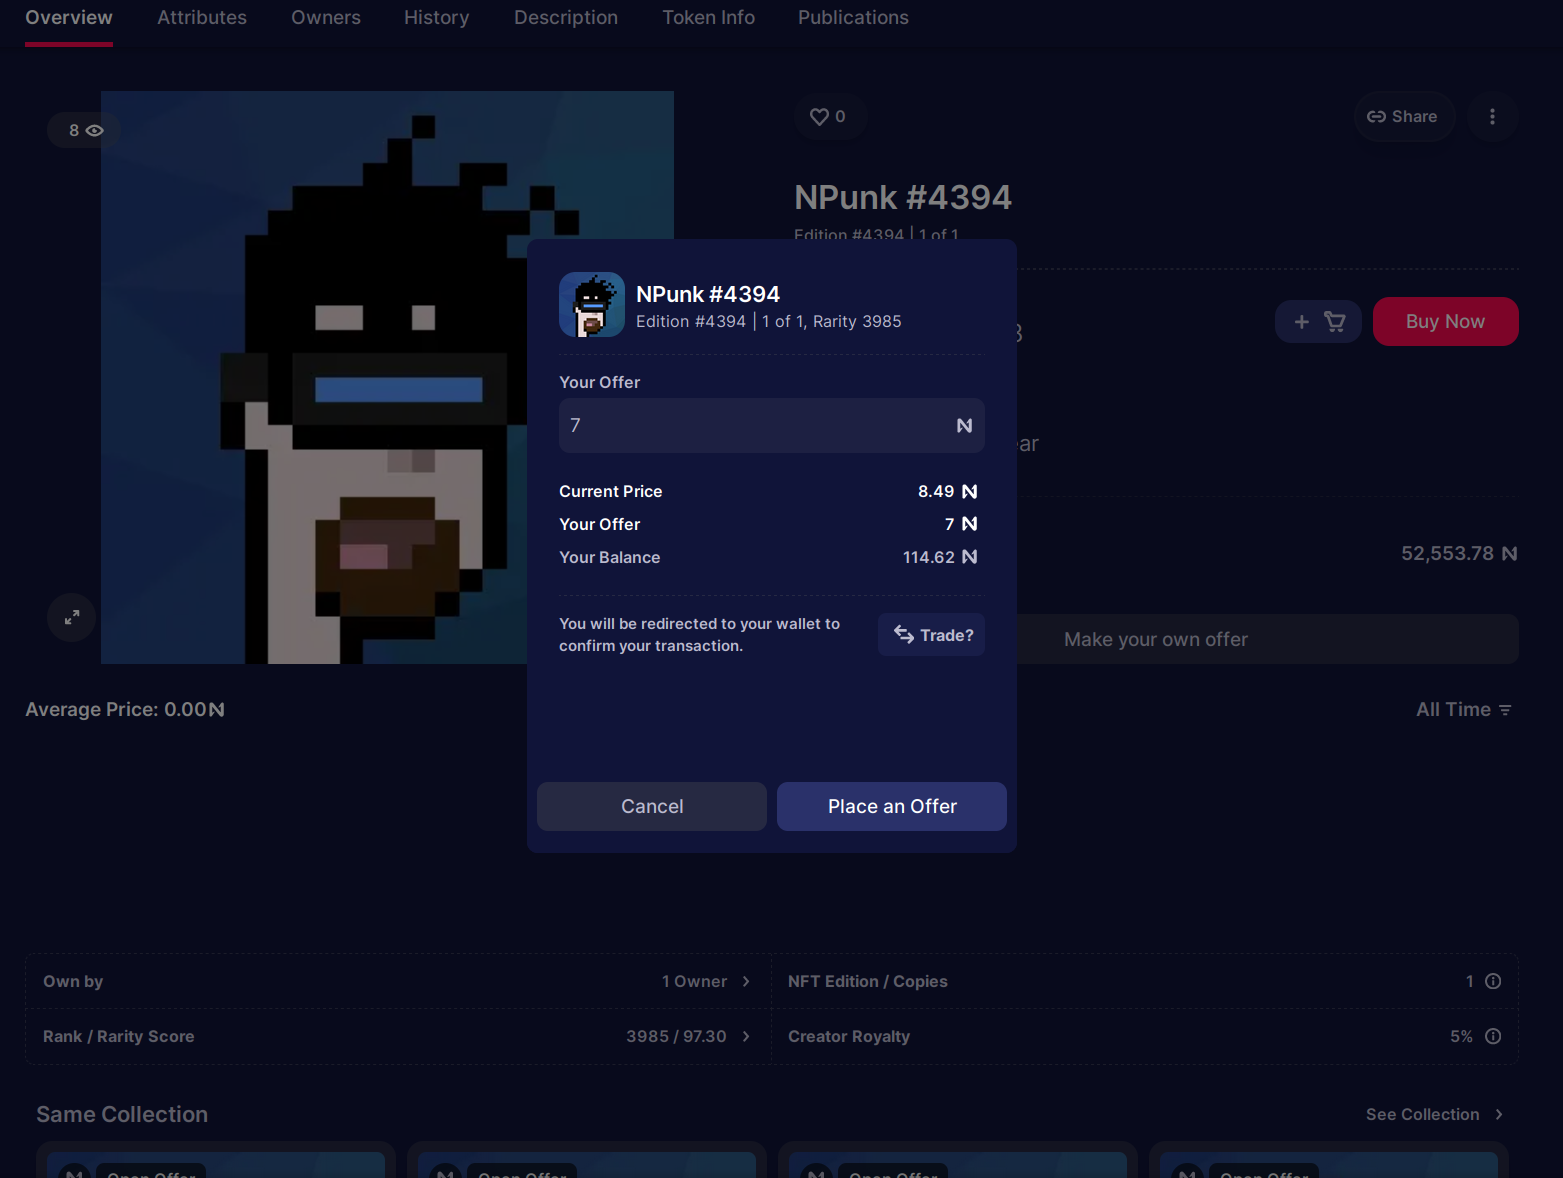
When a seller accepts your offer, you will get a notification in the top right corner. Remember that when you add an offer, the amount of NEAR you offered will be locked in Paras until the offer is accepted or canceled, and if you add a lot of offers in hopes that one of them may be accepted, they may all be accepted at the same time, so be careful with that.
When you receive an offer, it will appear in the notifications in the top right corner.
Selling an NFT
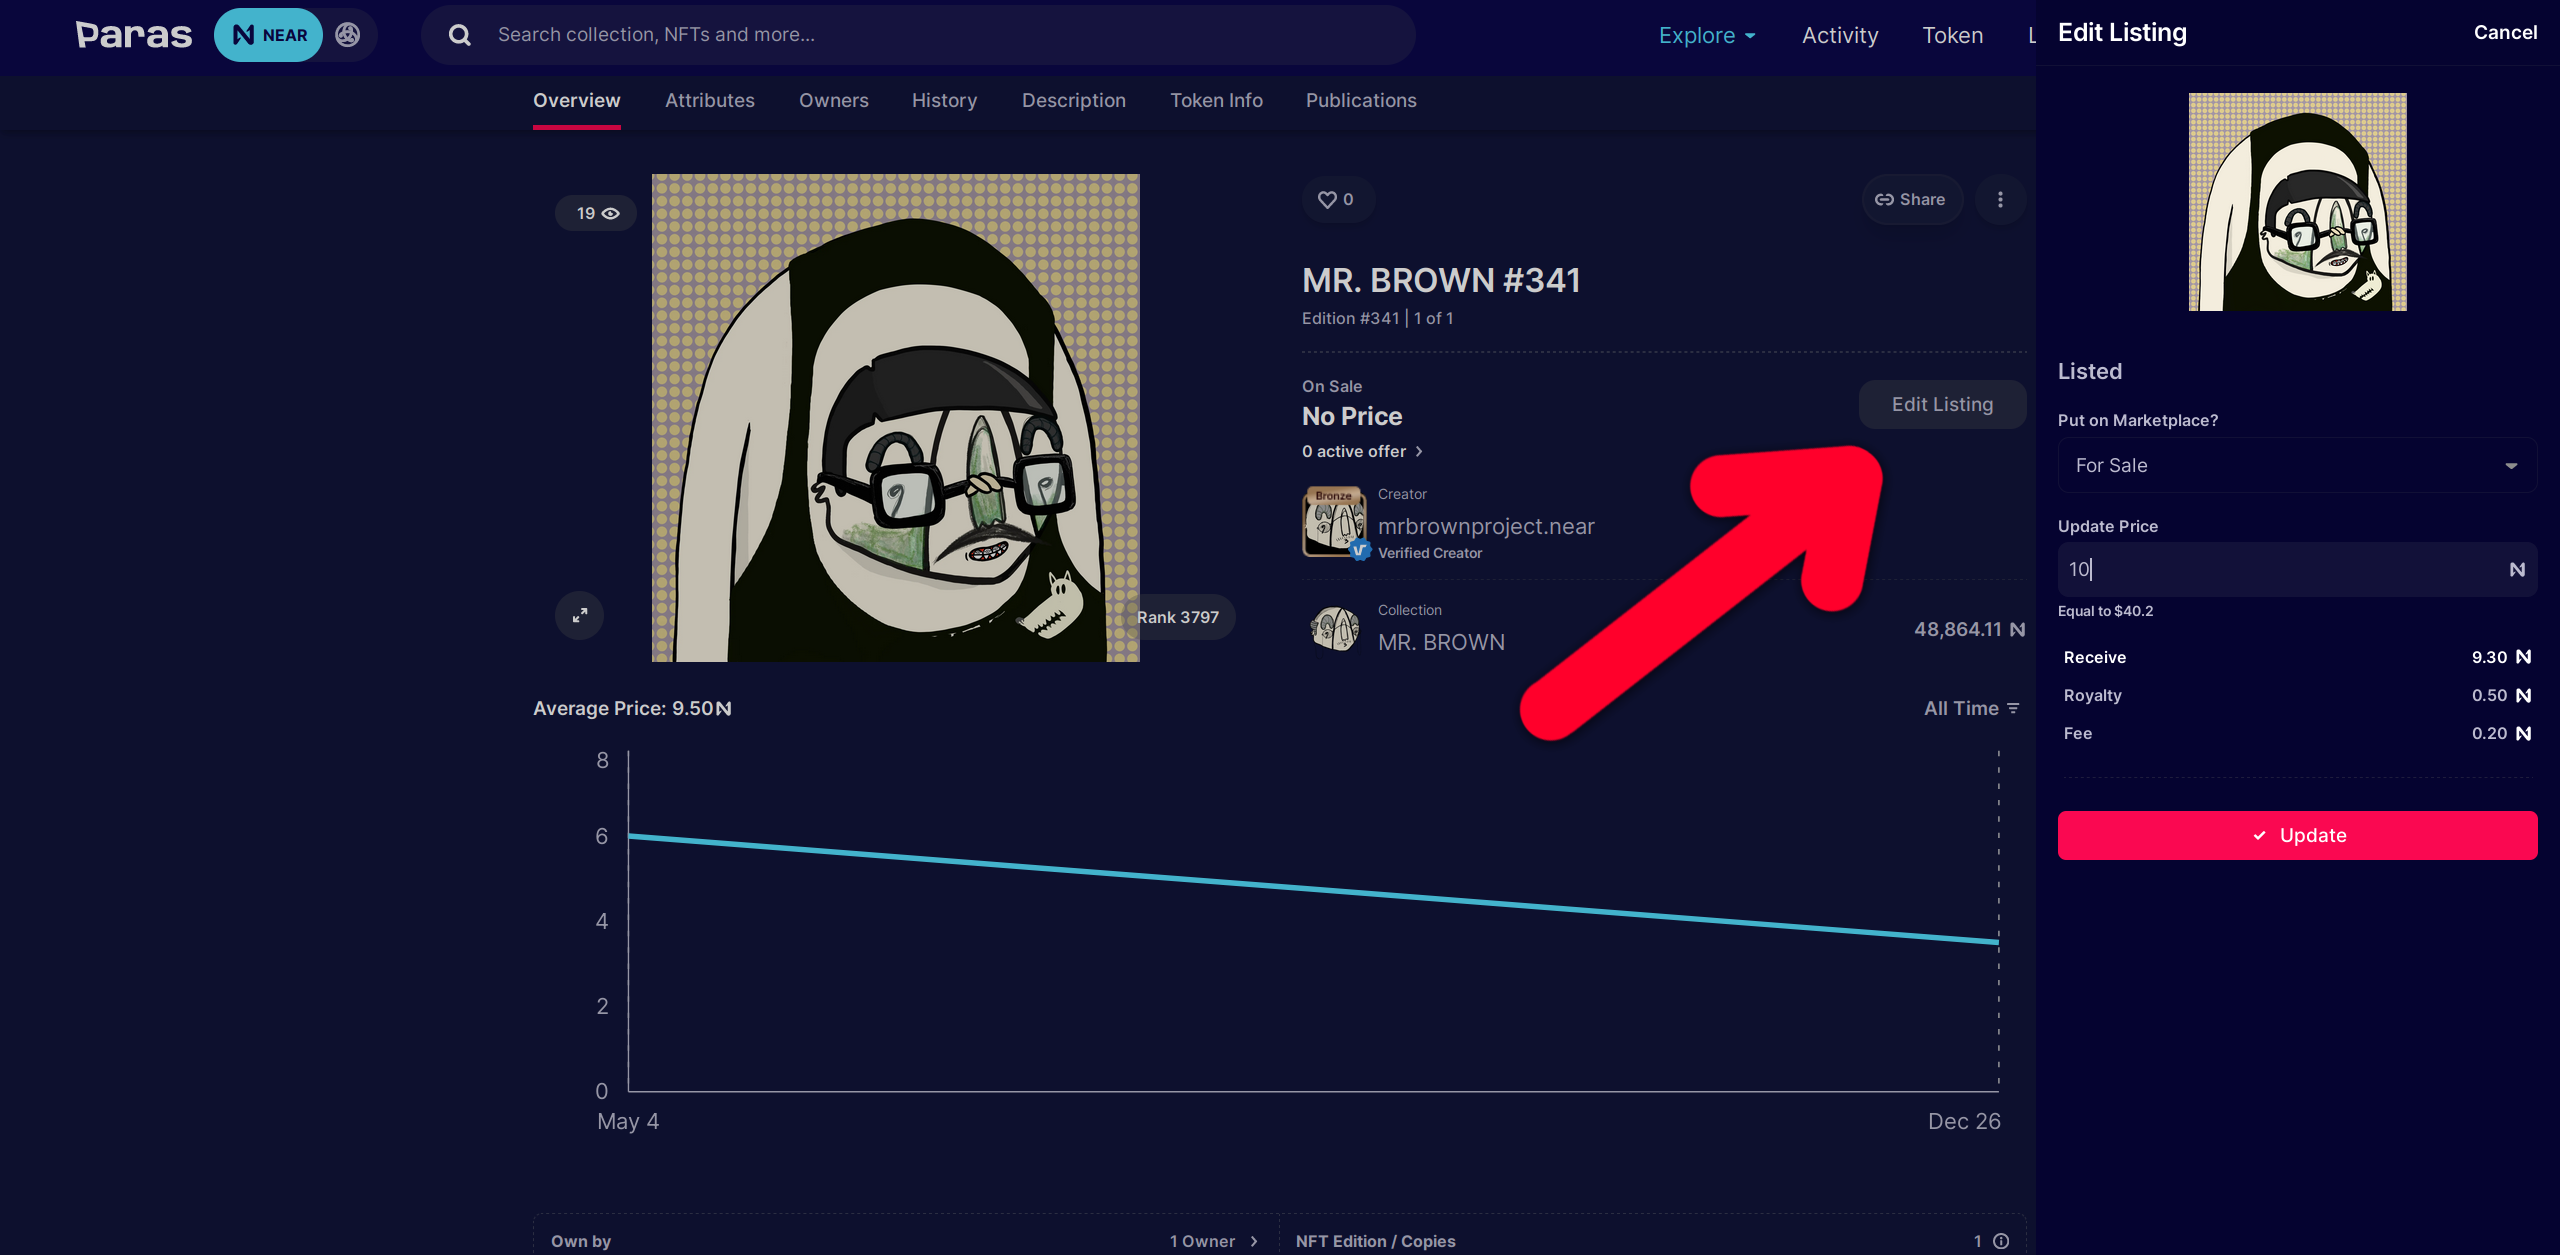
Once you have an NFT, you can navigate to your profile and click “Sell” to list it.
The link is https://paras.id/account.near, or you can click your profile picture
in the top right corner and click “Open Profile”. Click the NFT you want to sell,
click “Edit Listing”, set “Put on Marketplace?” to “For Sale”, and “Update Price” to
the price you want to sell it for. Then click “Update” and confirm the transaction in
your wallet.
Note that if you staked your NFT, most likely it won’t appear in your profile, and you will have to unstake it first.
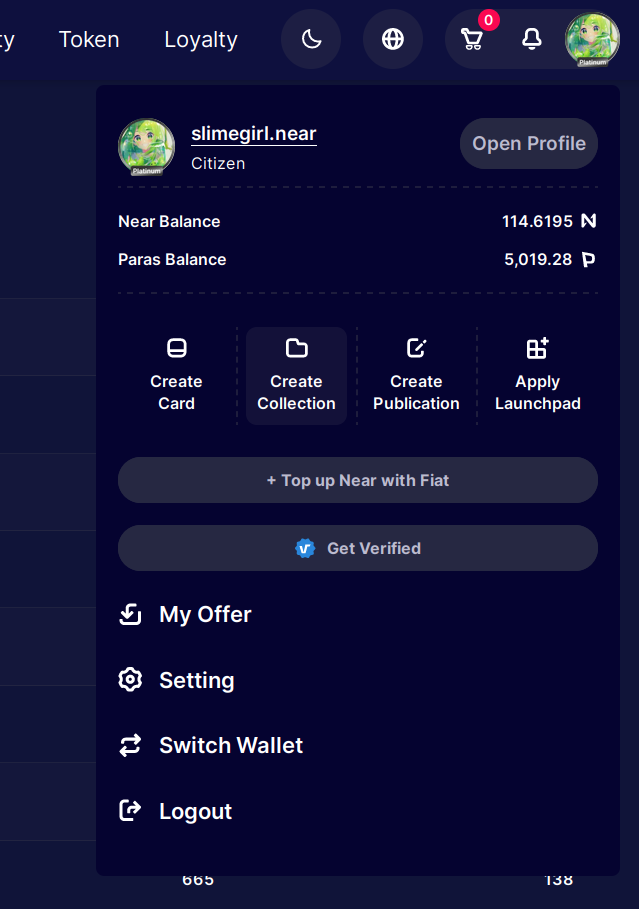
For the NFT trading part, that’s it. But Paras also has an ability to create an NFT collection, and you can do that by clicking “Create Collection” in the top right corner:
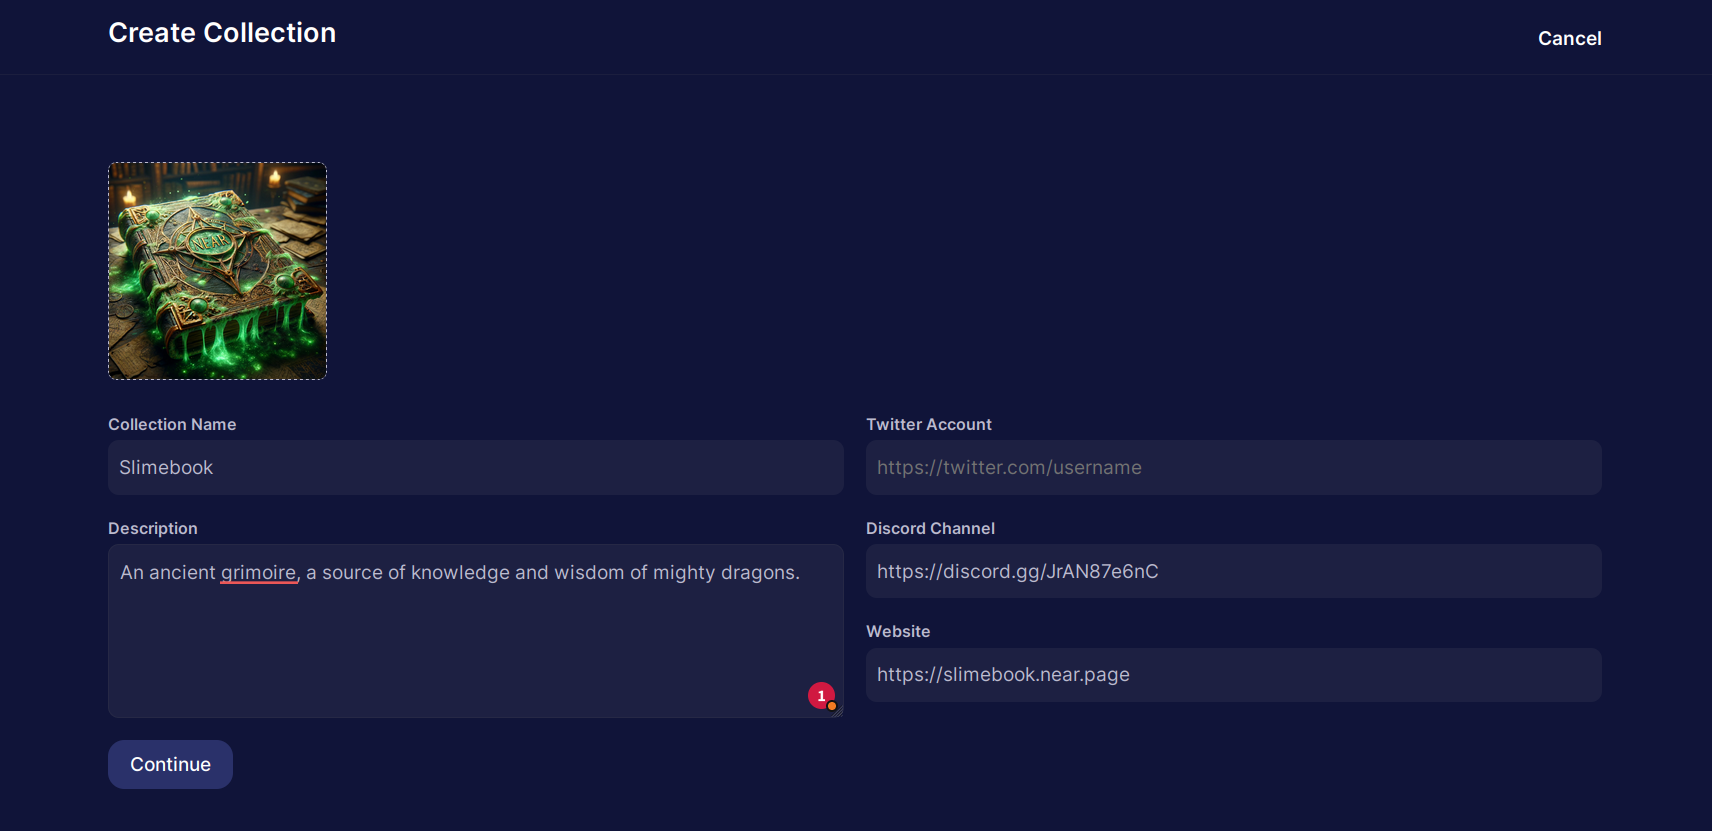
Next, fill in the details, upload the images, and click “Continue”:
Add a wide cover image and some NFTs. I added one:
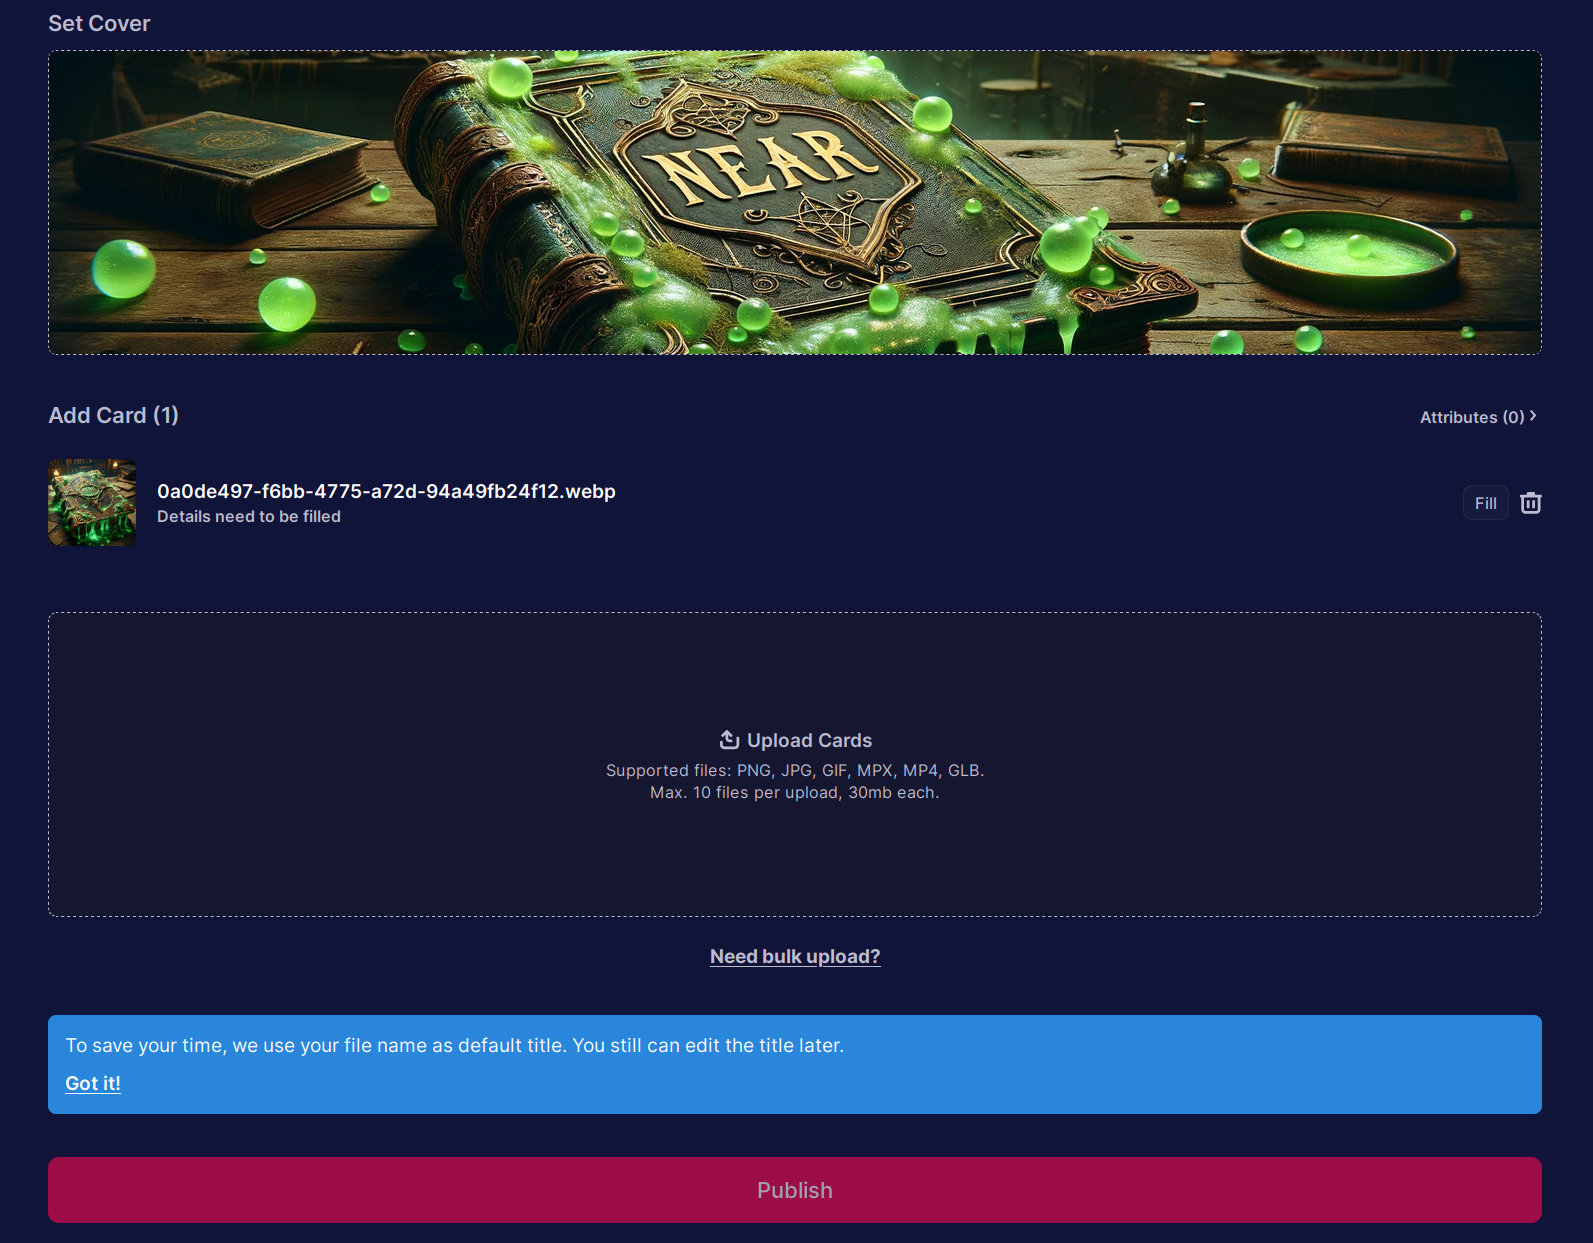
You can edit the NFT details by clicking “Fill” next to each card:
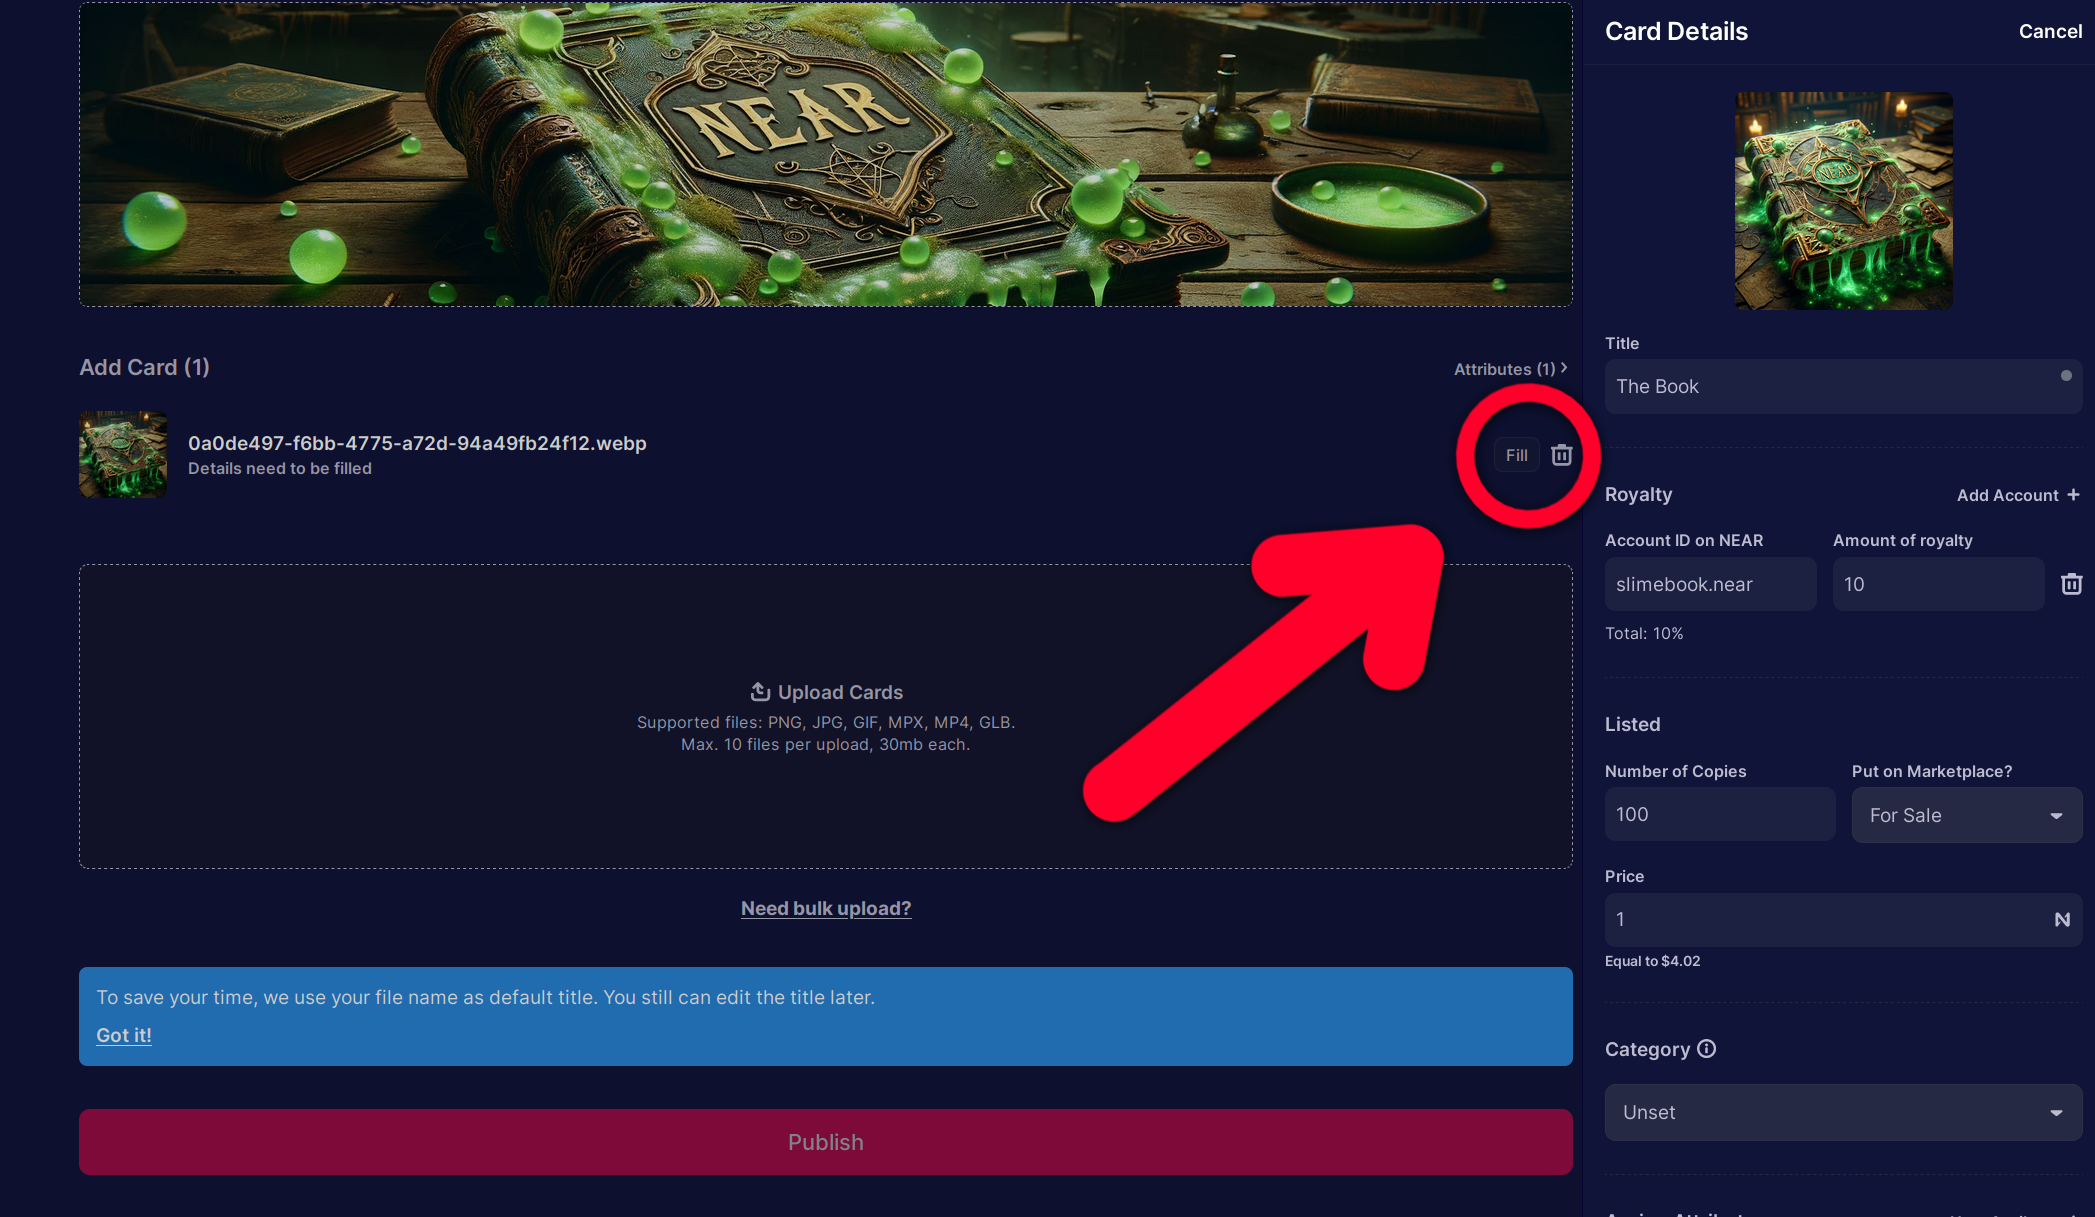
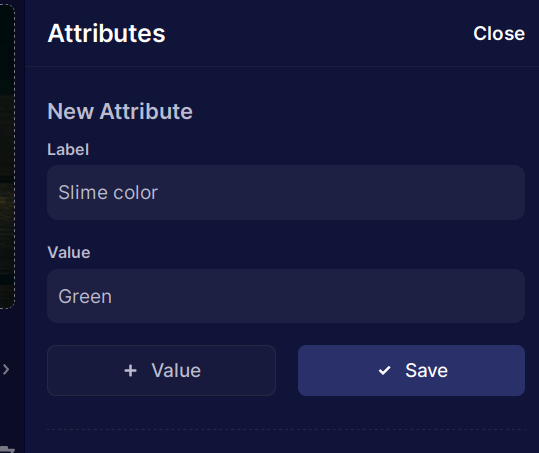
If you want to add an attribute, fill “Label” as the attribute name and “Value” as one of the attribute values. Then click “+ Value” and add another value. You can add as many values as you want, and as many attributes as you want. Then click “Save”.
When you’re done editing the cards, click “Publish” and confirm the transaction in your wallet. Your collection will be published and the cards will appear shortly. Here’s our collection: (click here)
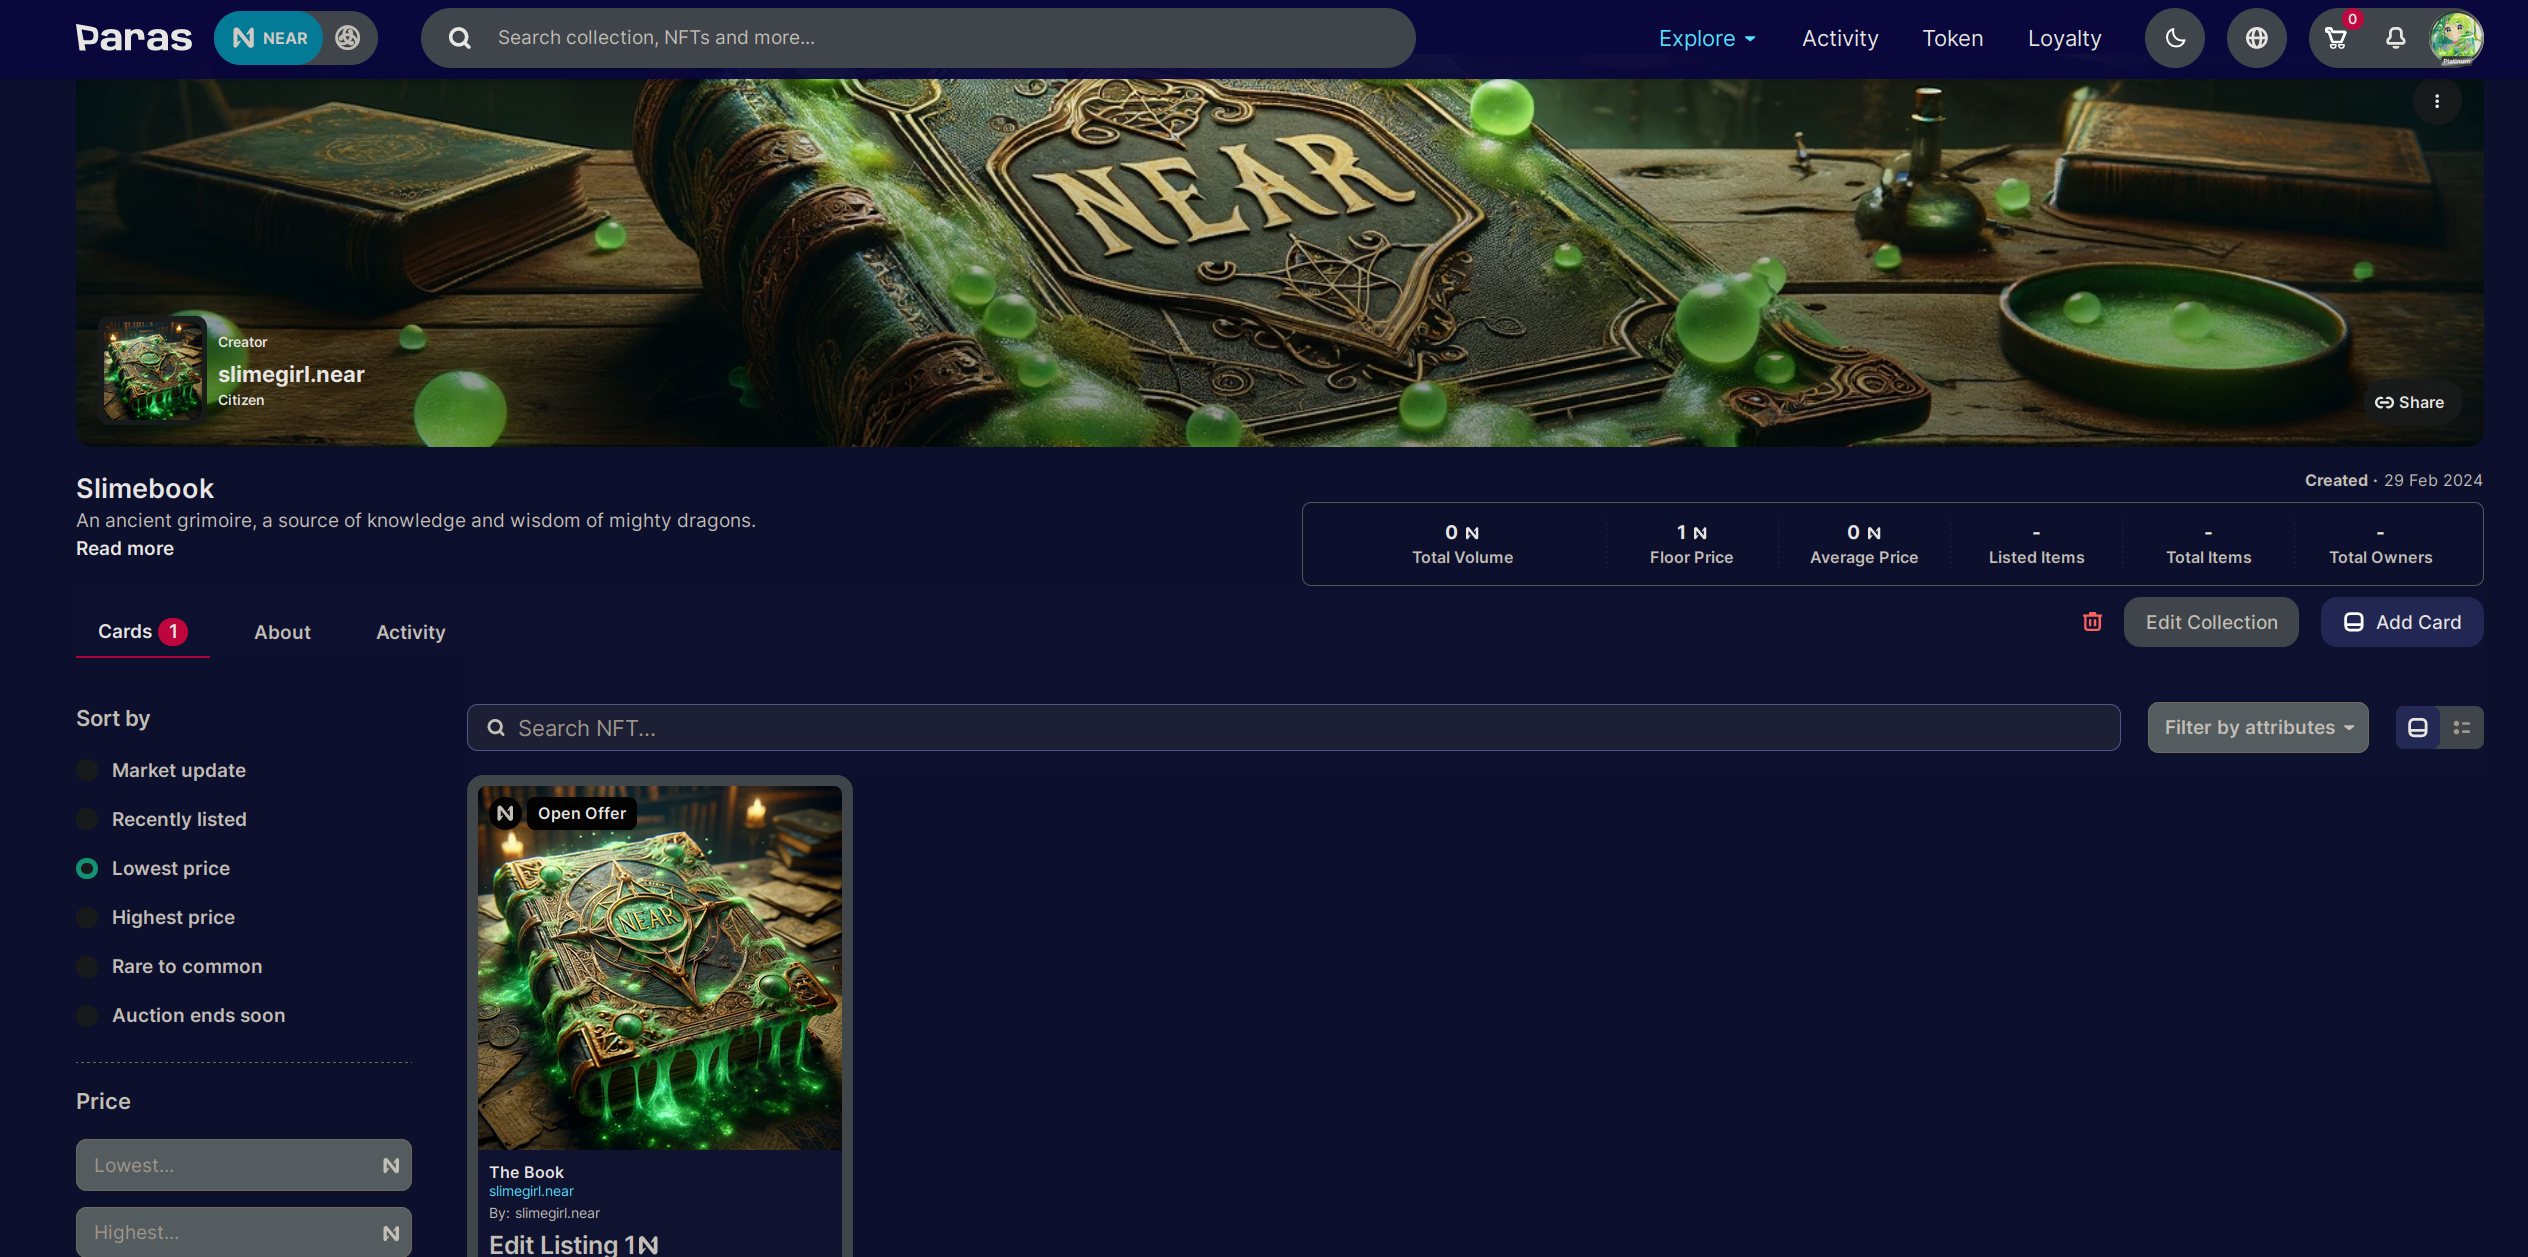
You can always edit the collection by clicking “Edit Collection” on the right.
$PARAS token
$PARAS is a loyalty token that you can stake on stake.paras.id and get rewards in PARAS and NEAR tokens.
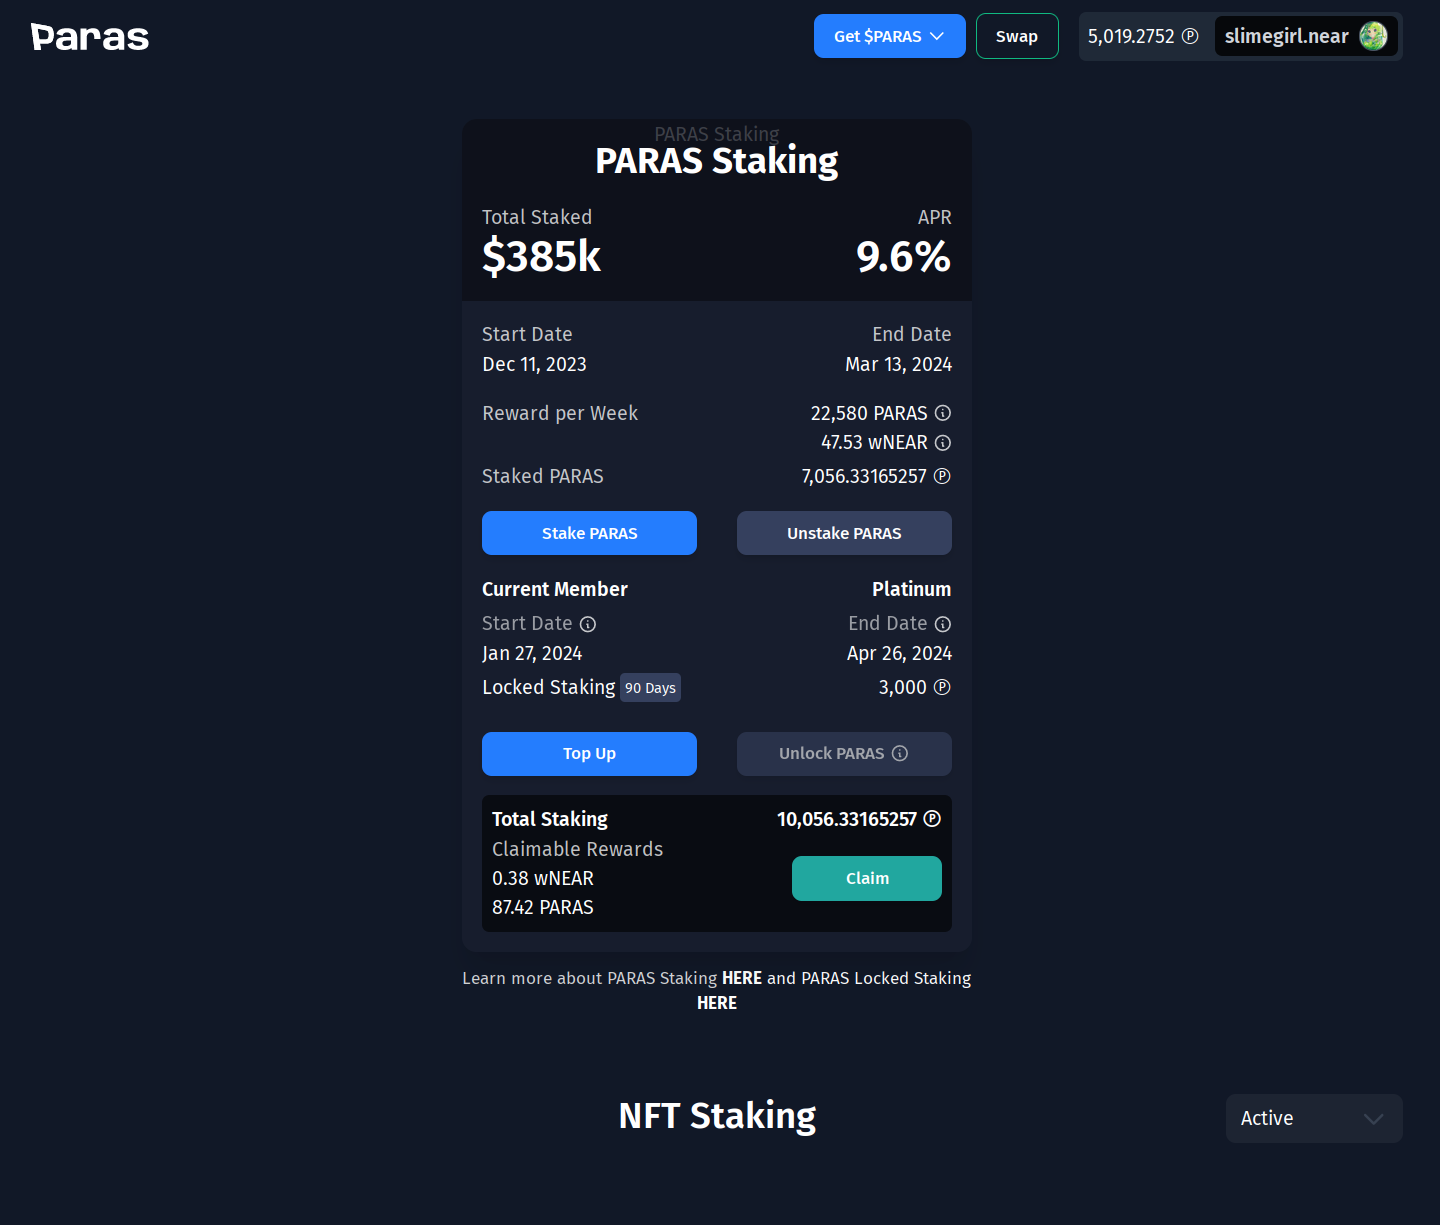
In addition, if you lock your PARAS for at least a month (locking means that you can’t unstake it until the lock period ends), you will upgrade your profile. The upgrade level depends on the amount of PARAS you lock:
| PARAS | Upgrade level |
|---|---|
| 0 | Bronze |
| 500 | Silver |
| 1000 | Gold |
| 3000 | Platinum |
If you want to lock your PARAS, you need to first stake it, and only then there will be an option to lock it.
At the time of writing, the upgrade levels don’t give you any benefits, but you can check the loyalty page to see if anything has changed.
stake.paras.id also allowed you to stake certain NFTs to get rewards in PARAS and NEAR tokens. But at the time of writing, the last staking round ended almost 2 years ago, so there’s a good chance that you won’t see anything there.
NEARWEEK
NEARWEEK is one of the most popular news sources for the NEAR ecosystem. It is a weekly newsletter that covers the latest news, updates, and events in the NEAR ecosystem. It is a great way to stay updated with the latest happenings in the NEAR ecosystem. One of its downsides is that there’s rarely any alpha of upcoming projects that are not yet popular, but that also means
Where to read it?
There are many ways to access NEARWEEK. You can read it on the NEARWEEK website, on BOS, or you can subscribe to the newsletter to get it delivered to your inbox every week.
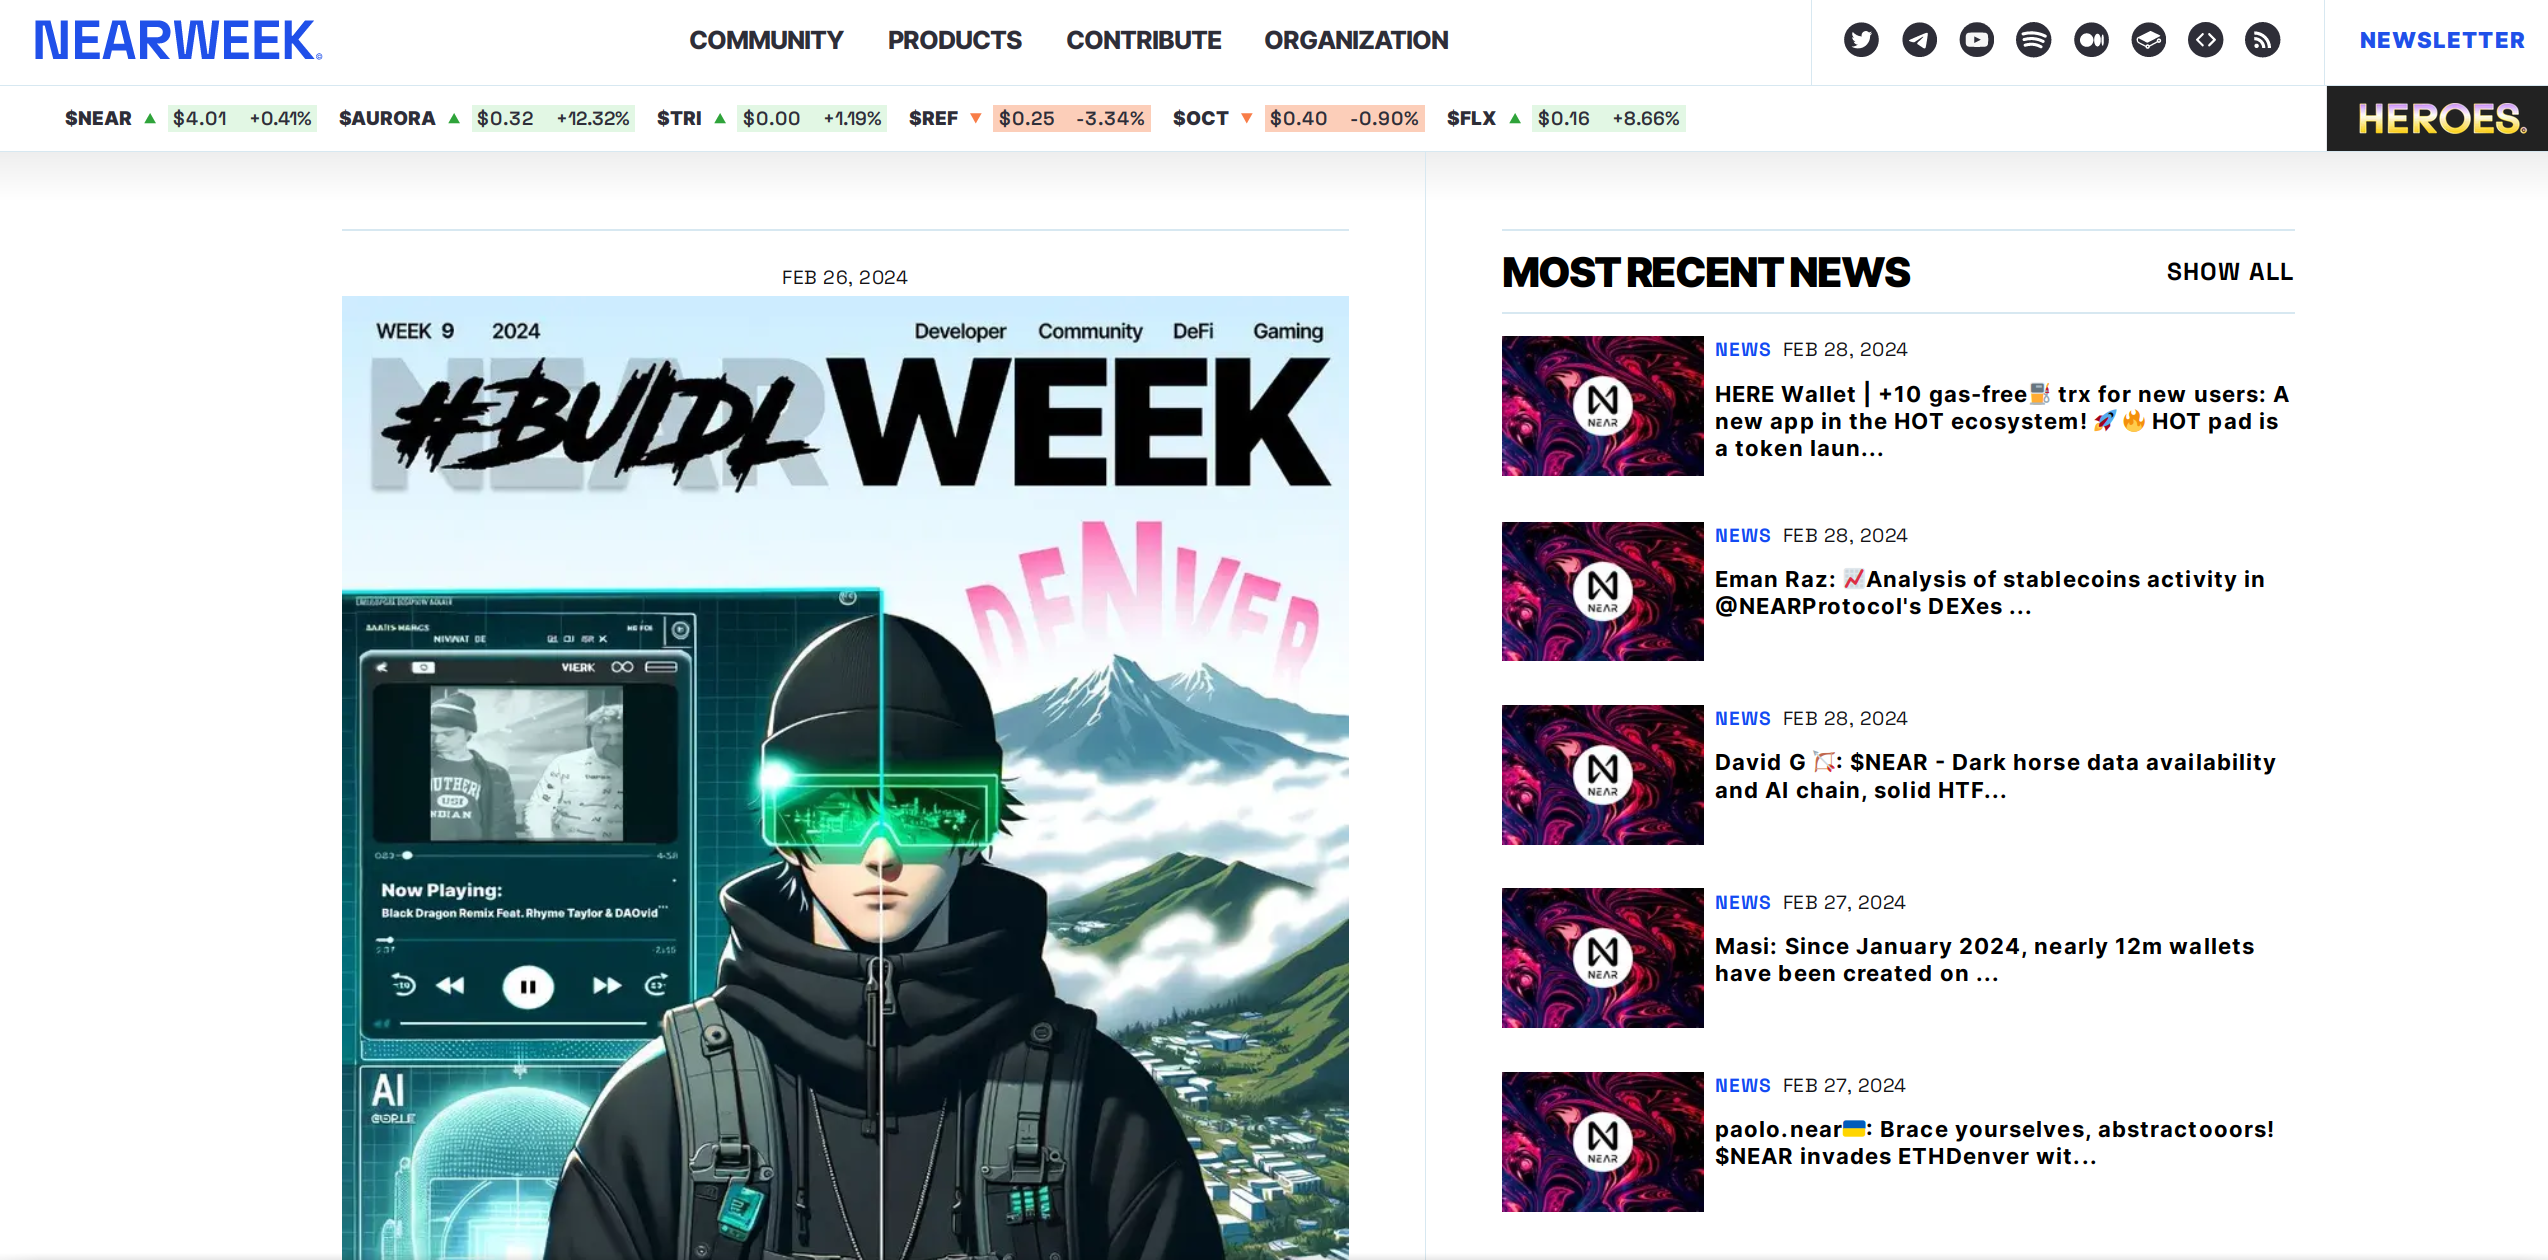
NEARWEEK also has a Telegram channel with daily updates, and Twitter for the latest news and updates.
Community calendar
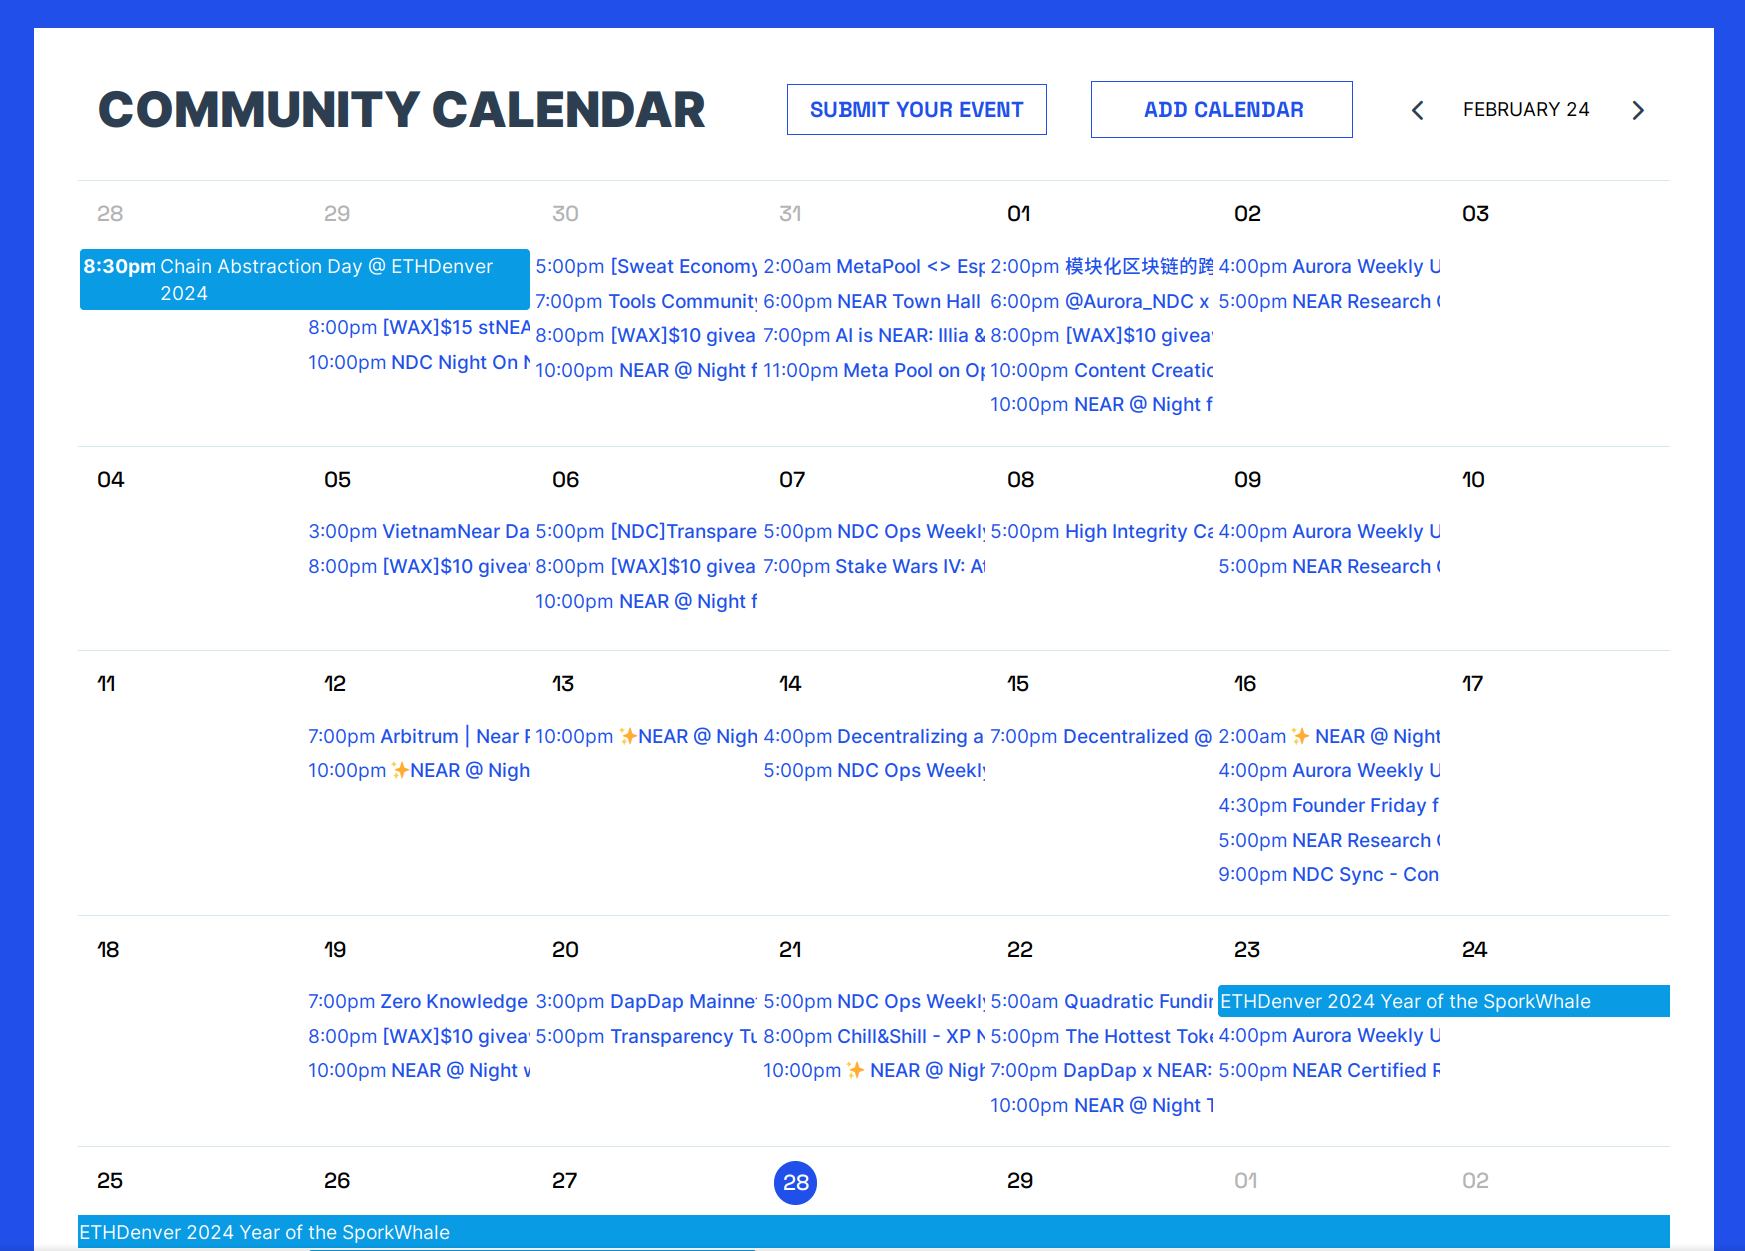
Not many are aware of this feature, but you can find the community calendar of NEAR ecosystem events on the NEARWEEK website. It is a great way to stay updated, as listening to live events and Twitter spaces usually gives you the most up-to-date information and more detailed insights.
Subscribe
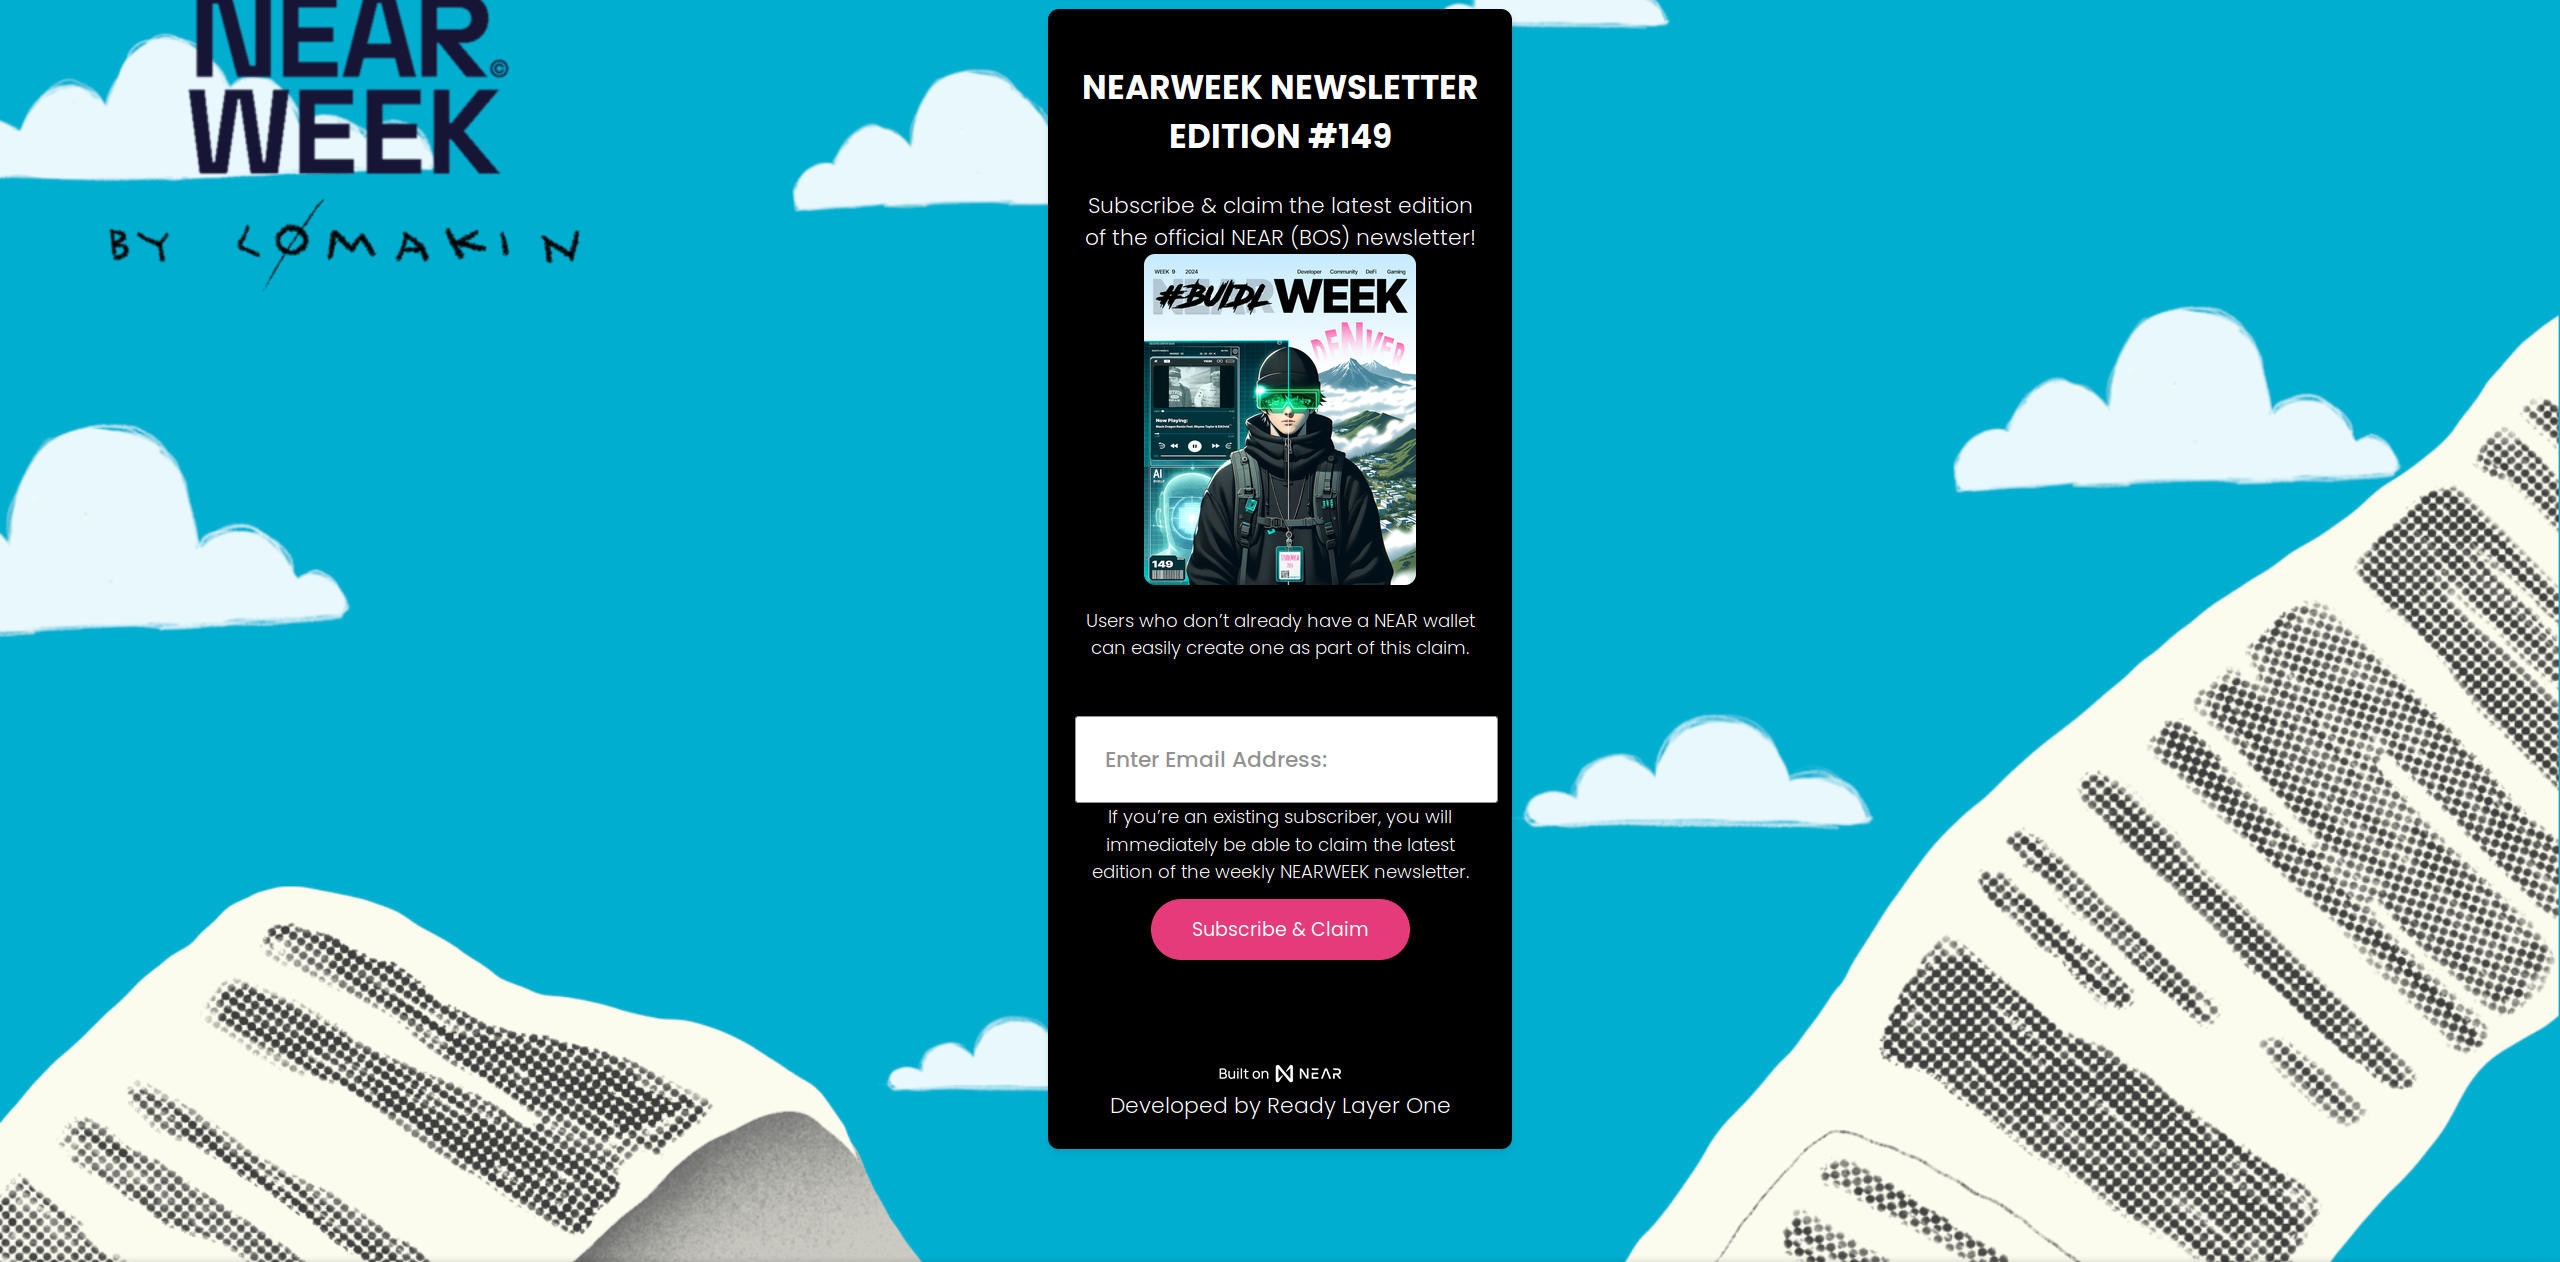
To subscribe to the NEARWEEK newsletter, visit subscribe.nearweek.com
and enter your email address. You will receive the latest newsletter in your inbox every week.
Additionally, if you enter your NEAR account ID, you will receive a free NFT.
Contributing
If you want to contribute to NEARWEEK and earn rewards, you can check the NEARWEEK
documentation.
But in short, the easiest way to let NEARWEEK know about something is to reply to a Twitter post
with !submit @nearweekbot.
Rainbow Bridge
Staking NEAR
If you hold a lot of NEAR, and plan to do so over a long period of time, you might want to stake your NEAR. Staking is a way to help secure the network, and in return, you get a share of the network’s rewards. This is a way to earn passive income on your NEAR holdings. The APR for staking NEAR is around 8% at the time of writing, but it can vary depending on how much of the total NEAR supply is staked.
Where does the APR come from?
The APR comes from the network’s inflation. The network inflates the total supply of NEAR by 5% per year, and this inflation is distributed to the validators and the people who have staked their NEAR. The validators get a fee from your APR that is shown in your wallet. For example, if the APR is 8% and fee is 1%, you will get 7.92% APR.
Some validators (like Aurora, Shitzu, Meteor) have high fees, but they additionally emit other tokens (AURORA, DOGSHIT, MOON), so sometimes the APR can be even higher than if they had no fees. But the stability depends on the price volatility of the reward token.
How does it help secure the network?
NEAR runs a Proof of Stake (PoS) consensus mechanism. This means that the network is secured by validators who have staked their NEAR. The more NEAR a validator has staked, the more likely they are to be chosen to produce a block. This is because the network is designed to choose validators to produce blocks based on how much NEAR they have staked. This is a way to incentivize validators to act in the best interest of the network, as they have a lot to lose if they misbehave. But there are people who don’t want to set up a validator node, maintain it, solve technical issues, and so on. They can delegate their NEAR to some validator and receive a share of the rewards. The validator will take a certain fee for providing this service. So, how does your NEAR help secure the network? By staking your NEAR, you are:
- Increasing the total amount of NEAR staked, which makes it harder for an attacker to accumulate enough NEAR to attack the network. The network will stop if more than 33% of the total supply is staked by malicious actors.
- Choosing validators who are likely to act in the best interest of the network. The choice of a validator is your own, and you can choose a validator who you trust to act in the best interest of the network. I recommend choosing a validator who has a good track record, and doesn’t have more than 3% of the total supply staked with them, as this could lead to centralization. If you know a person who runs the validator, it’s even better, as you can trust them more.
If you don’t know which validator to choose, you can check near-staking.com and nearscope.net, they have a list of validators and their statistics, so you can choose a validator who you trust.
Risks
Staking NEAR is not without risks. The main risk is that you could lose some or all of your staked NEAR if the validator you have chosen misbehaves. This could happen if the validator is hacked, or if they try to attack the network. The network is designed to punish (slash) corrupted validators, but if you support a corrupted validator, you are also punished. This is why it’s important to choose a validator who you trust. You can also spread your stake across multiple validators to reduce the risk of losing all of your stake.
How to stake NEAR
To stake NEAR, you need to use a wallet that supports staking. Most wallets support staking, and you can find the instruction for each wallet in the Wallets section.
Unstaking
When you stake NEAR, you lock it up for a certain period of time. This is because the network reserves the right to take your stake if the validator you have chosen misbehaves. The network may not be able to detect misbehavior immediately, so it locks up your stake for a certain period of time to give it time to detect misbehavior. The period of time that your stake is locked up for is called the “unstaking period”. The unstaking period is currently 4 epochs, which is around 52-65 hours. This means that if you want to unstake your NEAR, you will have to wait for 4 epochs before you can access it.
Liquid staking
There are protocols that allow you to stake your NEAR, and receive a token that represents your staked NEAR. This token is called a “liquid staking token”. When you want to get your NEAR back, you can exchange this token for NEAR, and you’ll get more NEAR than you originally staked, because you’ll also get the rewards that the network has given to your validator. Here’s how it’s done:
- You stake 10 NEAR with a liquid staking provider, and receive 8.5 stNEAR in return.
- You wait for a while, and the network gives the liquid staking provider some rewards. These rewards increase stNEAR’s value, so now 1 stNEAR is worth 1.5 NEAR.
- You exchange your 8.5 stNEAR for 12.75 NEAR, and you’ve made a profit of 2.75 NEAR.
The main benefit is that you have a token that can be traded on Ref, deposited as collateral on Burrow, and so on. The main downside is that the liquid staking provider takes a fee for providing this service, making your APR a bit lower.
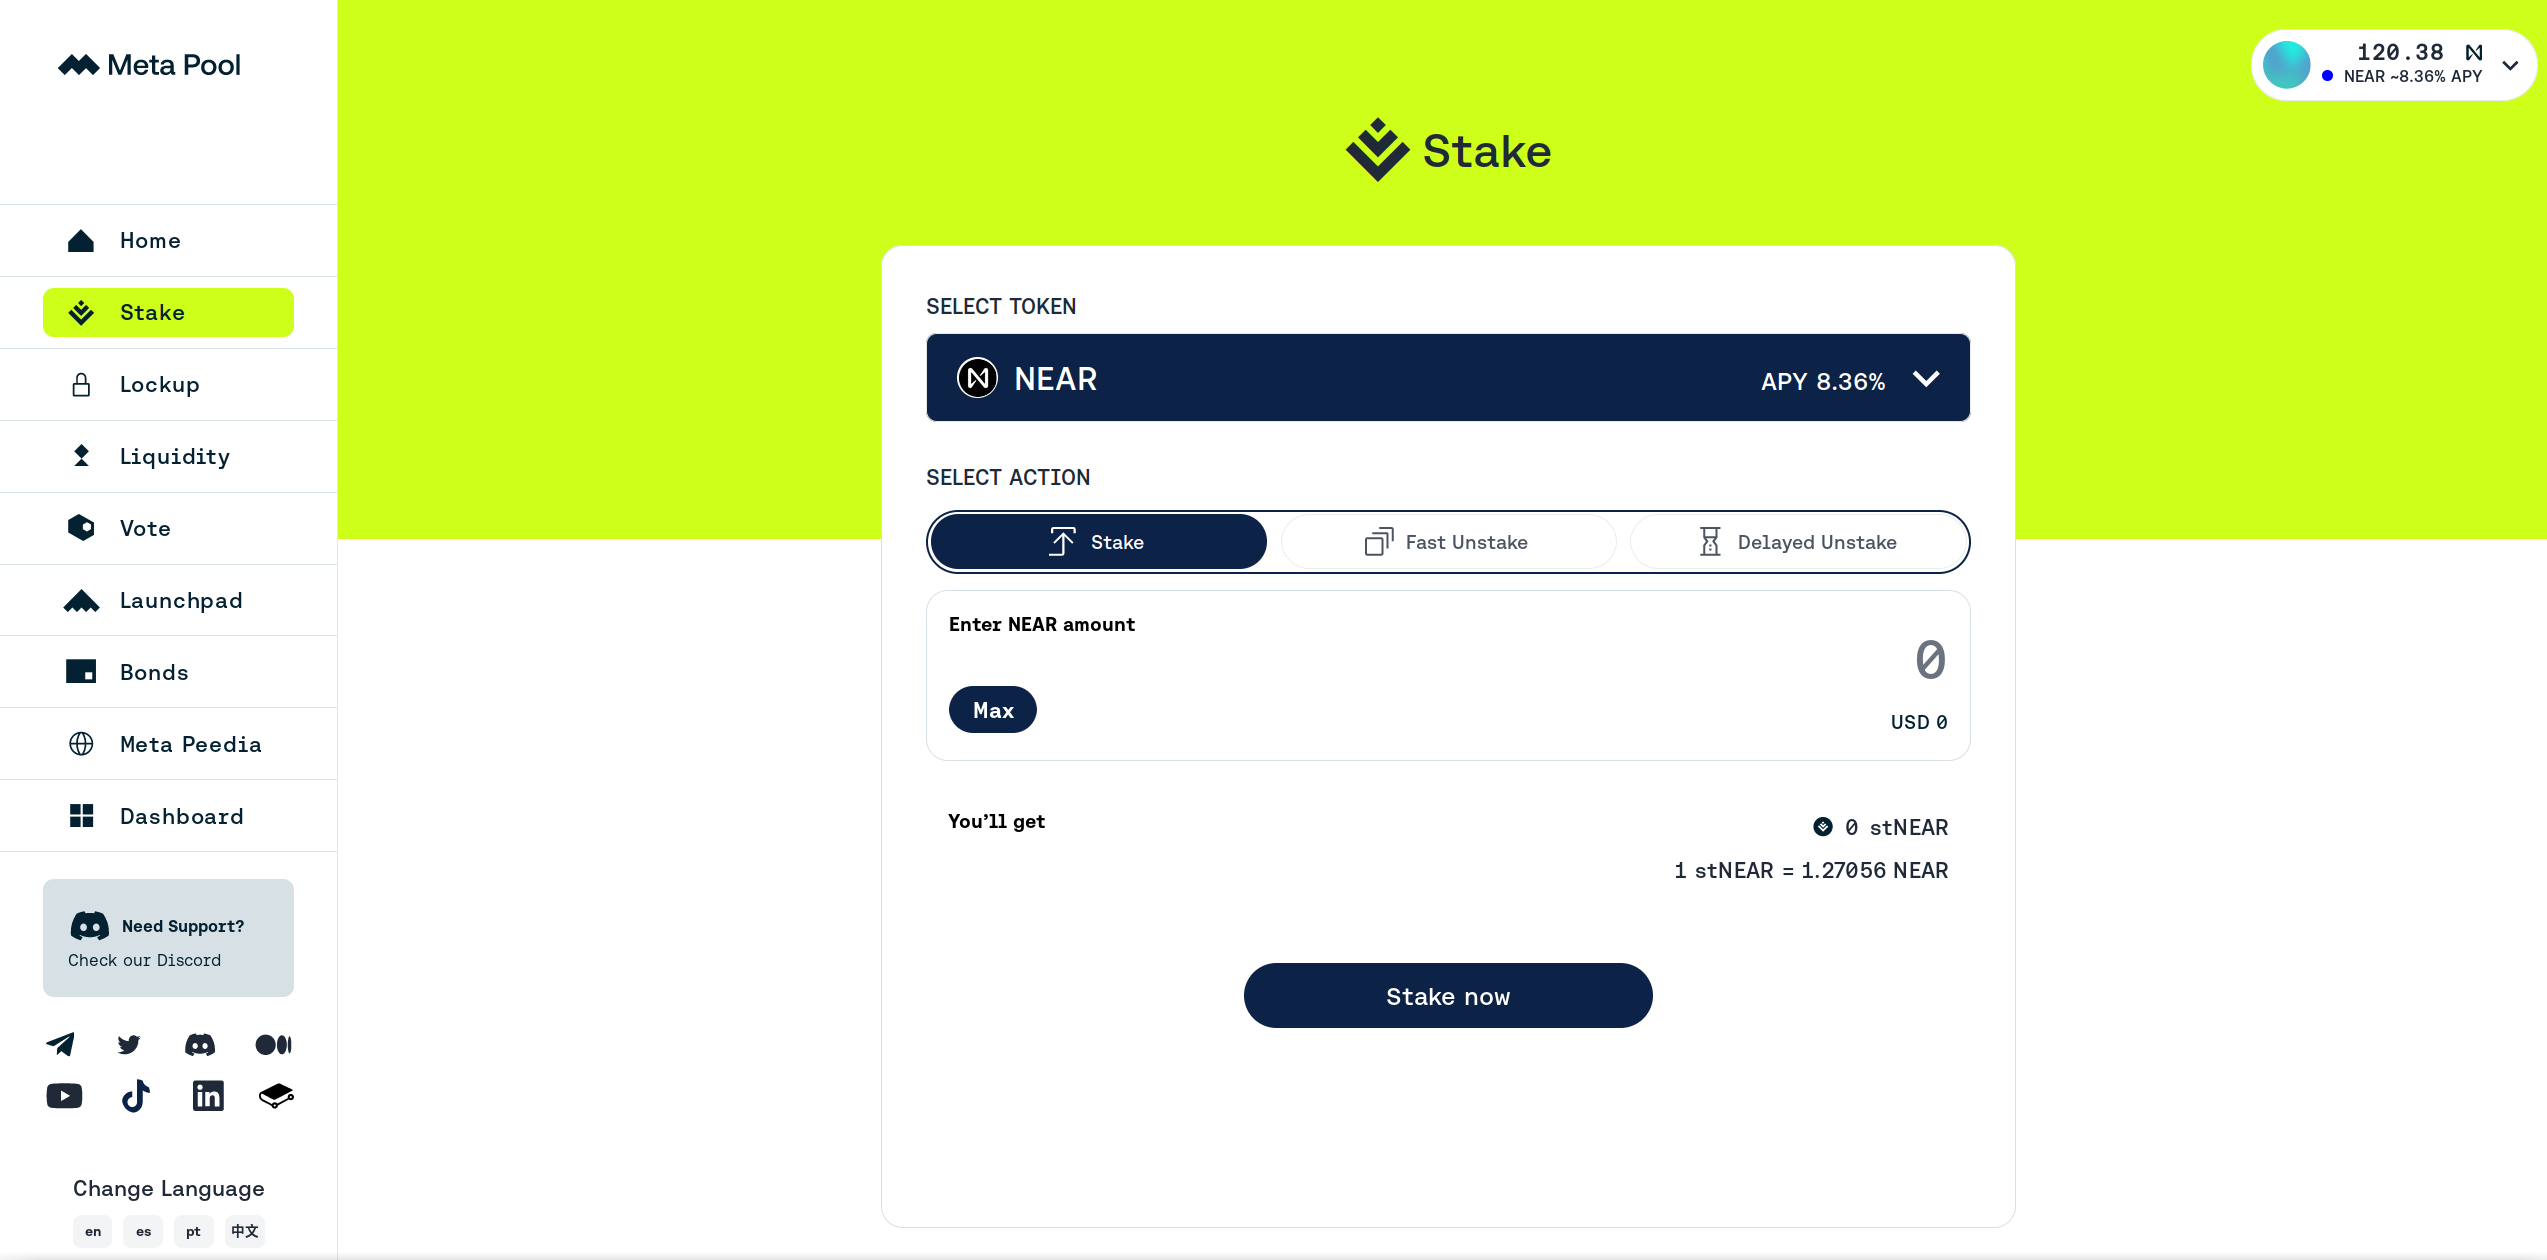
Liquid staking also has unstaking periods. Most of them also offer a way to get your NEAR back immediately, but you’ll have to pay a small fee for this. Or if the amount is not big, you can just sell your stNEAR.
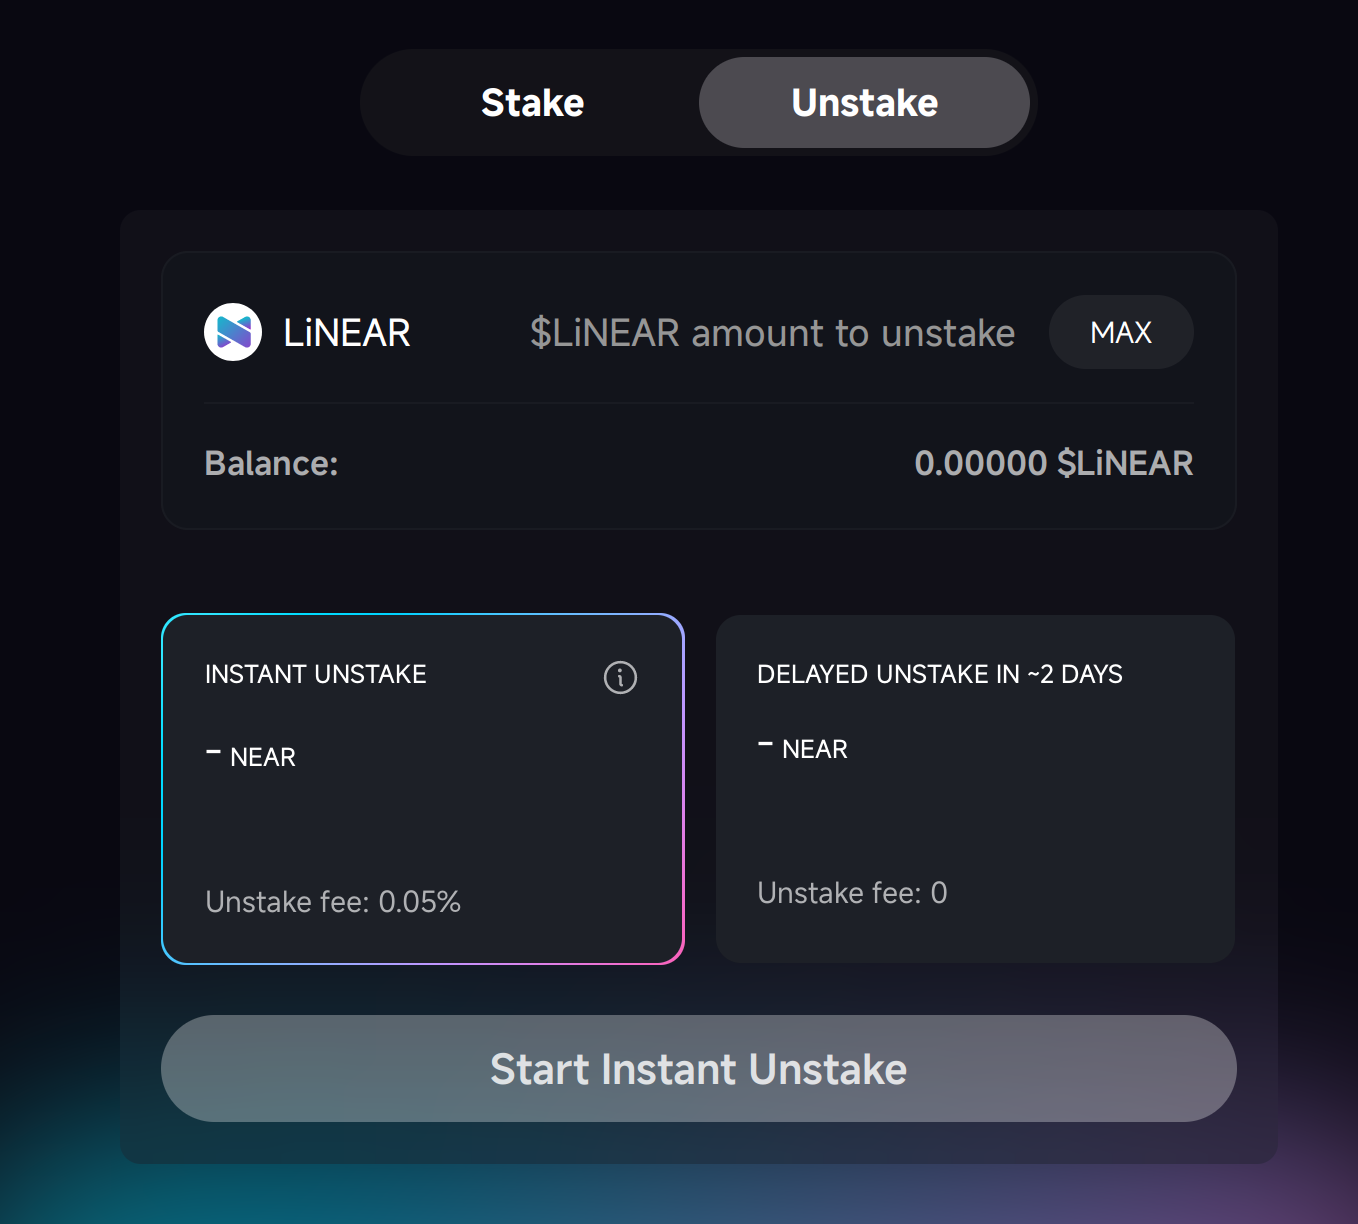
Usually these protocols stake to a lot of validators at once, so the risk of losing your stake is reduced. The most popular liquid staking providers are Meta Pool (stNEAR) and LiNEAR Protocol (LiNEAR). Some time ago, there was NearX by Stader, but it sunsetted its operations in January 2024.
A quick note about Octopus Network restaking
You can also stake your NEAR on the Octopus Network, and receive a slightly higher APR, but Octopus Network is a separate project, and everything said above may not be applicable to it (though, the concept is quite similar). You should check the Octopus Network’s documentation if you’re interested.
Allstake restaking
This has not been written yet and I don’t know much about it, but I guess it’s also a restaking protocol - learn more here.
Staking of other tokens
Some other tokens on NEAR can also be staked, but the process is quite different. You should check the documentation of the token to see if it’s possible to stake it, and how. Same goes about NFT staking.
Troubleshooting
I don’t see any validators in my MyNearWallet
Try waiting for 1-2 minutes, the list of validators usually loads slowly. If it’s still not there, try Meteor Wallet instead.
I don’t see any rewards in my wallet
- Compare the amount of “Staked NEAR” with the amount you staked when you first staked. If the amount of “Staked NEAR” is higher, you’ve received rewards. Some wallets don’t show rewards separately in the wallet, but you can see them in the transaction history.
- Try waiting for 1-2 days if you’ve just staked. The network doesn’t give rewards immediately, it takes some time to calculate them. You will start receiving rewards from the next epoch after you’ve staked, and you’ll receive them after the epoch ends.
- Check on near-staking.com, maybe your wallet has trouble with showing rewards.
I can’t see my staking balance
If you used liquid staking, you should check the balance of your liquid staking token (stNEAR or LiNEAR), not the “staked NEAR” in the wallet. If you staked normally and can’t see your staking balance, check near-staking.com to see if your wallet has trouble with showing staking balances. If it’s not there, check your transaction history to see if you unstaked and sent your NEAR to another account. If there’s no suspicious activity, your NEAR should be safe, it can’t just disappear out of nowhere, but you should contact the wallet’s support, just in case.
Becoming a validator
Becoming a validator is a way to earn more NEAR, since you don’t have to pay a fee to a validator, and you can take a fee from other people who delegate their NEAR to you. But it’s also a big responsibility, as you have to rent a high-spec server, maintain a validator node, even setting it up requires some technical knowledge. If you’re interested in becoming a validator, you should check the NEAR documentation, join the NEAR Discord and NEAR validators telegram
Stablecoins
Stablecoins are cryptocurrencies that are pegged to a stable asset, such as fiat currency, gold, or other commodities. They are designed to remove the volatility of the cryptocurrency, so that you don’t have to worry about the price of your cryptocurrency changing. This makes them a great option for people who want to use cryptocurrency for everyday transactions, but not for investment purposes. The most popular stablecoins are Tether (USDT) and USD Coin (USDC), which represent the US Dollar. If you receive 10 USDC, you can be sure that it will always be worth $10.
How do stablecoins work?
There are 3 types of stablecoins:
- Fiat-collateralized stablecoins: These are backed by a reserve of fiat currency, such as the US Dollar. For example, Tether (USDT) and USD Coin (USDC) are backed by a 1:1 reserve of US Dollars and other very stable assets, such as US Treasury bonds. In case a lot of people want to redeem their stablecoins for fiat currency, the issuer (Tether or Circle, in the case of USDC) will have the necessary funds to redeem them and keep the price stable. Do they really have the necessary funds? This is a matter of trust and regulation, and it has been a controversial topic in the cryptocurrency space.
- Crypto-collateralized stablecoins: These are backed by a reserve of other cryptocurrencies. For example, DAI is backed by a reserve of Ether (ETH), liquid staked Ether, other stablecoins, real-world assets, and other cryptocurrencies. The price of DAI is kept stable through a system of smart contracts and over-collateralized debt positions. It means you can supply some amount of collateral (more than 100%), and create 1 DAI. Or redeem 1 DAI for $1 worth of some collateral. At the time of writing, the collaterization ratio is almost 300%, meaning that for every 1 DAI there is $3 worth of other assets. If the price of DAI goes up, new DAI is created and sold to bring the price down. If the price of DAI goes down, DAI is bought and burned to bring the price up. This might be a bit more complex, but it doesn’t rely on trust in a centralized issuer. What if the price of the collateral goes down so fast that the system can’t sell it fast enough? This is a good question.
- Algorithmic stablecoins: These are not backed by any reserve, but they use algorithms to keep the price stable. There are different mechanisms to achieve this, so it’s hard to generalize. This is a very experimental field, and by far the riskiest one. One of the most popular algorithmic stablecoins was TerraUSD, anyone who knew how it worked, knew the risks, but many lost all their money. I recommend you to read whitepapers if you are a technical person and you are interested in this topic, but if you don’t understand how they work and don’t want to expose yourself to the unnecessary risk, I recommend you to stay away from them.
Stablecoins on NEAR
On NEAR Protocol, the most widely used stablecoins are:
- USDT - a fiat-collateralized stablecoin, you can use it like any other FT.
- USDC - a fiat-collateralized stablecoin, you can use it like any other FT.
- USN - a half-crypto-collateralized half-algorithmic stablecoin. It launched in a very bad timing, right before TerraUSD’s collapse, and although the algorithm is completely different, it has shut down in October 2022. While now it’s not very widely used nowadays, some protocols still have trading pairs and liquidity pools for USN, so it’s still worth mentioning here. I don’t recommend to use it, though, it’s dead and it’s not coming back.
What are USDT.e and USDC.e?
A few years ago, there was no USDT or USDC on NEAR, but many people wanted to have a stablecoin or two in the NEAR ecosystem. So, they created a bridged version of USDT and USDC, called USDT.e and USDC.e. They are created by using the Rainbow Bridge to lock the original USDT and USDC on Ethereum, and mint the equivalent amount of USDT.e and USDC.e on NEAR. But now that there are “native” versions of USDT and USDC on NEAR, issued directly by Tether and Circle, respectively, there is no need to have USDT.e and USDC.e anymore. But it’s not that easy to get rid of them, because there are still a lot of people who use them, and a lot of trading pairs and liquidity pools that will be hard to migrate. So, they are still around. It’s important to note that USDT.e and USDC.e are backed by the real USDT and USDC on Ethereum, but if the Rainbow Bridge gets hacked (which happens quite frequently with other bridges), there could be negative consequences for USDT.e and USDC.e prices. So, if you have the option to use native USDT and USDC, I recommend you to use them instead. But Rainbow Bridge is a very secure bridge compared to others, and there are some benefits to using the bridged versions of stablecoins - if you swap a token to it, in some cases you may get a slightly better price, so it’s not a big deal if you use USDT.e and USDC.e.
Contract addresses
- Native USDT:
usdt.tether-token.near - Native USDC:
17208628f84f5d6ad33f0da3bbbeb27ffcb398eac501a31bd6ad2011e36133a1 - Bridged USDT:
dac17f958d2ee523a2206206994597c13d831ec7.factory.bridge.near - Bridged USDC:
a0b86991c6218b36c1d19d4a2e9eb0ce3606eb48.factory.bridge.near - USN:
usn - Testnet USDT (for developers):
usdt.fakes.testnet - Testnet USDC (for developers):
usdc.fakes.testnet
ShardDog
ShardDog a platform built on Near Blockchain that facilitates projects to reach a greater audience and increase their userbase using their free NFT or FT drop feature, for a small fee based on project’s scope. An alternative to ShardDog is Bitte Drops, which allows you to create drops without contacting ShardDog, and completely free, but only works with Mintbase Wallet users.
How Shard.Dog works
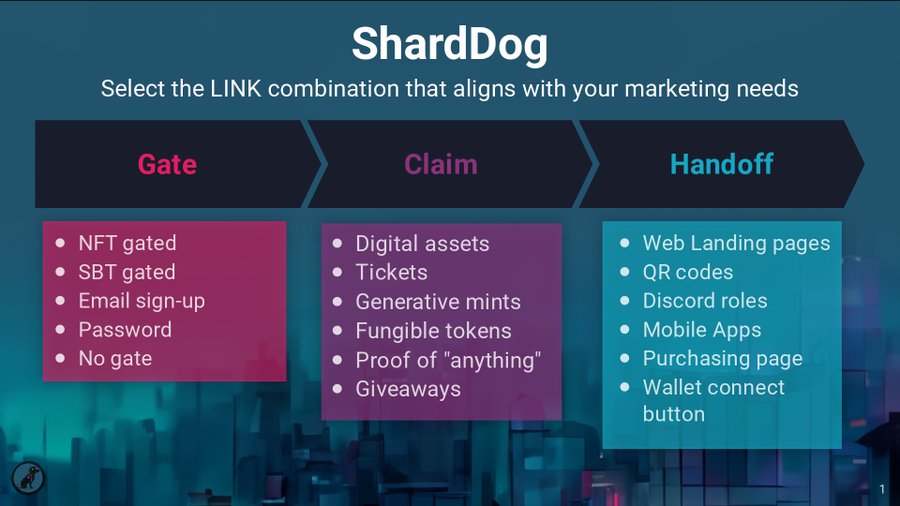
- Gate (who can access the drop)
- Claim (the NFT or FT being dropped)
- Handoff (how / where the user finds it)
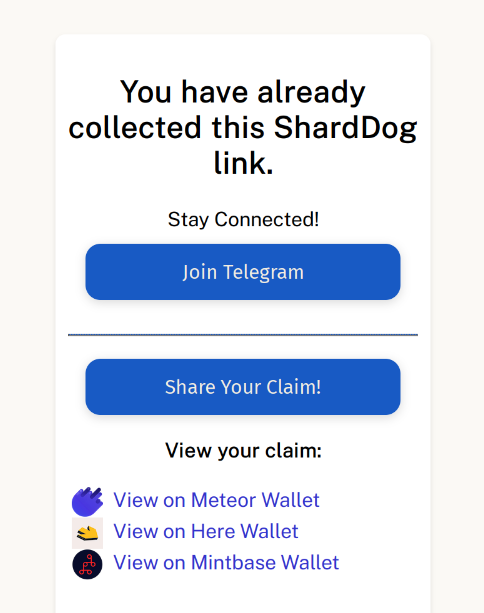
The most important feature is a button “Share Your Claim!”, which allows you to share your claim on Twitter, making it a good marketing tool.
Let’s Claim a ShardDog NFT Drop:
For this example, we’re going to claim “Content! Content! Content!” NFT Drop.
Creating a ShardDog Drop
To create a sharddog, contact them and provide the details of your drop, most likely, the process is manual.
Some examples
HarvestMoon is probably the most claimed ShardDog, claimed by 100,000 wallet.
Blackdragon is one of the first memes on Near Protocol (after Shitzu and Neko), it airdropped a lot of tokens to accounts that have interacted with popular NFT collections. Some drops cost thousands of dollars, if you didn’t sell them at the beginning.
Near Social
Nearblocks.io
Potlock
Keypom
Smart contracts
Memecoins
Common scams in crypto
Burning tokens
DAOs
Burrow
Account model
Accounts on NEAR have the following things:
- Account ID like
slimedragon.near - Access keys like
ed25519:HDXaKmewwTBHp87V8tCZWqDkgMLbJ7Eb3jifMC38r2kw - NEAR balance (other token balances are stored in the tokens themselves!) - Nothing too special here, just a number.
- Code. Every account can be a smart contract, and the code is stored in the account itself. But this book is not for people who want to write smart contracts, so I won’t cover this part.
- Storage. Also used for smart contracts.
Storage fee
There’s no such thing as free storage. When you store something on the NEAR blockchain, you pay for it. The price is low (1 NEAR for 100kb), but when millions of users store their data, it becomes a significant amount of money. Not to mention, sybil attacks can quickly drain the developer’s balance. That’s why users have to pay for their storage. The good thing is, as soon as you delete the data, your money is fully refunded.
An average NEAR account costs about 0.06 NEAR to maintain, this amount is usually deducted from your first deposit of NEAR. You can refund it to another account if you delete your account.
After that, the most common thing that you’ll store is token balances. Usually the fee is between 0.01 and 0.1 NEAR for each token, and it’s paid when you receive your first token. For FTs it’s paid once per account, so if you already have a balance of that token, you won’t have to pay it twice.
Technically, the storage fee is not paid, it’s frozen on the account that stores data. If you use an FT, the data is stored in the FT contract, which acts as a bookkeeper, so the fee is paid to the FT contract and it’s frozen there. If an account doesn’t have enough NEAR to pay for storage, the transaction fails.
Why are balances stored in a smart contract, and not in my account directly?
Every account can modify its own data, it would be easy for you to modify your balance.
If so, can the creator of the token modify my balance?
If we’re talking about the most popular tokens, no, they can’t. But for some tokens, yes, it can be done in 2 ways:
- The token creator can have a special function in the contract that allows them to modify the balances. Usually this means that the token is a scam,
- The token has a full access key. This means that the token creator can do anything with the account, including modifying the balances, modifying the token contract to add this “special function”, just anything.
How to check if the token has a full access key?
You can check it on the explorer:
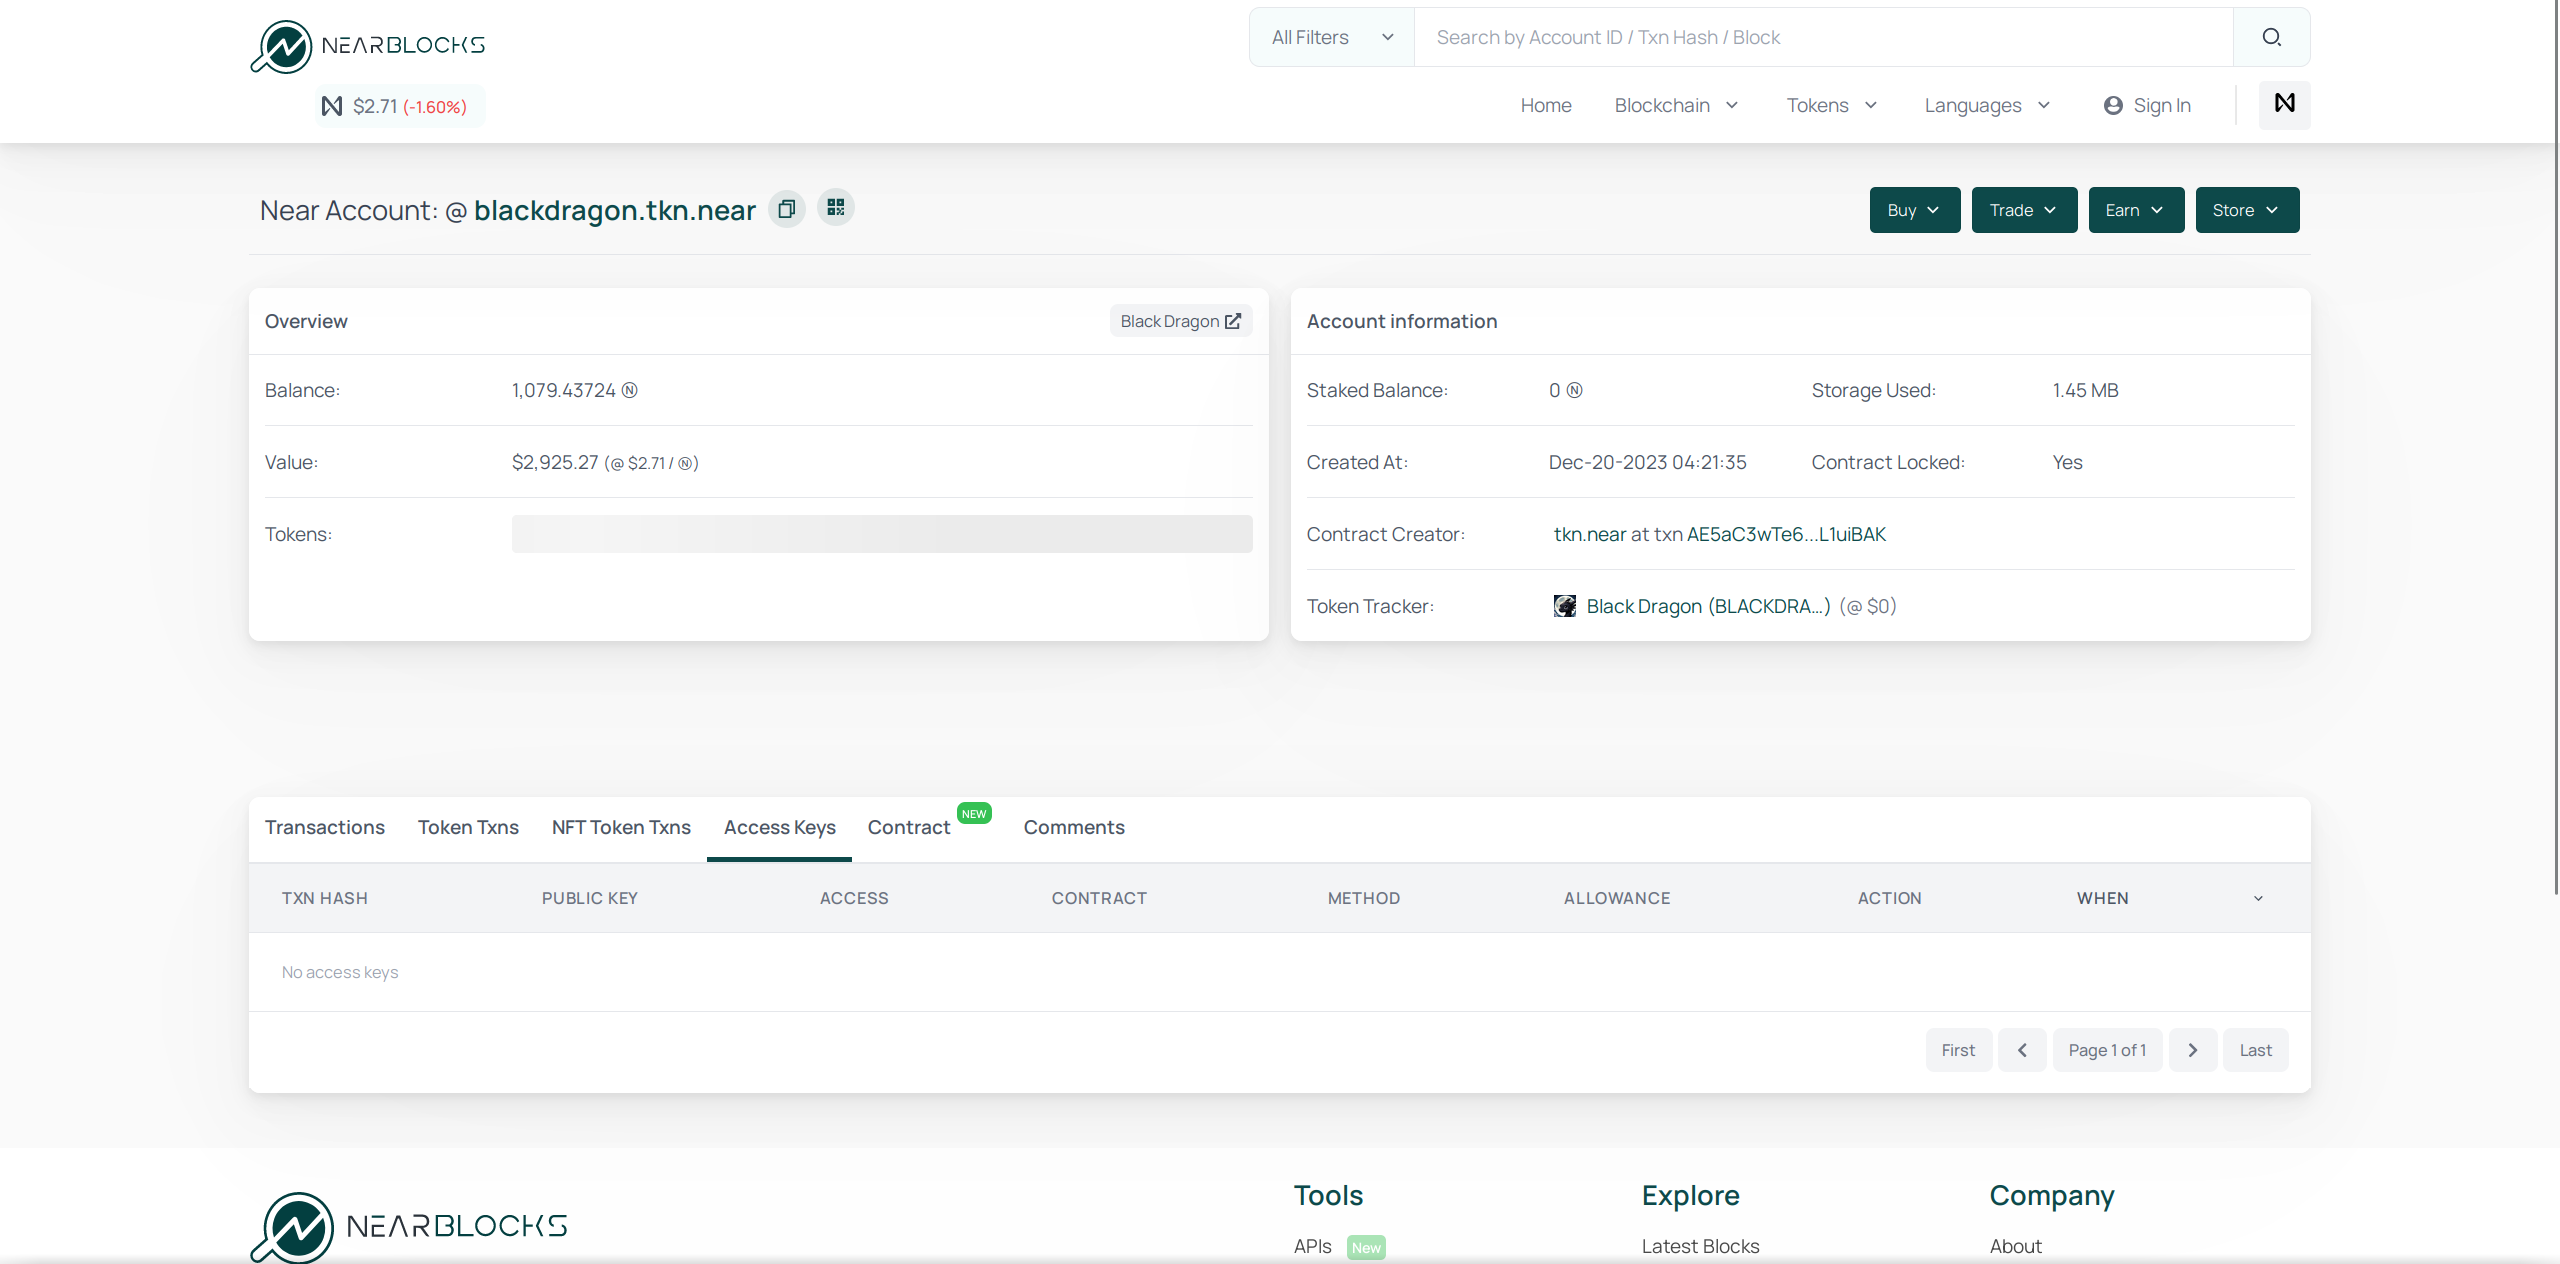
As we see, $BLACKDRAGON doesn’t have any access keys, so it can’t modify the
balances, unless there is a special function, which is currently hard or impossible
to verify. Tokens ending in .tkn.near are generally considered safe, as they are
all created using the same “template”, which doesn’t have any special functions.
Smart contracts
Smart contract code also requires storage, the bigger the contract is, the more NEAR it requires to have. The transaction data, that is available on the explorer, doesn’t require storage, since it’s not stored on the blockchain, and dismissed1 right after the transaction ends.
The full transaction history, including the transaction data, is stored in the archival nodes and indexers.
Account names
In NEAR, account names (account IDs) are human-readable names that are unique
across the entire network. They are used to identify accounts and can be used
to receive tokens, deploy contracts, and more. Because of that, you can see
in your wallet that are trying to send tokens to slimedragon.near, or
interact with v2.ref-finance.near, which are
legitimate addresses, the same way as you can do a search and see that you’re
searching on google.com, not a fake copy.
Valid account names
There are 2 types of account names: implicit and named. Implicit account names are the ones that consist of 64 seemingly random characters. Example: 998765b2120bf0ca10a9242343fdbda6612a48b279d69c9e4d99dbf5adda7d93. If you don’t want to be ashamed of your address when someone asks you for it, you shouldn’t use it. Instead, use named accounts. Named accounts are human-readable. Examples:
slimedragon.nearroot.nearsub.slimedragon.nearslimedrgn.tg
Named account IDs can contain alphanumeric symbols, hyphens, underscores, and must be between 2 and 64 characters long. They can’t start or end with a hyphen, and can’t have two or more consecutive hyphens.
Implicit accounts
Implicit accounts are accounts that contain 64 characters 0-9 and a-f. They cannot be created like normal named accounts, they always exist, but are initialized only when they receive some NEAR. By default, they have a full key with public key the same as its address (but encoded in base58), and no other keys, so it’s impossible to create an account with a predetermined implicit account ID.
Top-level names
Most commonly you’ll encounter wallets ending with .near, but there are other
top-level names, like .tg (can be created in HOT Wallet),
.sweat (cannot be created by users, used by Sweat Economy’s
smart contracts), .kaiching, .vrtx, .aurora, and
so on, but most of them are used internally and cannot be created by users.
Top-level (without .something) account IDs with lengths >= 32 characters could be
created by anyone, but they were used very often, and now it’s not possible. For example, this-account-is-owned-by-a-green-slime
is a valid account ID that can be created by anyone. Top-level accounts can only be created by registrar, a system account. In the future,
there may be auctions of top-level accounts, but now they are given manually by registrar owner, which is most likely controlled by Pagoda or Near Foundation.
Subaccounts
If you have an account with name slimedragon.near, you (and only you!) can create
an account called something.slimedragon.near. But after you create this account, it’s
a fully independent account.
Technically, near is also a top-level account, all .near accounts are its subaccounts,
but near doesn’t have access to your .near account, and can’t create slimething.slimedragon.near,
if that makes it easier to understand. For more information, visit docs.near.org
Access Keys
You can access your account only if you have a key to it. A key is usually created when your account is created, but you can add more keys to your account, and remove them.
In NEAR keys are permission-based. That means we can restrict the access of a key to only some actions. For example, we can create a key that can only publish posts on near social, but can’t transfer tokens.
Types of keys
There are 2 types of keys:
- Full access key
- Function call access key
Full access key
This key can do anything on the account. It can transfer tokens, change the account’s keys, and even delete the account. It’s like the master key of the account. This key is usually created when the account is created, and it can create other keys. This is the key that is stored in your wallet. You can also create multiple full access keys in the same account, if you want.
Function call access key
This key can only call certain methods on certain smart contracts. It can’t transfer tokens, change the account’s keys, or delete the account. This key is usually used by dapps to interact with their contracts using your account, without your confirmation in the wallet. But it can’t send NEAR in these transactions, so it’s safe to create these keys. They can request allowance some amount of NEAR to pay gas fees.
You have to check what contract and what method the key can call before creating it. Here’s what it looks like in MyNearWallet:
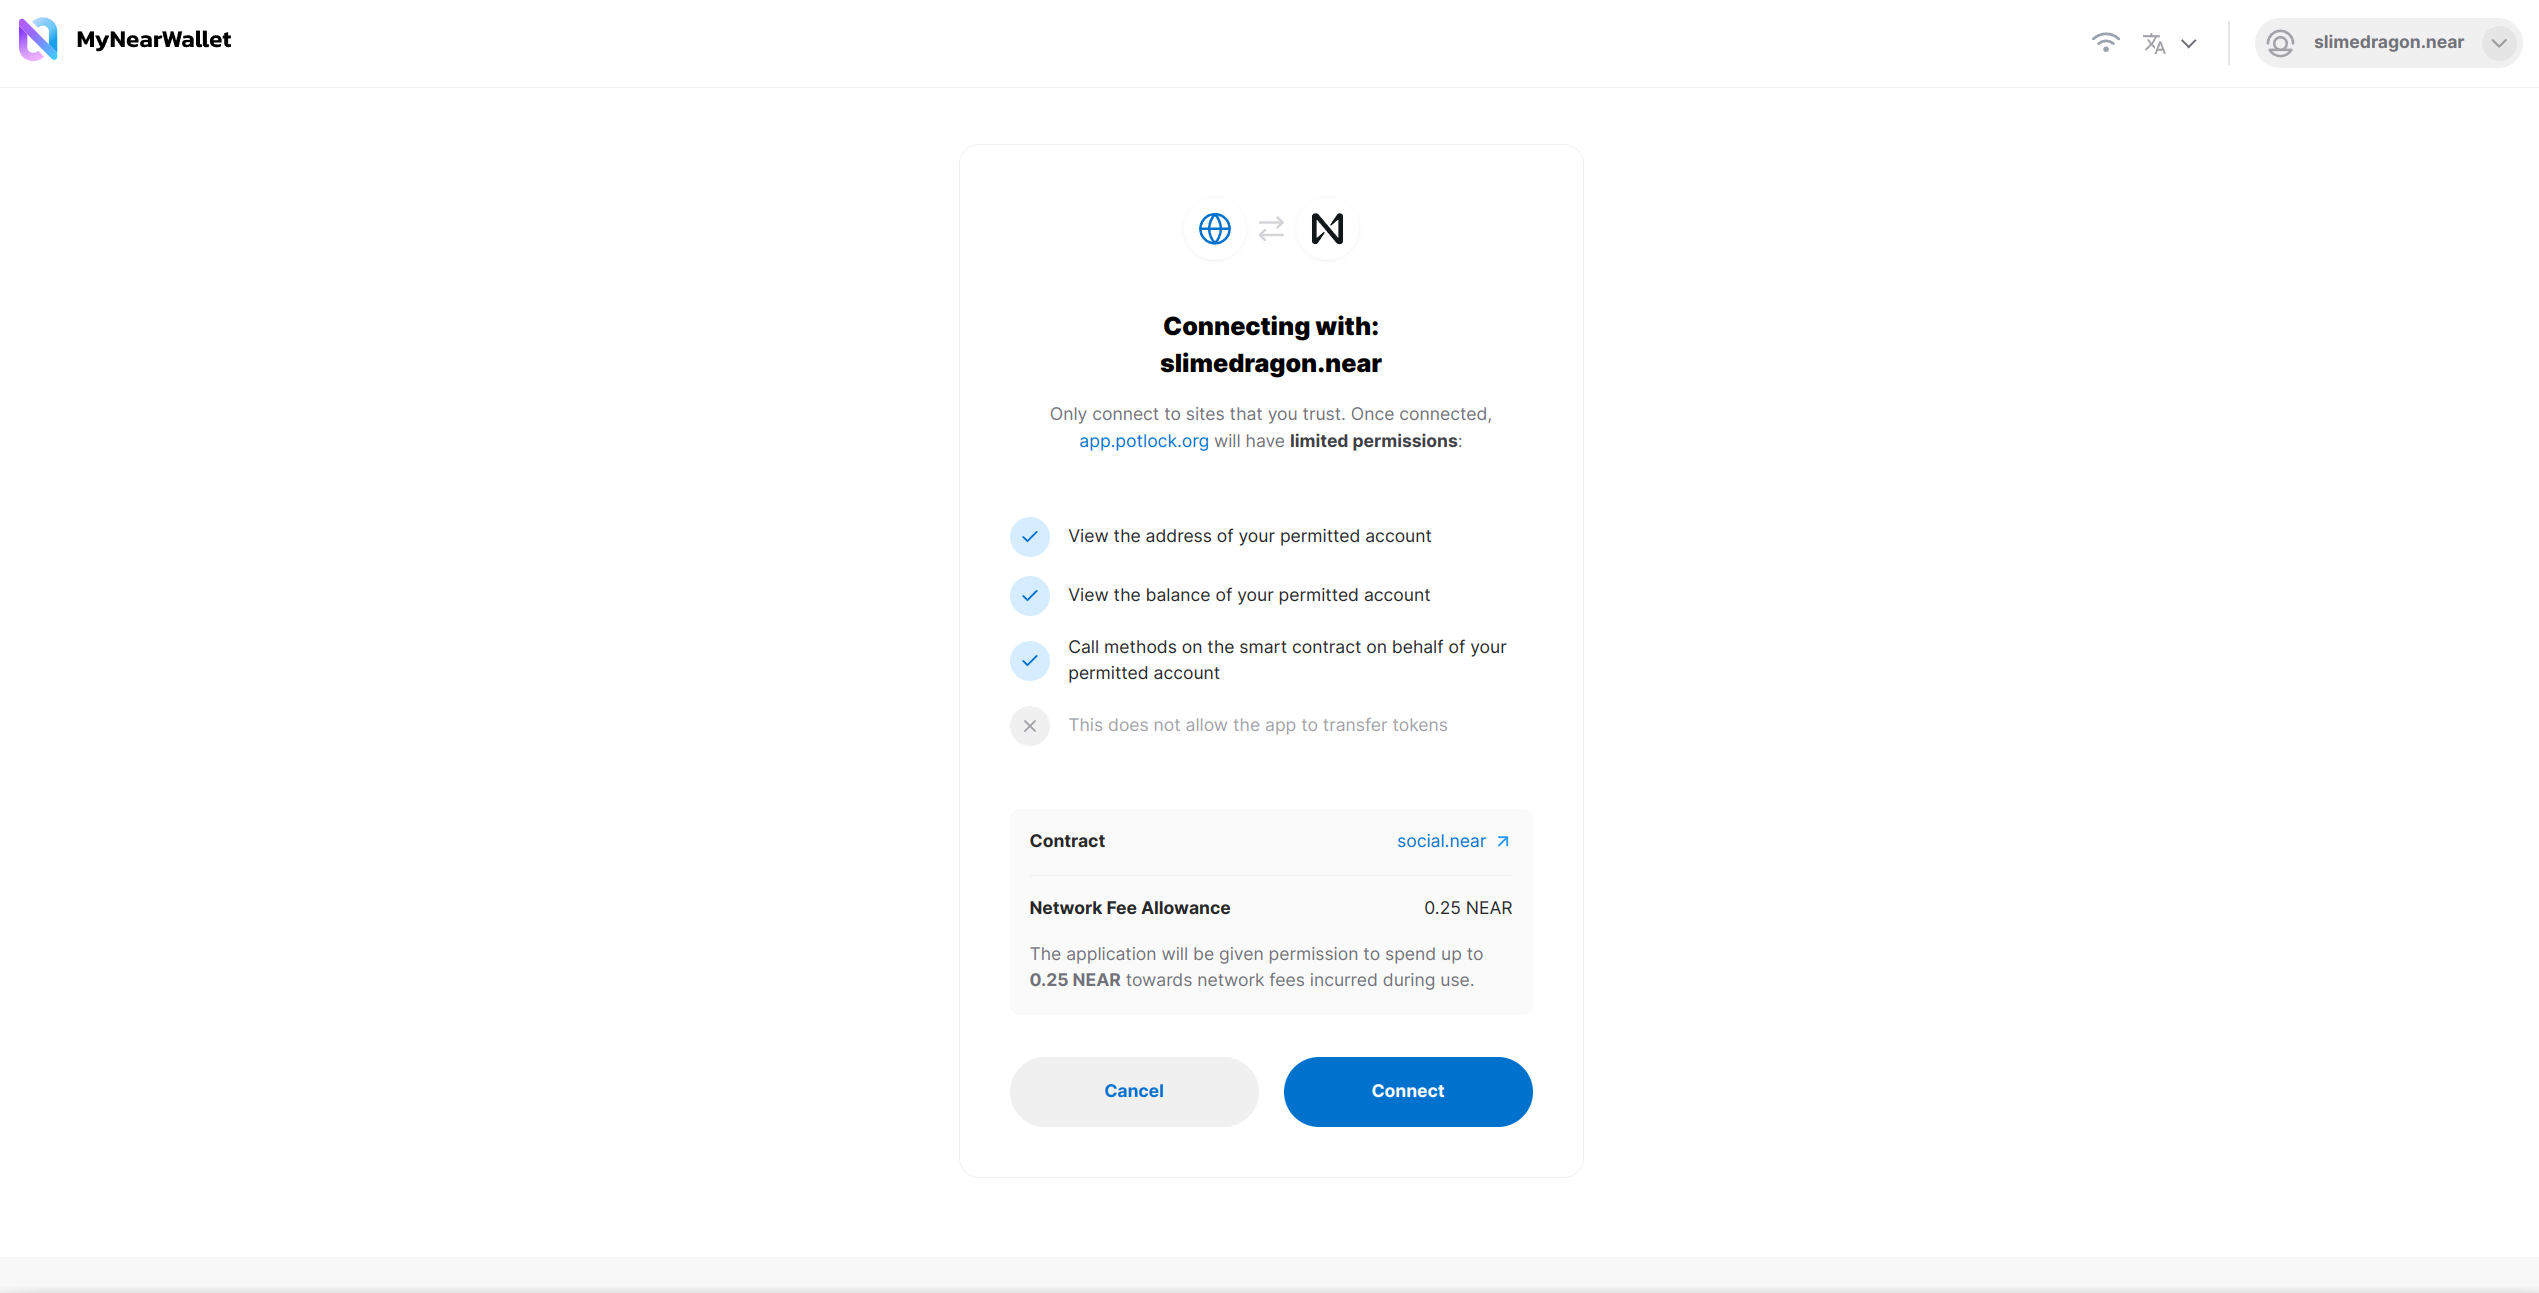
In Meteor Wallet it doesn’t say that this key can call methods, but it actually can, it’s just not displayed:
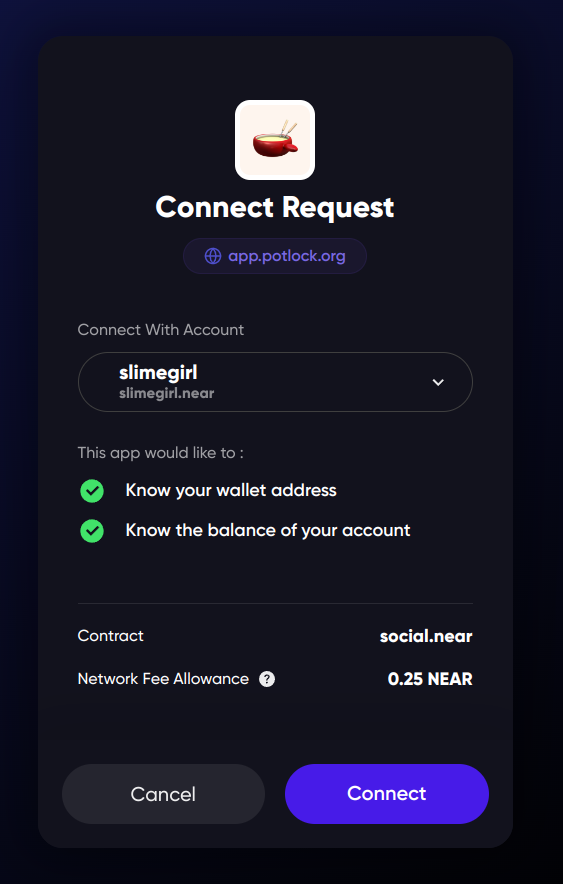
This dapp wants us to create a key that can call all methods of social.near smart
contract, and use up to 0.25 NEAR for gas fees.
Note that it doesn’t use your 0.25 NEAR right away, your NEAR stays in your account,
but the dapp can use some portion of it to pay for the transactions that it sends.
0.25 NEAR is the standard amount that dapps request, so even if you think this dapp
shouldn’t need this much, it’s probably safe to create this key.
In theory, a malicious dapp can send a lot of transactions and use up its allowance of 0.25 NEAR, and grab 30% of the fees for itself, making 0.075 NEAR of each user, but it’s not worth the effort, and users can’t lose more than 0.25 NEAR, so don’t worry about this. But it’s also possible to request unlimited allowance, so be careful with connecting to dapps.
But if it was something like usdt.tether-token.near, we would have to be careful,
because it can call the transfer method, and transfer all our USDT to someone else.
Make sure that the app requests only the permissions it needs, or permissions to access
its own contract.
But even if you give an app access to a token contract, most likely, it still can’t transfer the tokens. Users normally don’t check the contract address before connecting to an app, making it vulnerable to phishing attacks, so token developers need to have a way to protect their users from this. That’s why most token contracts require you to attack 1 yoctoNEAR (0.000000000000000000000001 NEAR) to the call, and since function call keys can’t send NEAR, they can’t call the transfer method and steal your tokens.
Transactions that send any amount of NEAR or interact with a different contract are always confirmed in the wallet, so you can always see what the app is trying to do with your account.
Revoking access keys
If you no longer want a key to have access to your account, you can remove it. This is called “revoking” the key. You can do it in your wallet. I’ll show you how to do it in Meteor Wallet:
- In the settings, click “Connected Apps”
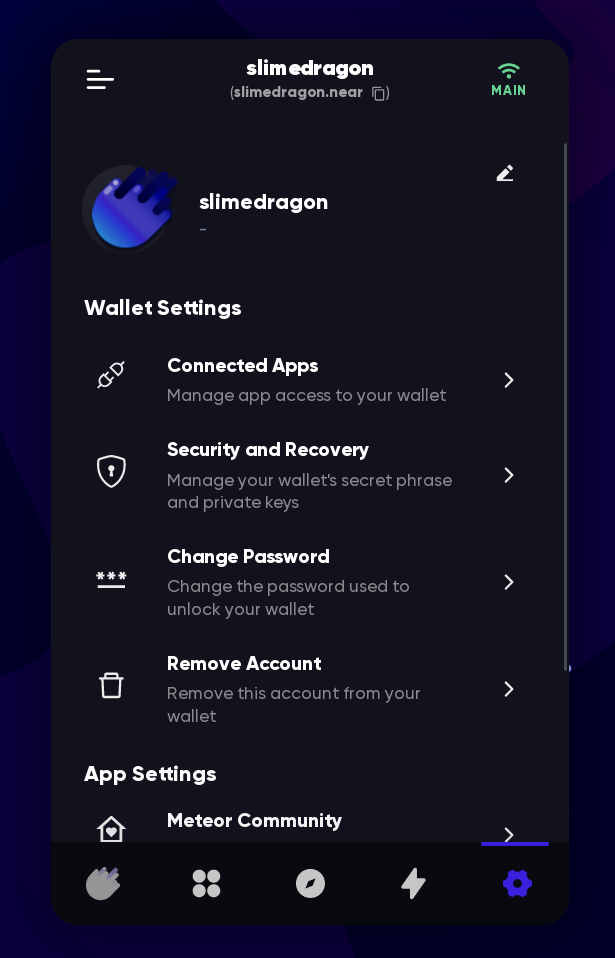
- Find the key you want to revoke, and click “Deauthorize”
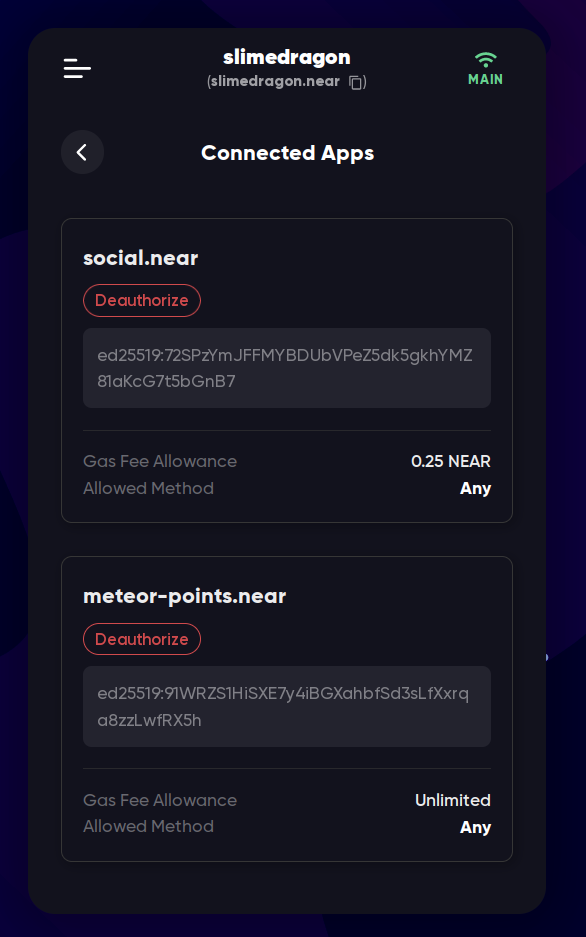
How keys work
Full access keys are created like this:
- A wallet generates a “seed phrase” - usually it’s a list of 12 words that you have
to save somewhere safe, as it gives its owner full access to the next steps. This step
is optional, you can just use the private key (it looks like
ed25519:<symbols>), but it’s harder to remember - The wallet converts the seed phrase to a “private” full access key. This key is stored in the wallet, and in some wallets you can export/import it directly, without the need of the seed phrase. It’s called “private” because you have to keep it private
- The wallet converts the “private” full access key to a “public key” - a representation of this key that can be shared with others. With this key, it’s possible to verify that a transaction was signed by the key, but it’s not possible to sign transactions with it
- When your account is created, the public access key is added to it. This is the key that is used to verify that the transactions were signed by the full access key
- Now the wallet can use the full access key to sign transactions, and send them to the network. Network then verifies that the transaction was signed by your key, using the public key (it’s a lot of maths that we’ll skip in this book[^1], but just know that it’s possible to verify but not to sign with the public key, that’s why it’s called “public”)
TODO: Add a gif of the process
You don’t have to care about function call keys, they are created by dapps and are managed by the dapps themselves. But in short: the private key is stored in the dapp’s website, and the public key is added to your account.
If someone knows your seed phrase, they can convert it to your full access key, and then sign and send transactions with it. That’s why it’s important to keep your seed phrase safe.
Both private keys and public keys are just a bunch of bytes, but in NEAR they are
represented as a string of characters, prepended with ed25519:. For example, a key
can look like this: ed25519:72SPzYmJFFMYBDUbVPeZ5dk5gkhYMZ81aKcG7t5bGnB7.
ed25519 means that it’s an Ed25519 key, and
the rest is the key itself. I won’t dive into the complicated maths behind it in this
book, but just know that it’s the name of the key algorithm.
All public keys are stored on the blockchain, and can be viewed by anyone:
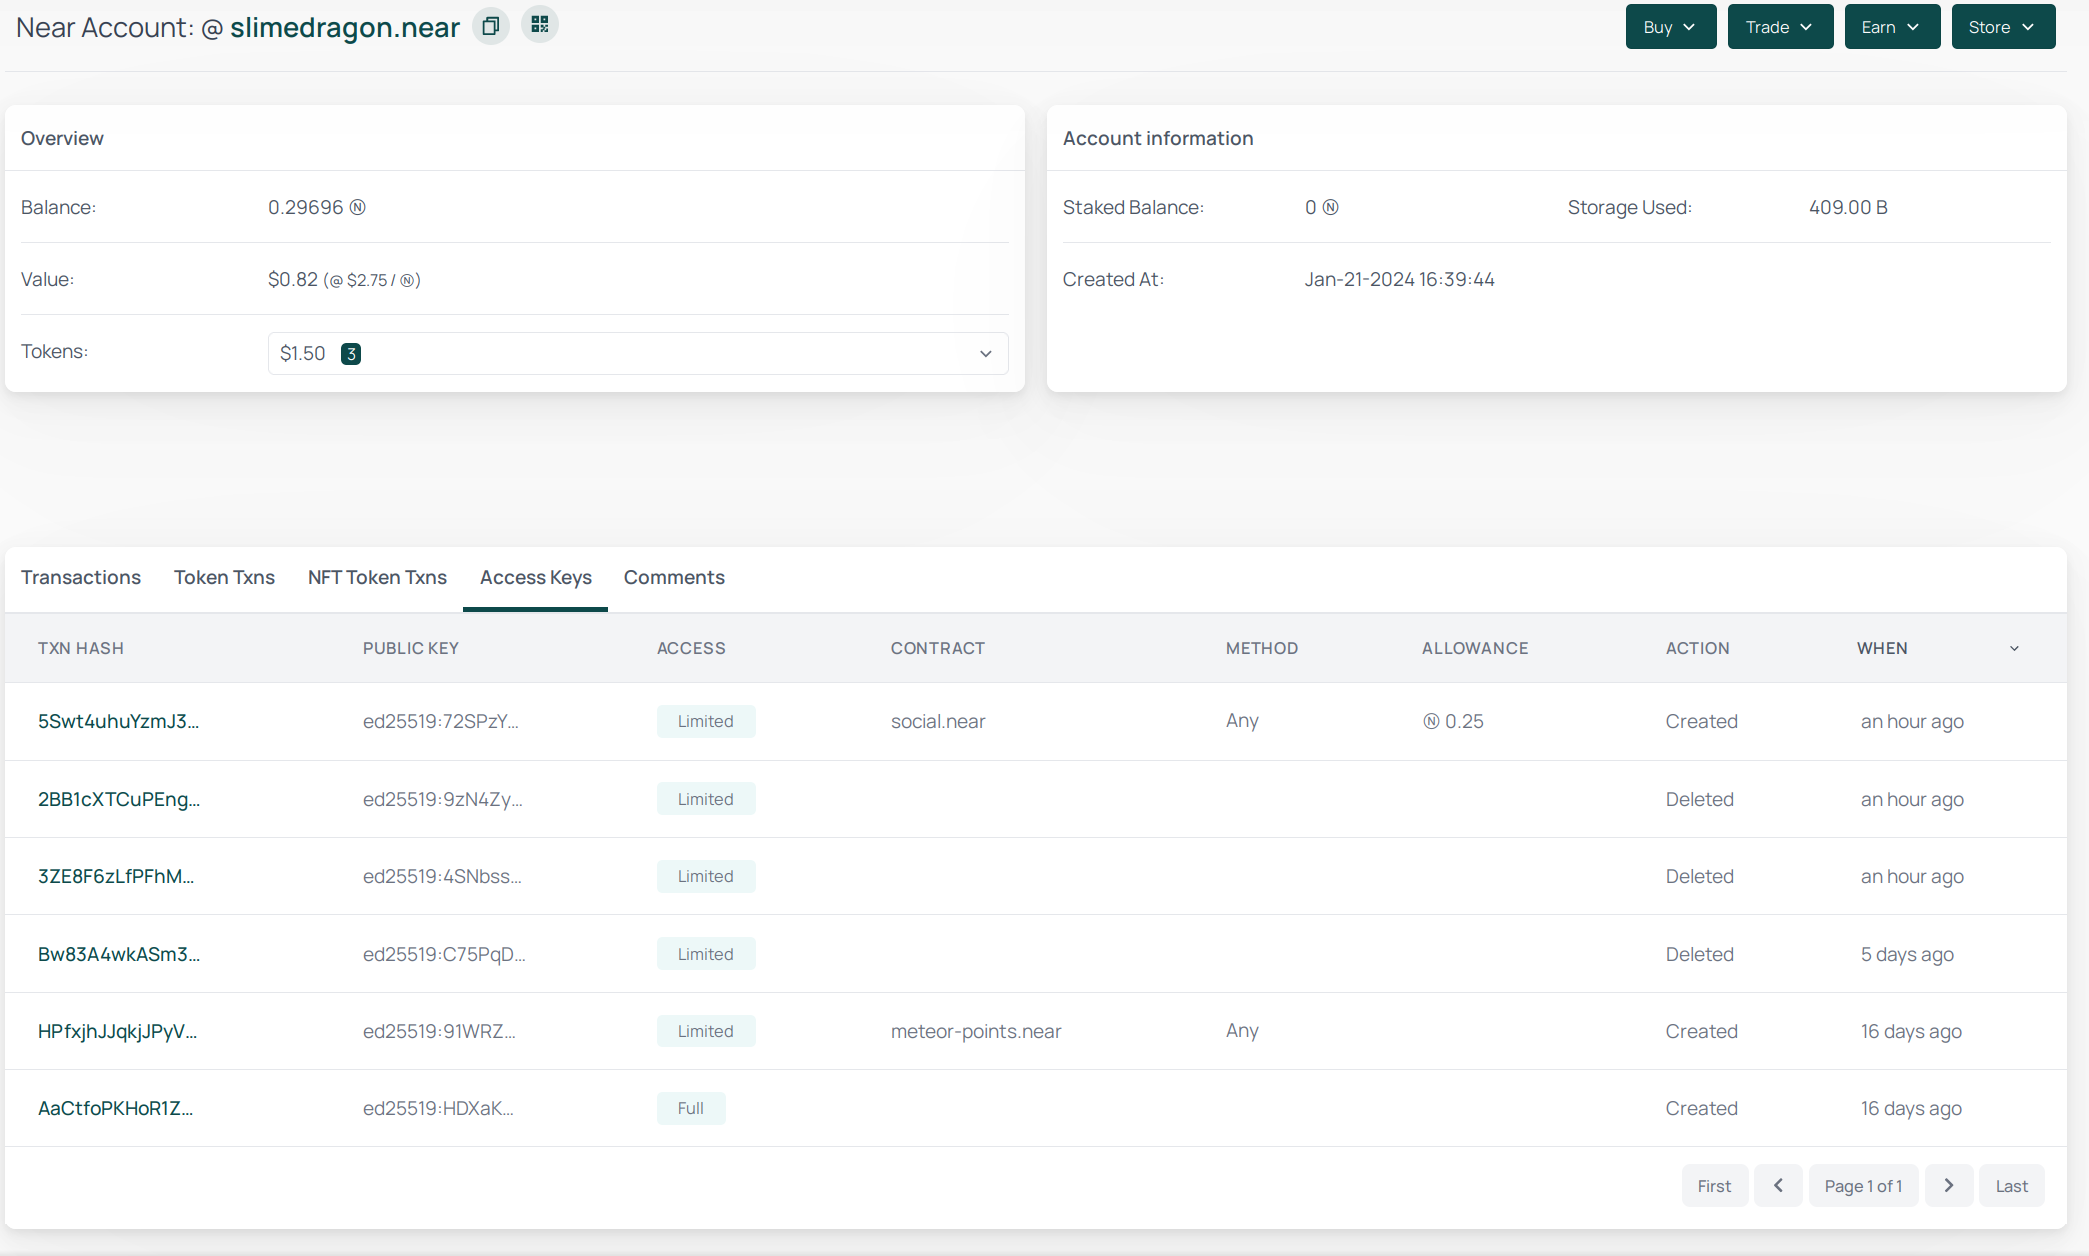
What can you do with this key system?
Using this flexible and permission-based key system, you can do things like:
- Transfer your account to a new key
- If you for some reason want to share your account with someone, you can create a new full access key, and give it to them. They will be able to do anything with your account, and you can see which key was used to sign a transaction, so you can always know who did what, and remove the key if you don’t want them to have access anymore. But note that they can also remove your key, so be careful with who you trust
- If you’re playing a game that requires you to sign a lot of transactions, and you don’t want to click “confirm” every time, the game can ask you to create a function call key that can only call the game’s contract, and then use it to sign transactions without your confirmation, while still being unable to transfer your tokens
[^1] If you’re interested in the maths behind this, you can read about elliptic curve cryptography, which is used in NEAR and many other blockchains. TODO: find an easier explanation and link it here
Transfer accounts (change account keys)
On most blockchains, if you leak your seed phrase, you give full access to your account to anyone who knows it. You have to transfer your funds to a new account, and you can’t use the old account anymore, as the hacker can set up a bot that will transfer all the funds from your account as soon as you receive them. But on NEAR, you can just change your keys, and the old key will be useless. This is called “key rotation”. Note that a hacker can also change your keys, so if you think that your account may be compromised, you should act quickly.
Why use it?
There are a few reasons why you might want to change your account keys:
- You lost your seed phrase, but you still have access to the wallet, and you want to create a new seed phrase to restore your account in case you lose access to the wallet.
- You think that your old key might be compromised, and you want to create a new one. If you’ve leaked your seed phrase, or if you’ve used it on a compromised device, you should definitely change your keys. This is the same as changing your password on other websites.
- You have a soulbound NFT or a non-transferable token, and you want to transfer the account to another person. You can’t just give them the seed phrase, and the other person changes the keys so that you can no longer access the account.
How to do it?
WARNING: This is a dangerous operation. If you do something wrong, you won’t be able to recover access to your account. Make sure you have a clear understanding of how keys work before doing this, and avoid doing this unless absolutely necessary.
The process is actually simpler than it sounds. You just need to create a new full access key, and then delete the old one. Here’s how you can do it in Meteor Wallet:
Meteor Wallet
-
Open the wallet:
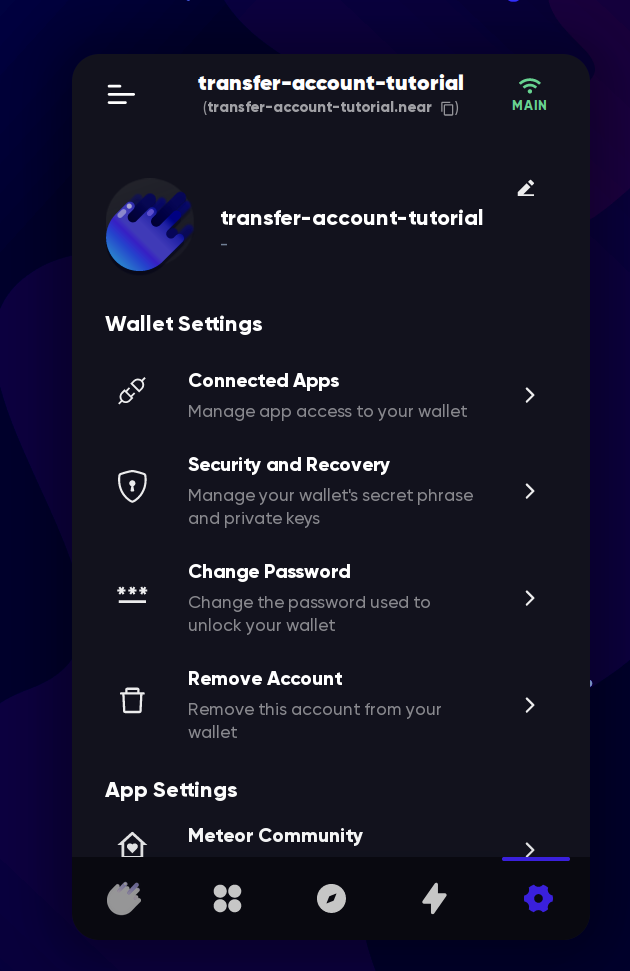
-
Click “Security and Recovery”
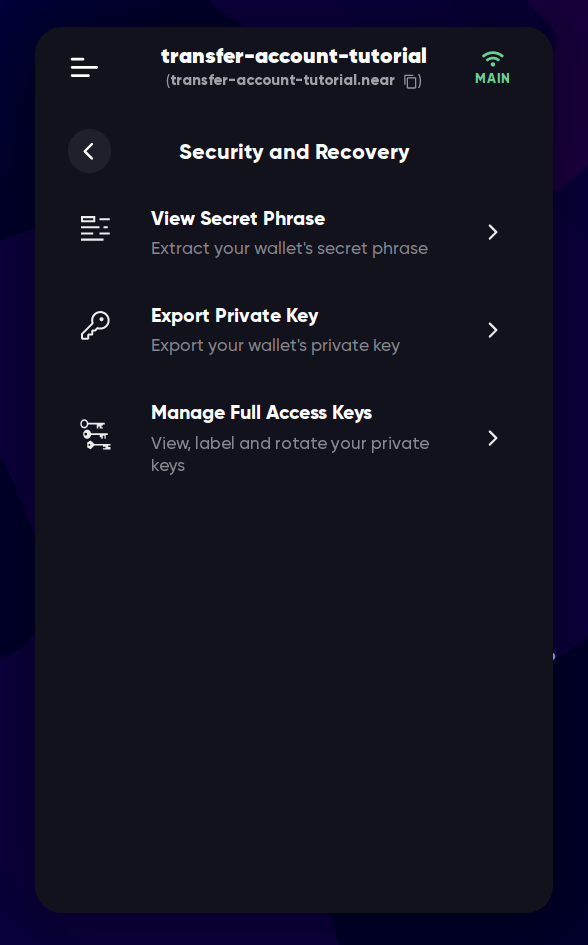
-
Click “Manage Full Access Keys”
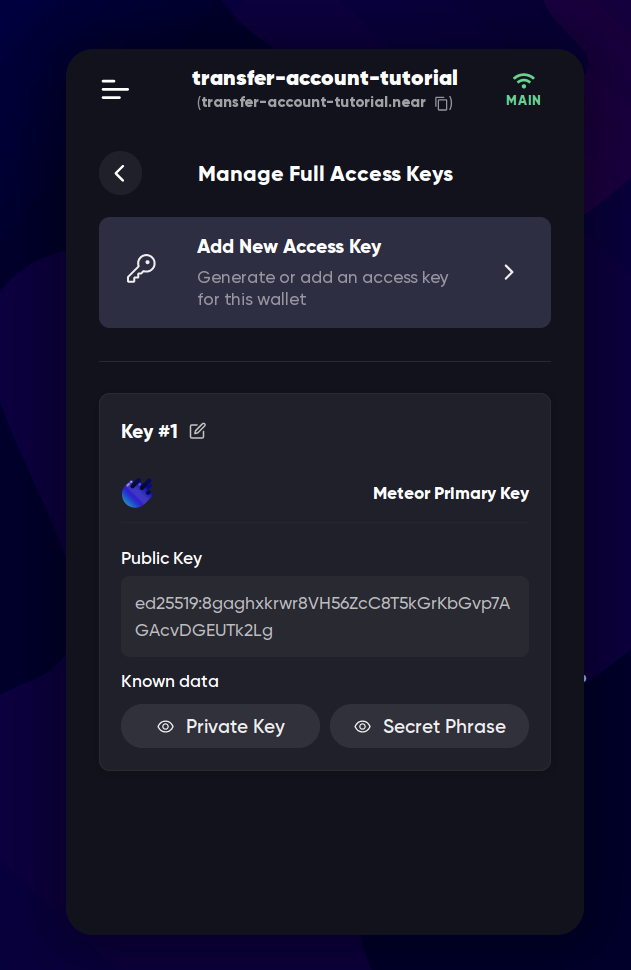
-
Remember your existing public key, you can copy it somewhere, or just remember the first 3 characters
-
Click “Add New Access Key”
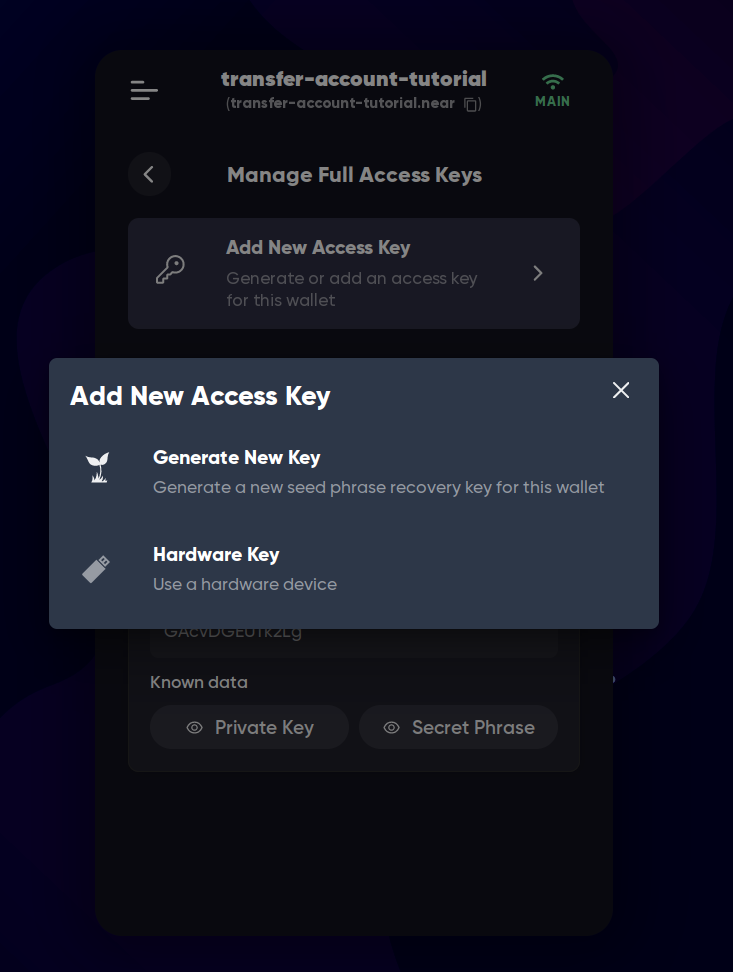
-
Click “Generate New Key” (or if you want to transfer to a hardware device, choose this option)
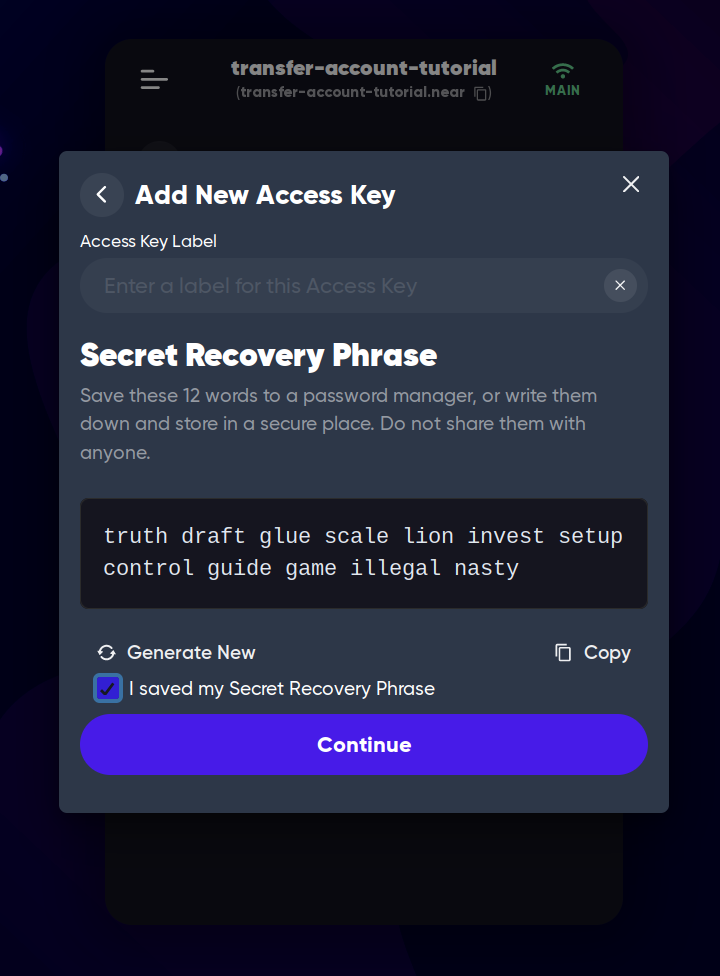
-
Save the seed phrase, and click “Continue”
-
When the key is added, the “Manage Full Access Keys” page will look like this:
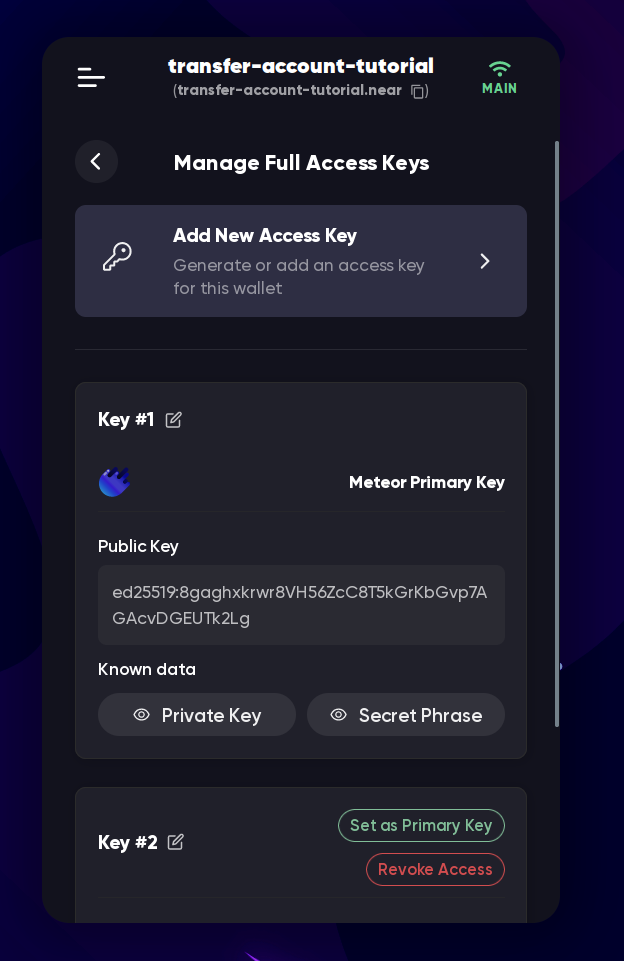
-
Either
- Click “Set as Primary Key” near the new key so that the wallet now uses the new key to sign transactions. The new key is not the one that you remembered in step 4
- Logout from your account and login with the new phrase
-
Now you can delete the old key by clicking “Revoke Access” next to it. The old key is the one that you remembered in step 4
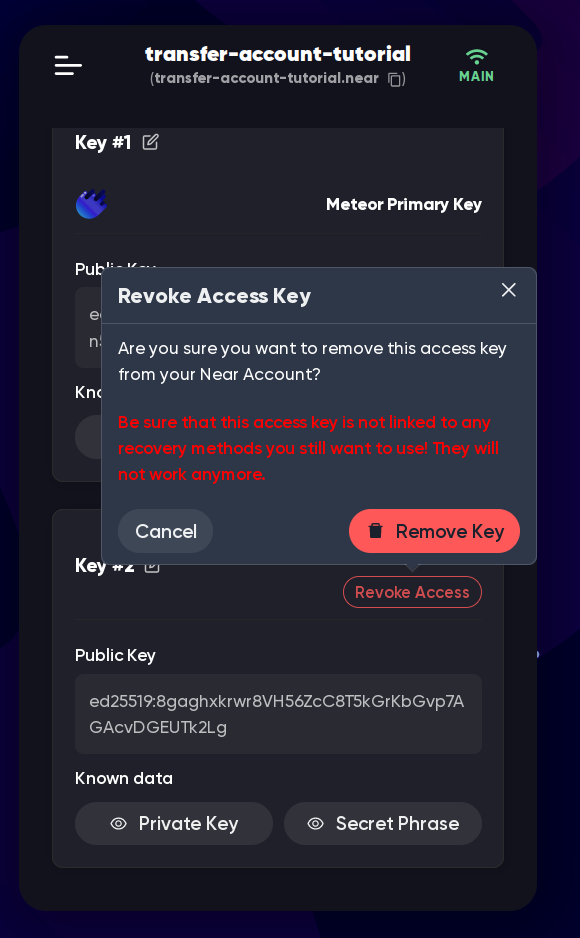
Now try to login with your old phrase/key, and you should see that it doesn’t work anymore. If you want to be sure, you can check the account’s keys on the explorer or in the wallet.
This method works in all wallets that offer full key management, but the interface might look different.
MyNearWallet
In MyNearWallet there is even a button to do it in one click: “Rotate Key”, but you need to manually specify a new seed phrase, it can’t auto-generate a random one for you. Don’t copy/paste the seed phrase from a “seed phrase generator” website, as it can save the phrase and steal your funds later. I recommend using another wallet, or creating a new account and using the phrase from it.
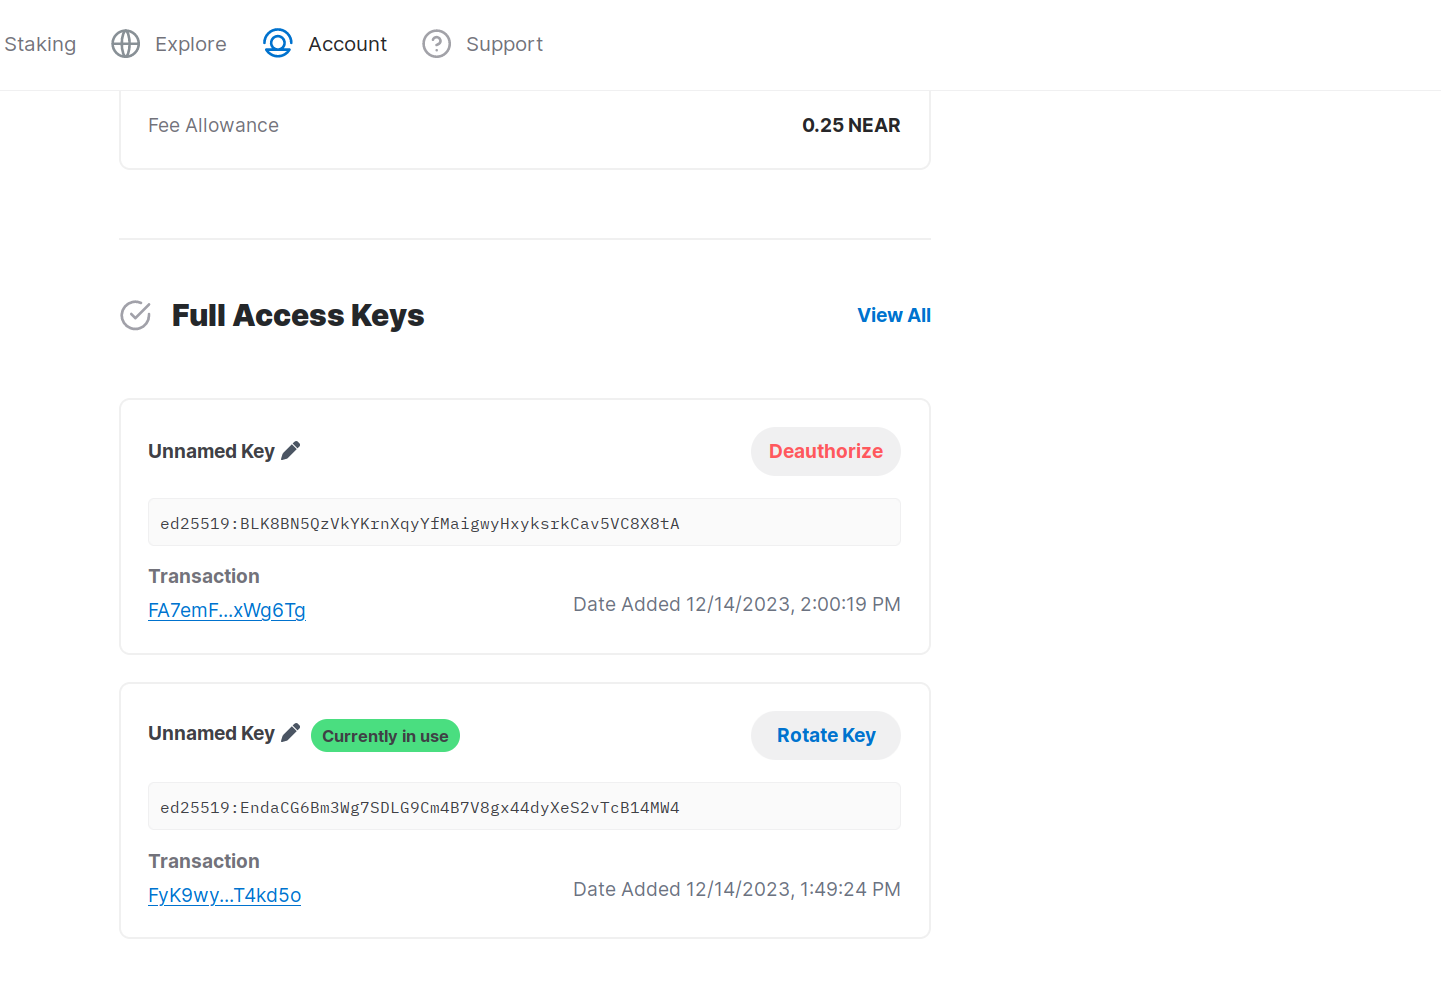
Where to save the seed phrase
Here’s a list of most popular places to save your seed phrase:
Hardware wallets
Hardware wallets are the most secure way to store your seed phrase. They are physical devices that store your seed phrase offline, and can’t be accessed by hackers. Even if someone steals your hardware wallet, they can’t access your funds without knowing your PIN code. The phrase is never shared with your PC, and instead, transaction data is sent to the hardware wallet, signed there, and then sent back to the PC. The most popular and supported by the NEAR ecosystem hardware wallet is Ledger.
Paper
You can write your seed phrase on a piece of paper and store it in a safe place. It’s important to keep it safe from fire, water, theft, and your family that might throw it away because it’s just a paper.
Not save it at all
This is the most theft-proof way to store your seed phrase. If you don’t have it, no one can steal it from you. But if you lose your wallet, or it gets stolen, or your PC gets broken, you won’t be able to restore access your funds. That’s why it’s not recommended to use this method. But if it’s a temporary throwaway account that doesn’t hold any funds, it’s completely fine to not save the seed phrase.
Telegram “saved messages”
You can save your seed phrase in a private chat with yourself. This is definitely one of the most popular ways to store your seed phrase, it’s not the most secure way to store it, but maybe it’s better than nothing. If you use this method, make sure that your Telegram account is secured with 2FA, and that you have a strong password. But I don’t recommend using this method, because:
- If your account is hacked, the hacker will have access to your seed phrase
- If Telegram is hacked, the hacker will have access to your seed phrase
- If some Telegram employee who has access to the database wants to steal your seed phrase, they can do it (they will probably be fired and sued, but this fact won’t make you feel better)
- No one knows who else has access to the database.
- If you forget your password, or somehow lose your phone number, you won’t be able to restore access to your seed phrase
In a .txt file on your PC
This is also a popular way to store your seed phrase, but it’s not secure, too. If your PC gets hacked, the hacker will easily get access to your seed phrase. If your PC gets broken, you won’t be able to restore access to your seed phrase. If you still decide to use this method, make sure to do that in a password-protected file, password-protected folder, or password-protected archive.
In a password manager
The security of this method is the same as the security of your password manager.
On google drive, dropbox, etc.
This is the least secure way to store your seed phrase. If the cloud storage is hacked, the hacker will have access to your seed phrase. If the cloud storage is down, you won’t be able to restore access to your seed phrase. Its security is also limited by the security of your account on the cloud storage service.
How to choose a password
If you decide to store your seed phrase in a password-protected file, folder, or archive, you need to choose a strong password. You can check the security of your password here, but don’t input your real password there, just input something similar. For example, if my password is “IAmAGreenSlime123!100%”, I can input “IAmABlackCat555!Really.” to check it. If you know a language other than English, you can use a phrase from that language, because most password crackers are trained on English phrases and check only alphanumeric symbols to make it faster to crack the password.
Mintbase
TradePort
Transactions
Providing liquidity
Aurora
Jump DeFi
Node types
Near CLI
NEAR Governance and NDC Operations
Other Projects
Popular projects that are not necessarily needed to understand how NEAR works, but too big to ignore
KAIKAI
Sweat Economy
Contributing
If you want to improve the book, first of all, thank you! 🎉
To do this, you need a discord or telegram account. Join our discord. There, you can ask questions, suggest changes, and discuss the book with other readers and contributors. If you don’t have a discord account, join our telegram chat and contribute there.
You can contribute in many ways:
- Reporting a mistake. A typo, broken link, outdated information, or even too complex / boring explanation - anything that makes the book less useful and can be improved.
- Writing a new page. If you think that something is missing, you can write a new page and send it in discord.
- Editing an existing page. If you think that something can be improved, or is outdated, you can edit the page and send it as well.
- Adding new information. If you think that some page is missing important information, or would be more useful with a screenshot / video, you can add it.
- Spreading the word. If you think that the book is useful, you can share it with your friends, on social media, or in other communities. (note: as of now, this type of contribution is not rewarded, but it’s still very helpful)
- Donating. If you think that the book is useful and want to support it, you can donate
on PotLock or directly
to
slimebook.near. The money will be used to reward contributors and improve the book.
How the book is structured
The book is structured in levels, and each level has a few pages. The levels are ordered by difficulty, and the pages inside one level are not ordered. Every page is written in markdown (.md), a format that is easy to read and write, and can be converted to HTML, PDF, and other formats. You can find more about markdown here. Or if you don’t want to do this, you can just send a .txt file and I’ll add headings, links, images, and other formatting.
Editing a page
-
Go to the page you want to edit
-
Click the
icon in the right top corner:
-
Copy the content of the page, and paste it in some text editor. For example, EditMyMarkdown is a good online editor with preview of formatting
-
Edit the page until you’re happy with it
-
Send the edited page in discord or telegram chat
If you want to create a new page, you can start with a template:
# Title

Contents
Writing guidelines
- Be clear and concise. If you can explain something in 1 sentence, don’t use 3
- Use simple words. Don’t use technical words unless necessary. The main audience of the book is non-technical users who are new to NEAR, or new to web3 / crypto, we don’t want to scare them. But depending on the level of the page, more advanced concepts are welcome
- Use images and videos if they can help to understand the topic
- Use links to other pages in the book and to external resources
- If you want to contribute but it’s too much for you, you can still send the information and I’ll edit it, though you’ll get less reward
Rewards
For every contribution, you will be rewarded with NEAR tokens. The amount of tokens depends on:
- The quality of the contribution. This is perhaps the most important and complex factor. It includes the quality of the writing, the usefulness of the information, the clarity of the explanation, and the relevance of the information. The quality is a subjective factor, but I’ll try to be as fair as possible. Ideally, I could set up a DAO, but I believe that simplicity and speed are more important for now.
- The amount of work. This includes the length of the page, the amount of new information, the amount of changes, and the amount of work required to make the contribution. Images and videos are welcome and can increase the reward, but please don’t spam 20 images on 1 page. For example, this page (contributing) is not very long and took me about 2 hours to write (+ some time to set up potlock, treasury account, the “Suggest an edit” button in the corner, finding an online editor, and other things, but let’s ignore this), so it’ll be rewarded with about 5-20 NEAR, depending on the other factors.
- The amount of money in the slimebook treasury. The treasury is filled with donations and maybe some grants in the future. If you contributed while the treasury is almost empty, you can still be fairly compensated in the future, but it’s not guaranteed.
Have questions?
Join our discord or telegram chat.